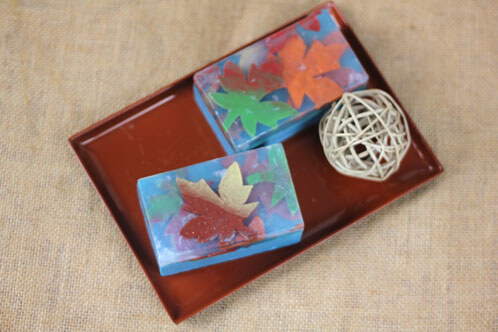
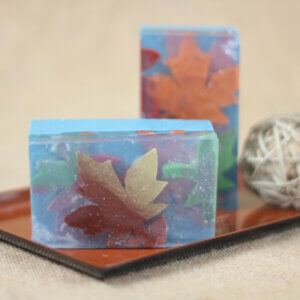
Autumn is upon us and to celebrate we’ve created this gorgeous soap project full of colorful leaves. This project takes advantage of the clarity of Bramble Berry’s House Clear Melt & Pour Soap Base to highlight the depth created by layering the soap leaves. You can even customize this project to mimic the new spring leaves come springtime.

What You’ll Need:
27 oz Clear Melt and Pour Base
27 oz White Melt and Pour Base
Shimmer Copper Sparkle Color Block
Non-Bleeding Perfect Orange Color Block
Shimmer Light Gold Color Block
Non-bleeding Perfect Red Color Block
Shimmer Cappuccino Color Block
Non-Bleeding Chrome Green Color Block
1 teaspoon Iridescent Glitter
0.5 oz Arabian Spice Fragrance Oil
3 mL diluted Aqua LabColor
Glossy Silicone Square Tray Mold

Click here to add everything you need for this project to your Bramble Berry shopping cart!
ONE: Cut and melt 12 oz of Clear Melt and Pour base into small, 1 inch cubes. Melt in the microwave on 30 second bursts, add 1 teaspoon of glitter, 5 mL of Red Apple Fragrance Oil and then divide into six different containers. Each container should hold about 2 oz of melt and pour base. Then, color each container with shavings from a single color block. Remember, the color blocks are WYSIWYG, so add more or less color according to your preference.
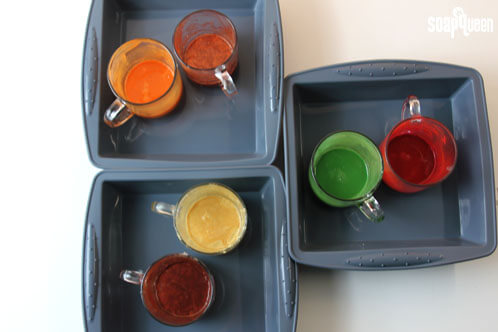
TWO: For this step, pick two colors that are complimentary and simultaneously pour the two colors into the Glossy Silicone Square Tray Mold. Move your hands as you pour to create interesting patterns, and you can even drag a chopstick or dowel through the soap to give it an extra swirl. TIP: I used three separate Glossy Silicone Square Tray Molds so we could pour all three color pairs at once, but if you are working with just one mold, you can wait 15 minutes and let the soap dry, unmold it and then pour your next set of colors.
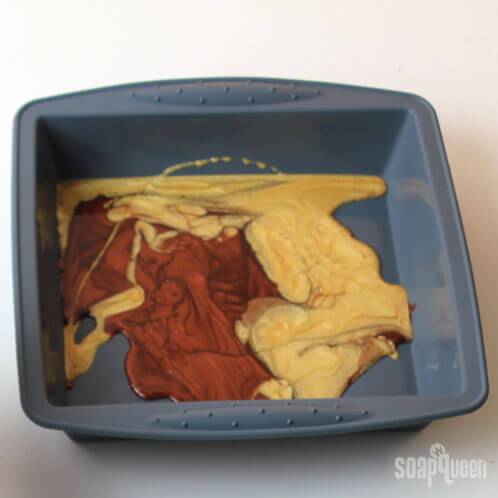
THREE: After about 15 minutes, unmold the flat, colored layer of soap. Cut out the leaves on the free Bramble Berry Fall Leaves Template, then use a Clean Up Tool to trace the outlines onto the soapy leaves. This part takes some patience and precision, but it’s totally worth it! After you’ve traced light outlines on the soapy leaves, they are easy (but time consuming!) to cut out with a craft knife.
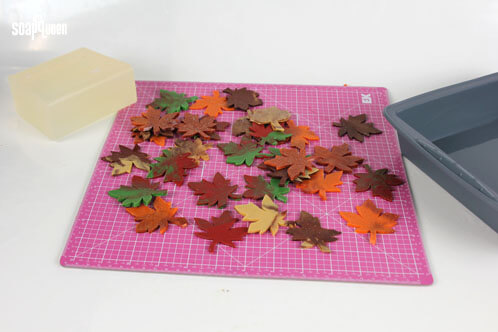
FOUR: Cut out about two dozen leaves and then set them aside. Then, cut and melt about 5 oz. of Clear Melt and Pour Base. Add 3 mL of Red Apple fragrance and stir, and then pour the layer into the Brownie Tray Mold. Wait 5 – 10 minutes for the layer to form a thick skin, spray the soap liberally with isopropyl alcohol, and then arrange the soapy leaves in a “pile” on the clear soap.

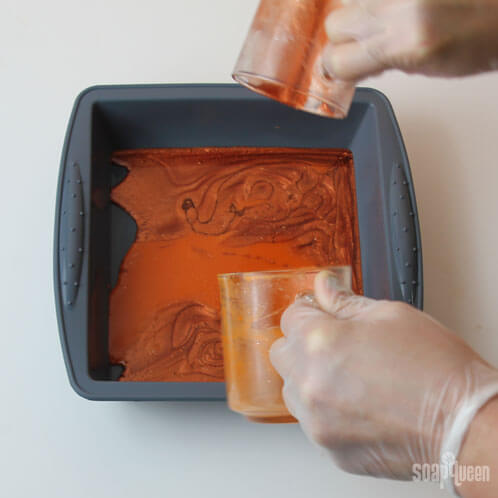
FIVE: Repeat the process of cutting and melting 5 oz. of Clear Melt and Pour base, adding fragrance, letting it dry, spraying isopropyl alcohol and arranging a new layer of leaves until you’ve filled about half the mold. I repeated this process three times, but it may be different for you depending on how many leaves you originally cut out. Be careful to pour when your clear soap is at 130 degrees or less. If you pour any hotter, you risk melting your pretty leaves!
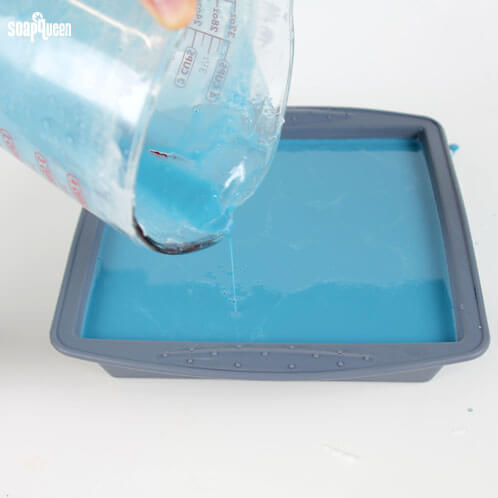
SIX: Cut and melt 27 oz. of White Melt and Pour base. Once the soap has been fully melted, mix in 0.5 oz. of Arabian Spice FO and 3 mL of diluted Aqua Blue Lab Color. Once the soap has cooled to 130°F or below, and the soap in the Brownie Tray Mold has formed a thick skin, spray the molded soap liberally with isopropyl alcohol and pour the blue soap over it. Spray again with isopropyl alcohol to disperse bubble and surface tension. Let the soap dry overnight and then unmold and cut!
Give the soap 1 – 2 hours to dry before unmolding and then cut, wrap and enjoy. Want wrapping tips? This is a great video to watch for help with your soap wrapping.
Want tips on wrapping your beautiful melt and pour soaps to prevent them from sweating? Check out this Soap Queen TV video on quick and easy packaging techniques!
Fall Leaves Melt & Pour Soap Tutorial
Ingredients
- 27 oz Clear Melt and Pour Base
- 27 oz White Melt and Pour Base
- Shimmer Copper Sparkle Color Block
- Non-Bleeding Perfect Orange Color Block
- Shimmer Light Gold Color Block
- Non-bleeding Perfect Red Color Block
- Shimmer Cappuccino Color Block
- Non-Bleeding Chrome Green Color Block
- 1 teaspoon Iridescent Glitter
- 8 ml Red Apple Fragrance Oil
- 0.5 oz Arabian Spice Fragrance Oil
- 3 mL diluted Aqua LabColor
- Glossy Silicone Square Tray Mold
- Clean-up Tool
- Fall Leaves Template PDF
Instructions
- Cut and melt 12 oz of Clear Melt and Pour base into small, 1 inch cubes. Melt in the microwave on 30 second bursts, add 1 teaspoon of Glitter, 5 mL of Red Apple Fragrance Oil and then divide into six different containers. Each container should hold about 2 oz of melt and pour base. Then, color each container with shavings from a single color block. Remember, the color blocks are WYSIWYG, so add more or less color according to your preference.
- or this step, pick two colors that are complimentary and simultaneously pour the two colors into the Glossy Silicone Square Tray Mold. Move your hands as you pour to create interesting patterns, and you can even drag a chopstick or dowel through the soap to give it an extra swirl. TIP: I used three separate Glossy Silicone Square Tray Molds so we could pour all three color pairs at once, but if you are working with just one mold, you can wait 15 minutes and let the soap dry, unmold it and then pour your next set of colors.
- After about 15 minutes, unmold the flat, colored layer of soap. Cut out the leaves on the free Bramble Berry Fall Leaves Template, then use a Clean Up Tool to trace the outlines onto the soapy leaves. This part takes some patience and precision, but it’s totally worth it! After you’ve traced light outlines on the soapy leaves, they are easy (but time consuming!) to cut out with a craft knife.
- Cut out about two dozen leaves and then set them aside. Then, cut and melt about 5 oz. of Clear Melt and Pour Base. Add 3 mL of Red Apple fragrance and stir, and then pour the layer into the Brownie Tray Mold. Wait 5 – 10 minutes for the layer to form a thick skin, spray the soap liberally with isopropyl alcohol, and then arrange the soapy leaves in a “pile” on the clear soap.
- Repeat the process of cutting and melting 5 oz. of Clear Melt and Pour base, adding fragrance, letting it dry, spraying isopropyl alcohol and arranging a new layer of leaves until you’ve filled about half the mold. I repeated this process three times, but it may be different for you depending on how many leaves you originally cut out. Be careful to pour when your clear soap is at 130 degrees or less. If you pour any hotter, you risk melting your pretty leaves!
- Cut and melt 27 oz. of White Melt and Pour base. Once the soap has been fully melted, mix in 0.5 oz. of Arabian Spice FO and 3 mL of diluted Aqua Blue Lab Color. Once the soap has cooled to 130°F or below, and the soap in the Brownie Tray Mold has formed a thick skin, spray the molded soap liberally with isopropyl alcohol and pour the blue soap over it. Spray again with isopropyl alcohol to disperse bubble and surface tension. Let the soap dry overnight and then unmold and cut!
- Give the soap 1 – 2 hours to dry before unmolding and then cut, wrap and enjoy. Want wrapping tips? This is a great video to watch for help with your soap wrapping.