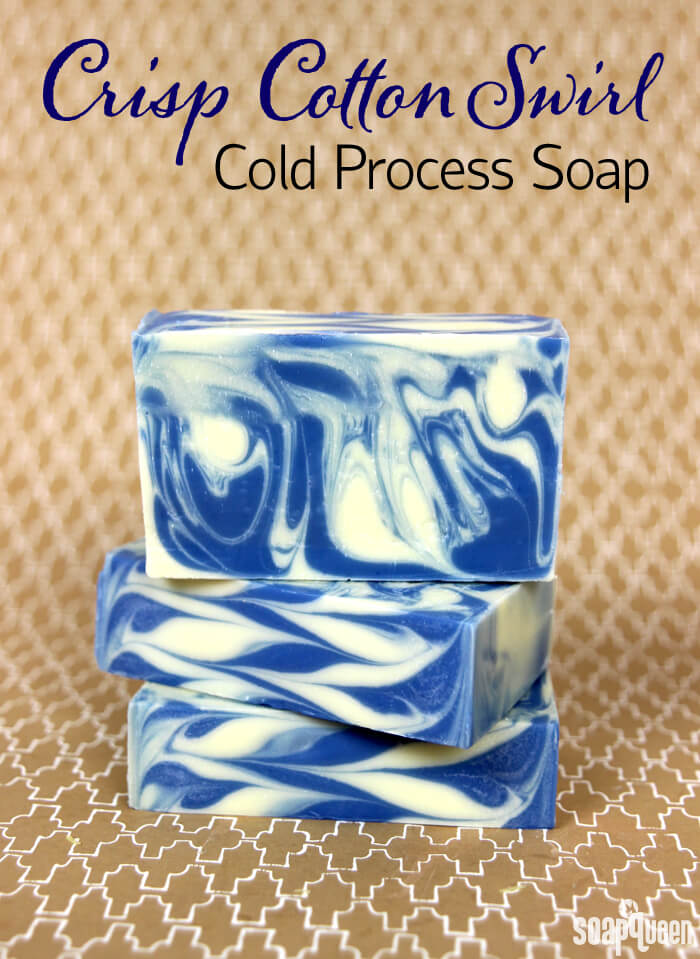
Today the Back to Basics series wraps up with the final tutorial, this Crisp Cotton Swirl Cold Process Soap. Swirls in cold process soap require a thin trace, so it’s important to not over stick blend the batter. It helps to have a recipe with a large percentage of slow moving oils, like olive or canola. If you missed the previous three Back to Basic tutorials, be sure to check them out! The tutorials are accompanied by the Back to Basic Soapmaking Kit, which includes all the ingredients (except lye) you need to make the four projects. Now, let’s get swirling!
 Creating swirls in cold process soap takes a little bit of practice. Swirls require a good understanding of trace; it’s crucial that the soap does not become too thick or the soap will not swirl together. On the flip side, the soap cannot be too thin or the colors may muddle together. Learn more about trace here. The key is a recipe that contains plenty of slow moving oils, like canola or olive oil. It’s also important to choose a fragrance oil that behaves well in cold process soap, and does not cause the soap to accelerate. This recipe contains 30% olive oil and 25% canola oil to make sure you have plenty of time to work. It also uses Crisp Cotton Fragrance Oil, which does not accelerate trace.
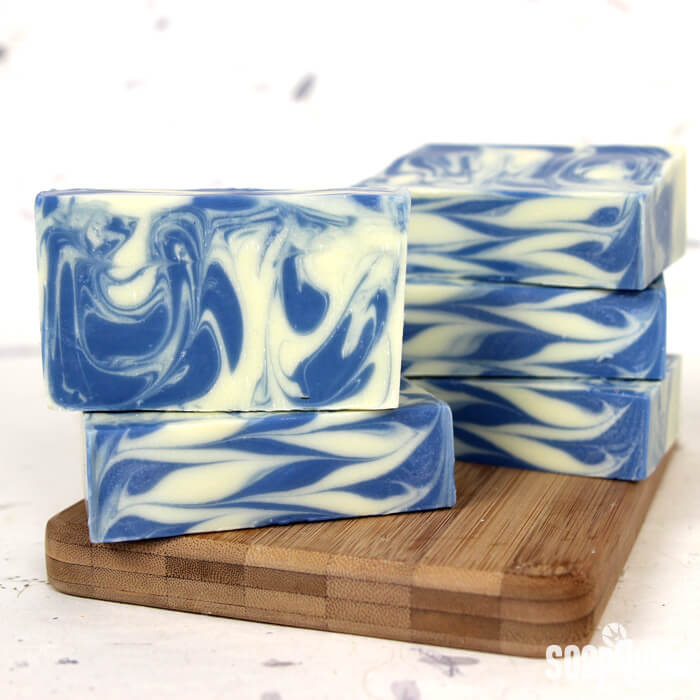
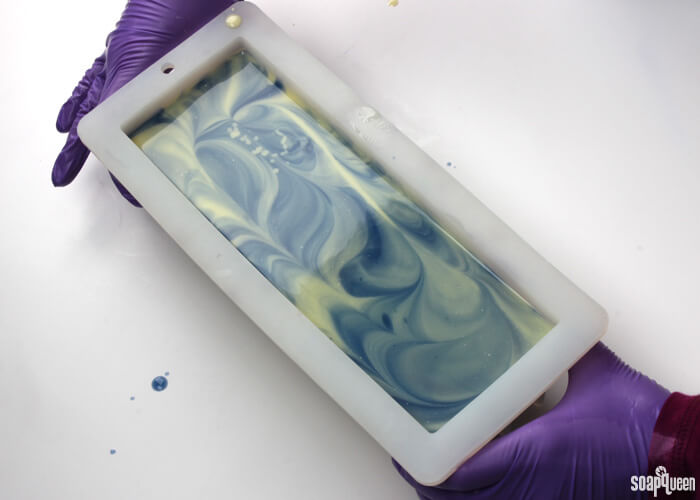
The type of swirl used in this bar is referred to as a “drop swirl.” This means the colors are poured, or “dropped,” into the mold from varying heights. As the soap is poured, it will begin to swirl inside the mold. For this project, we also used the Hanger Swirl Tool to give the soap extra movement. This project is colored with Titanium Dioxide and Ultramarine Blue pigments. These colorants do not bleed into each other, which is the key to crisp and clean swirls. If you have never prepped colorants for cold process soap before, check out this Soap Queen TV video to learn how.
Crisp Cotton Swirl Cold Process Recipe (5% superfat)
10″ Silicone Loaf Mold
10.2 oz. Olive Oil (30%)
6.8 oz. Coconut Oil (20%)
8.5 oz. Palm Oil (25%)
8.5 oz. Canola Oil (25%)
4.7 oz. Sodium Hydroxide Lye
11.2 oz. Distilled Water
Ultramarine Blue Pigment
Titanium Dioxide
3 oz. Crisp Cotton Fragrance Oil
This tutorial is the fourth and final in the Back to Basics Cold Process Series. This series of tutorials includes four cold process recipes that are perfect for beginning soapers. The Back to Basics Soapmaking Kit includes all the soaping ingredients you need to create all four recipes, including the 10″ Silicone Mold. The only ingredient you need to buy separately is lye, and any tools you may need. A great way to receive the basic soaping tools is with the Beginner’s Soaping Tool Kit, or click the “Buy it Now” button for the tools necessary for this project, lye and kit to your cart to your cart separately.

Click here to add everything you need for this project to your Bramble Berry shopping cart!
If you’ve never made Cold Process soap before, stop here! I highly recommend checking out our FREE four part SoapQueen.tv series on Cold Process Soapmaking, especially the episode on lye safety. And if you’d rather do some reading, Bramble Berry carries a wide range of books on the topic, including my newest book, Soap Crafting. You can also checkout the digital downloads for that instant gratification factor. I also recommend reviewing the first blog post in this series, which is all about how to handle lye safely.
FRAGRANCE PREP: In a glass, fragrance safe container, measure 3 oz. Crisp Cotton Fragrance Oil. Set aside.
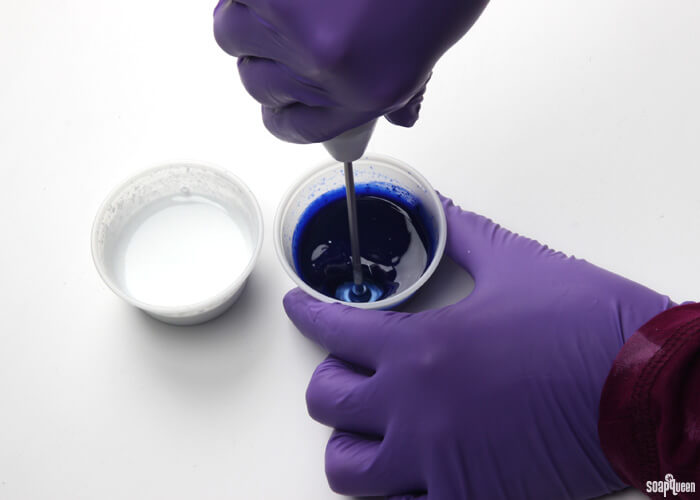
COLOR PREP: To ensure that the Titanium Dioxide blends smoothly into the soap batter, we recommend micronizing it before dispersing it in oil. Please note this is an optional tip but it does help with the titanium dioxide clumping in the soap =) To micronize colorant, simply use a coffee grinder to blend the colorant to break up any clumps of color and prevent streaks of white from showing in the final soap. We like to use a coffee grinder that has a removable, stainless steel mixing area for easy cleaning. Then, disperse 1 teaspoon of the colorant into 1 tablespoon of sunflower or sweet almond oil (or any other liquid oil). In a separate container, disperse 1 teaspoon of the Ultramarine Blue Oxide in 1 tablespoon lightweight liquid oil. Use a mini mixer to get the clumps of color worked out smoothly. Check out this video to learn how to disperse colorants.
Set Up Your Area: Before soaping, it’s helpful to have your soaping area prepared before you start. While soaping, you don’t want to be running around looking for a spatula or whisk! This recipe requires a few whisks, and separate containers for the three colors. You will need your mold, prepared lye water, pre-mixed oils, stick blender, and a spatula. Check out the Soapy Session Preparation and Setup Guide for tips.
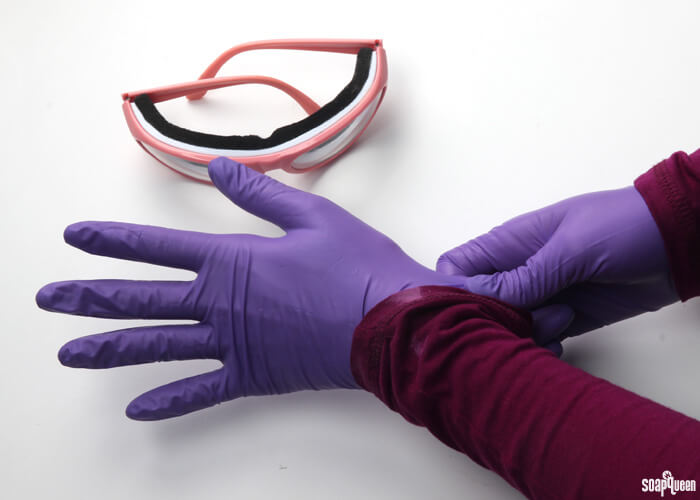
SAFETY FIRST: Suit up for safe handling practices! That means goggles, gloves and long sleeves. Make sure kids, pets, and other distractions and tripping hazards are out of the house or don’t have access to your soaping space. Always soap in a well-ventilated area.
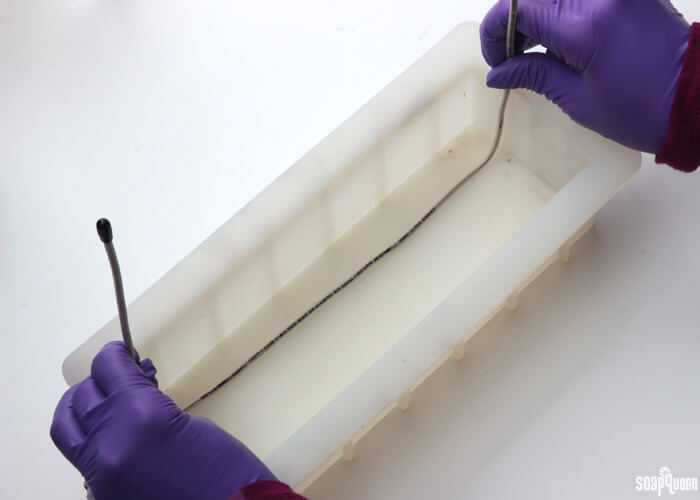
 TOOL PREP: Bend the Hanger Tool to fit in the mold lengthwise. It’s okay if it’s a little short, but you want it to fit comfortably within the mold.
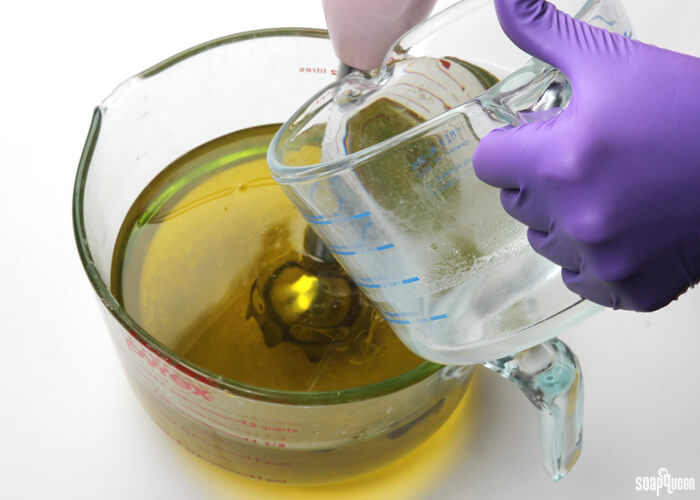
ONE: Slowly and carefully add the lye to the water and gently stir until the lye has fully dissolved and the liquid is clear. Set aside to cool.
TWO: Melt the coconut oil, olive oil, palm oil and canola oil completely (remember to fully melt then mix your entire container of palm oil before portioning). Once the lye water and the oils have cooled to 130 degrees or below (and are ideally within 10 degrees of each other), add the lye water to the oils and begin pulsing with the stick blender. If you’d like a harder bar of soap that releases faster from the mold, you can add sodium lactate to the cooled lye water. Use 1 teaspoon of sodium lactate per pound of oils in the recipe. For this recipe, you’d add about 2 tsp. sodium lactate.
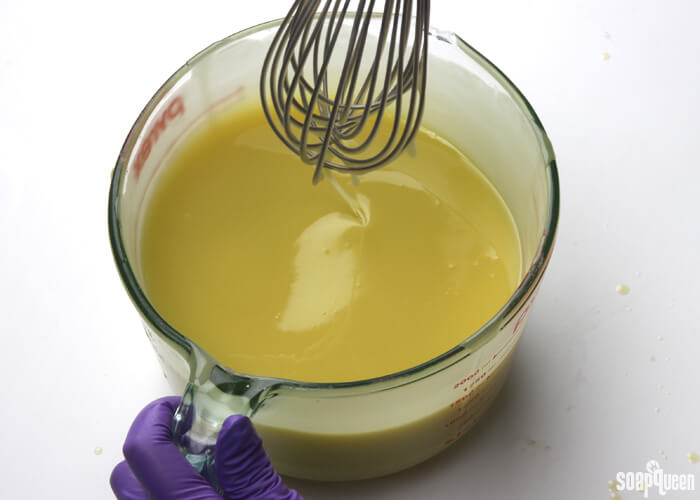
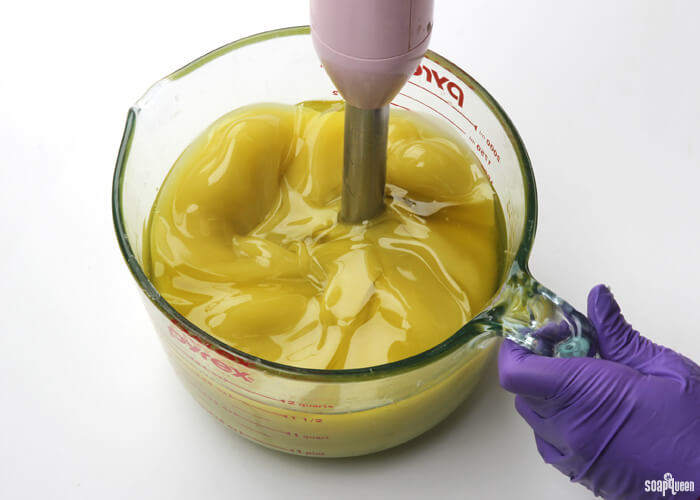 THREE: Alternate between using the stick blender to stir the mixture, and pulsing the stick blender. After about 20-30 seconds, test for trace. Because this project involves swirls, you don’t want it to become too thick, so don’t over stick blend! When a stick blender, whisk or spatula is pulled from the mixture, the trailings should not yet suspend on the top of the soap. Below is a great example of very thin trace; you can see that the trailings fall right back into the batter and do not sit on top.
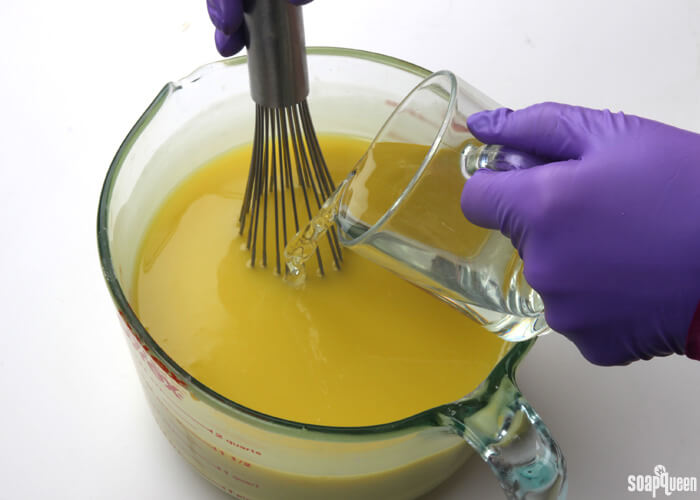
 FOUR: Once you reach a thin trace, add the 3 oz. of Crisp Cotton Fragrance Oil and use a whisk to stir in. Do not use a stick blender to mix in the fragrance, or the batter may become too thick. Crisp Cotton Fragrance Oil does not accelerate trace in cold process soap. If you are working with a different fragrance oil that does accelerate trace, add the fragrance oil after adding the colorants.
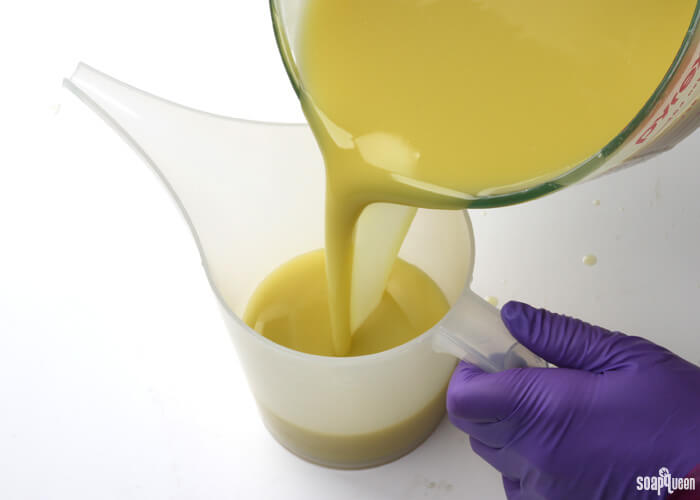
 FIVE: Split the soap batter into two even containers; it’s okay to eyeball it! There will be about 3 cups in each container.
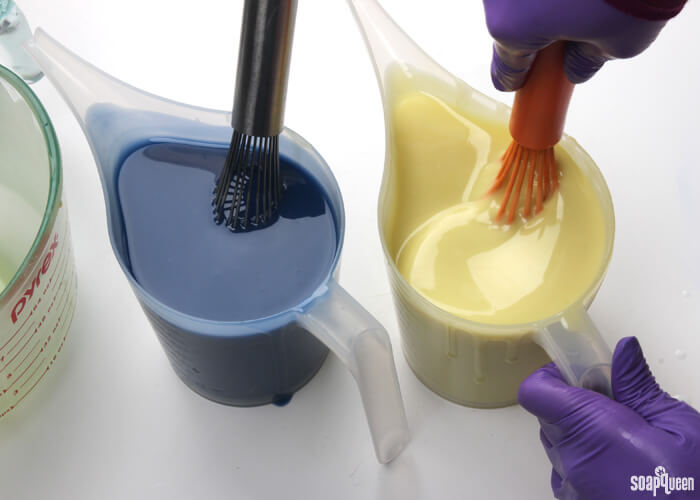
 SIX: To one container, add all the dispersed Ultramarine Blue Oxide and use a whisk to mix in. To the other container, add all the dispersed Titanium Dioxide and use a whisk to thoroughly mix in.
 SEVEN: Pour about 1/4 of the white soap into the mold. Tap the mold on the counter gently to release any bubbles.
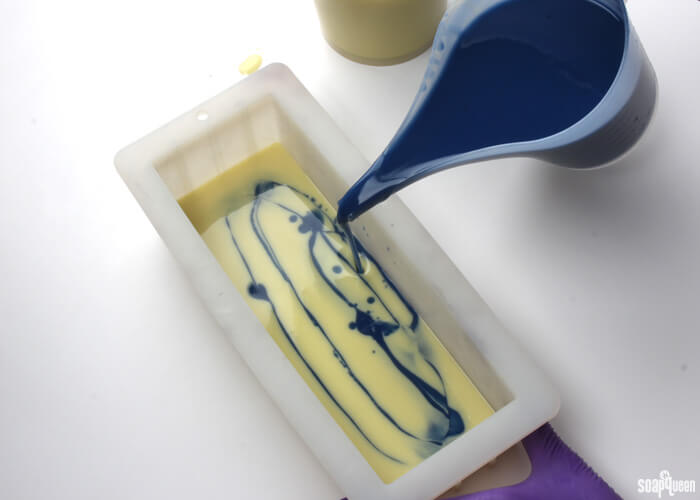
 EIGHT: Pour about 1/4 of the blue soap into the layer of white, moving the soap throughout the mold. Pour from a few inches above the mold to cause the soap to “break through” into the white. Don’t worry about making your pour “perfect.”
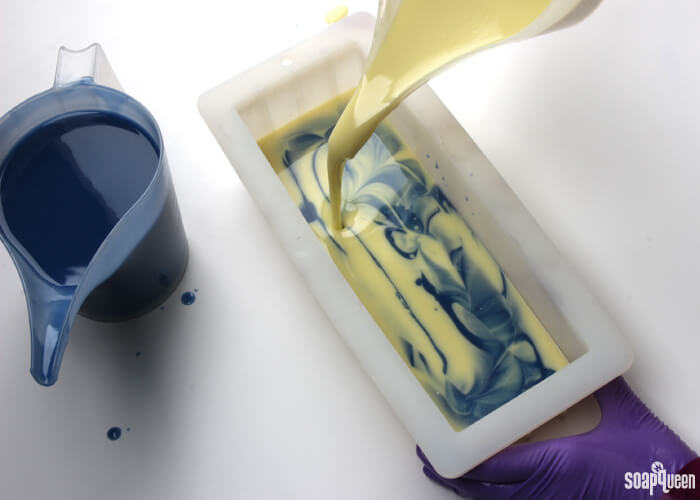
 NINE: Continue to pour the white and blue soap into the mold from various heights. As you continue to pour, the soap will begin to swirl itself naturally.
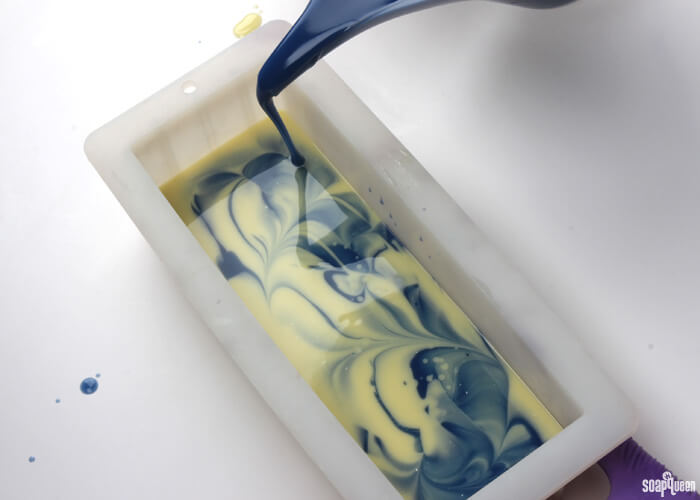 TEN: Continue to pour until you have a very small amount of blue and white soap. This remaining soap will be used to create the swirl top. Gently tap the soap on the counter to help release any bubbles.
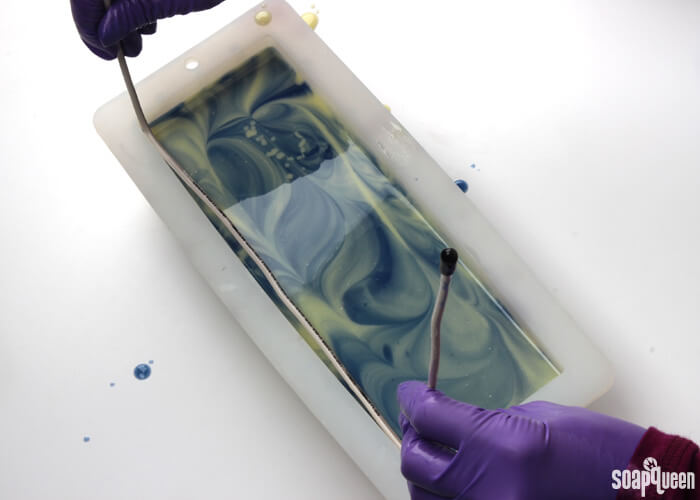
 ELEVEN: Line the hanger tool up alongside the length of the mold on the side farthest from you. Insert it all the way to the bottom of the mold. Then, move the hanger in circular motions toward yourself starting at the bottom and spiraling towards the top. After you have completed about 2-3 circles, pull the hanger toward you and out of the mold.
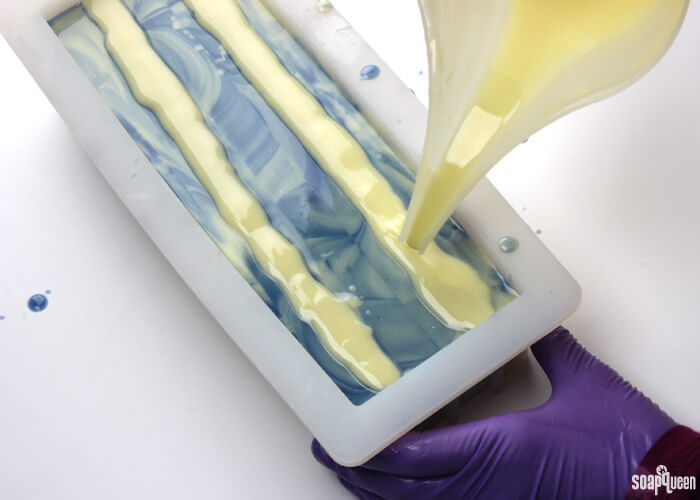
 TWELVE: Carefully pour two lines of white soap down the length of the mold. Don’t worry about the line looking perfect. Then, create three lines of blue soap in between the white lines. Tap the mold on the counter to help settle and smooth the lines of white and blue soap.
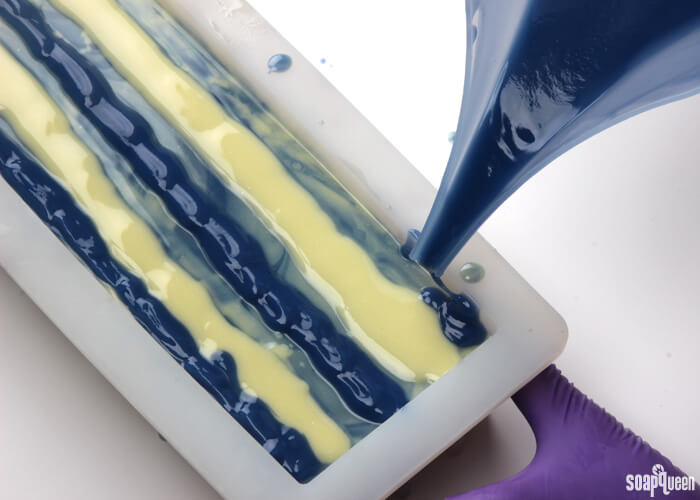
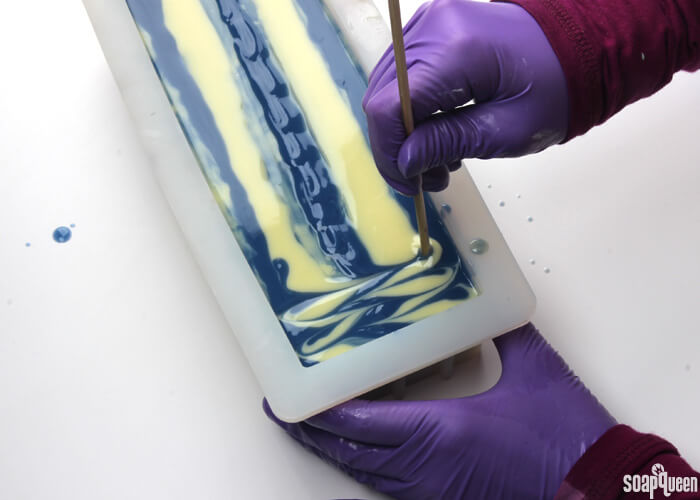
 THIRTEEN: Insert a dowel or chopstick into the very top of the soap. You only want to swirl the lines of white and blue soap, not the already swirled soap underneath. Drag the chopstick back and forth down the length of the mold. Continue this pattern until you reach the other side of the mold.
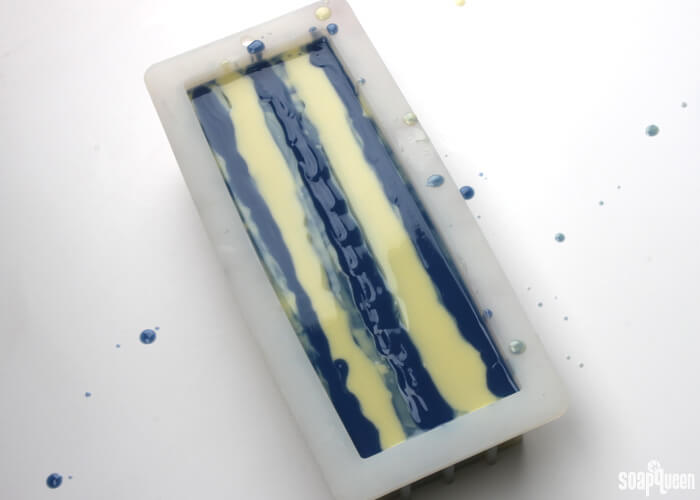
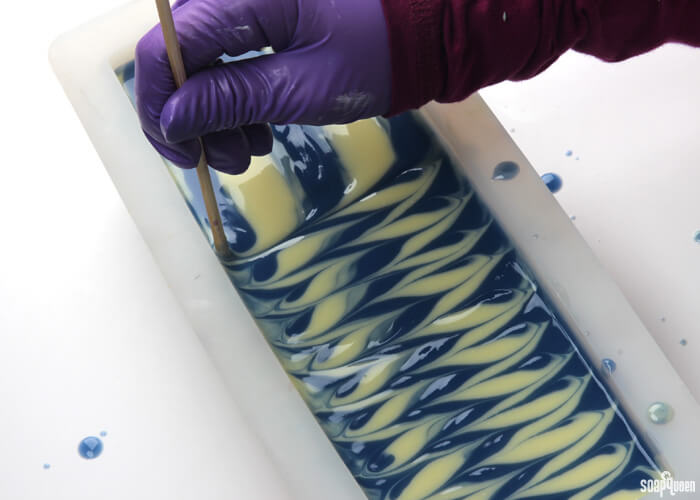 FOURTEEN: Drag the chopstick around the outside of the entire mold. This step is optional, but it gives the swirl a nice finished look.
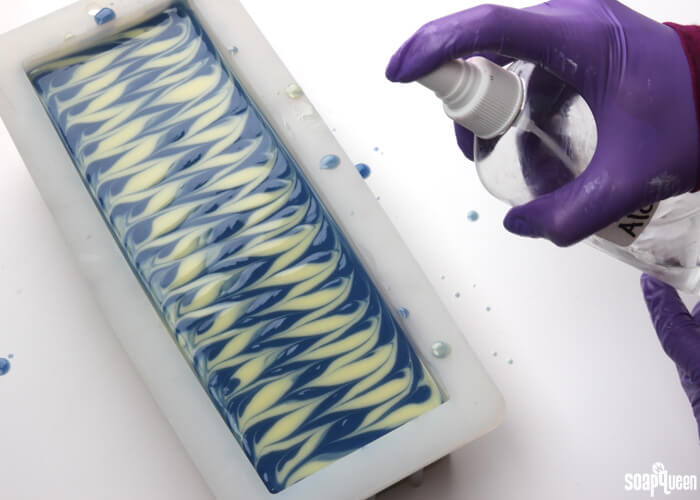
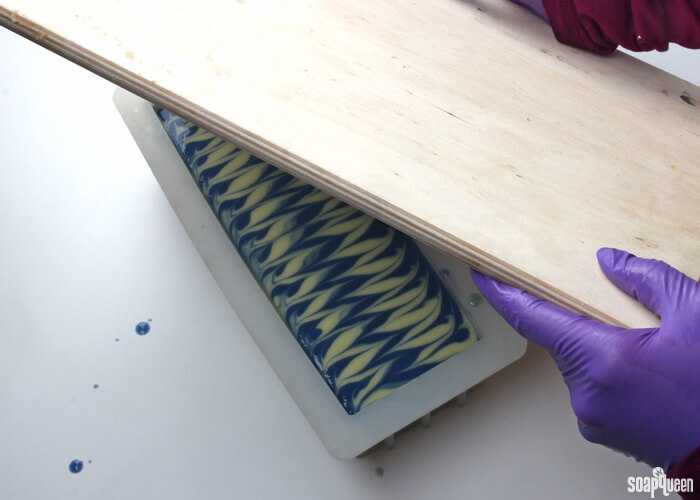
 FIFTEEN: Spray the top of the soap with 99% isopropyl alcohol to prevent soda ash. Cover the mold with a lid or piece of cardboard to insulate. Insulate for 24 hours. Allow to sit in the mold for 2-3 days before unmolding. Cut into bars, and allow them to cure for 4-6 weeks. Enjoy!

What was the first swirl technique you ever tried? The “In-the-Pot” swirl is another great swirling technique for beginners!

Back to Basics: Crisp Cotton Swirl Cold Process
Ingredients
- 10 ″ Silicone Loaf Mold
- 10.2 oz. Olive Oil 30%
- 6.8 oz. Coconut Oil 20%
- 8.5 oz. Palm Oil 25%
- 8.5 oz. Canola Oil 25%
- 4.7 oz. Sodium Hydroxide Lye
- 11.2 oz. Distilled Water
- Ultramarine Blue Pigment
- Titanium Dioxide
- 3 oz. Crisp Cotton Fragrance Oil
Instructions
FRAGRANCE PREP: In a glass, fragrance safe container, measure 3 oz. Crisp Cotton Fragrance Oil. Set aside.
COLOR PREP: To ensure that the Titanium Dioxide blends smoothly into the soap batter, we recommend micronizing it before dispersing it in oil. Please note this is an optional tip but it does help with the titanium dioxide clumping in the soap =) To micronize colorant, simply use a coffee grinder to blend the colorant to break up any clumps of color and prevent streaks of white from showing in the final soap. We like to use a coffee grinder that has a removable, stainless steel mixing area for easy cleaning. Then, disperse 1 teaspoon of the colorant into 1 tablespoon of sunflower or sweet almond oil (or any other liquid oil). In a separate container, disperse 1 teaspoon of the Ultramarine Blue Oxide in 1 tablespoon lightweight liquid oil. Use a mini mixer to get the clumps of color worked out smoothly. Check out this video to learn how to disperse colorants.
SAFETY FIRST: Suit up for safe handling practices! That means goggles, gloves and long sleeves. Make sure kids, pets, and other distractions and tripping hazards are out of the house or don’t have access to your soaping space. Always soap in a well-ventilated area.
TOOL PREP: Bend the Hanger Tool to fit in the mold lengthwise. It’s okay if it’s a little short, but you want it to fit comfortably within the mold.
- Slowly and carefully add the lye to the water and gently stir until the lye has fully dissolved and the liquid is clear. Set aside to cool.
- Melt the coconut oil, olive oil, palm oil and canola oil completely (remember to fully melt then mix your entire container of palm oil before portioning). Once the lye water and the oils have cooled to 130 degrees or below (and are ideally within 10 degrees of each other), add the lye water to the oils and begin pulsing with the stick blender. If you’d like a harder bar of soap that releases faster from the mold, you can add sodium lactate to the cooled lye water. Use 1 teaspoon of sodium lactate per pound of oils in the recipe. For this recipe, you’d add about 2 tsp. sodium lactate.
- Alternate between using the stick blender to stir the mixture, and pulsing the stick blender. After about 20-30 seconds, test for trace. Because this project involves swirls, you don’t want it to become too thick, so don’t over stick blend! When a stick blender, whisk or spatula is pulled from the mixture, the trailings should not yet suspend on the top of the soap. Below is a great example of very thin trace; you can see that the trailings fall right back into the batter and do not sit on top.
- Once you reach a thin trace, add the 3 oz. of Crisp Cotton Fragrance Oil and use a whisk to stir in. Do not use a stick blender to mix in the fragrance, or the batter may become too thick. Crisp Cotton Fragrance Oil does not accelerate trace in cold process soap. If you are working with a different fragrance oil that does accelerate trace, add the fragrance oil after adding the colorants.
- Split the soap batter into two even containers; it’s okay to eyeball it! There will be about 3 cups in each container.
- To one container, add all the dispersed Ultramarine Blue Oxide and use a whisk to mix in. To the other container, add all the dispersed Titanium Dioxide and use a whisk to thoroughly mix in.
- Pour about 1/4 of the white soap into the mold. Tap the mold on the counter gently to release any bubbles.
- Pour about 1/4 of the blue soap into the layer of white, moving the soap throughout the mold. Pour from a few inches above the mold to cause the soap to “break through” into the white. Don’t worry about making your pour “perfect.”
- Continue to pour the white and blue soap into the mold from various heights. As you continue to pour, the soap will begin to swirl itself naturally.
- Continue to pour until you have a very small amount of blue and white soap. This remaining soap will be used to create the swirl top. Gently tap the soap on the counter to help release any bubbles.
- Line the hanger tool up alongside the length of the mold on the side farthest from you. Insert it all the way to the bottom of the mold. Then, move the hanger in circular motions toward yourself starting at the bottom and spiraling towards the top. After you have completed about 2-3 circles, pull the hanger toward you and out of the mold.
- Carefully pour two lines of white soap down the length of the mold. Don’t worry about the line looking perfect. Then, create three lines of blue soap in between the white lines. Tap the mold on the counter to help settle and smooth the lines of white and blue soap.
- Insert a dowel or chopstick into the very top of the soap. You only want to swirl the lines of white and blue soap, not the already swirled soap underneath. Drag the chopstick back and forth down the length of the mold. Continue this pattern until you reach the other side of the mold.
- Drag the chopstick around the outside of the entire mold. This step is optional, but it gives the swirl a nice finished look.
- Spray the top of the soap with 99% isopropyl alcohol to prevent soda ash. Cover the mold with a lid or piece of cardboard to insulate. Insulate for 24 hours. Allow to sit in the mold for 2-3 days before unmolding. Cut into bars, and allow them to cure for 4-6 weeks. Enjoy!