
Patchouli essential oil has an earthy, smoky scent. It can elicit strong opinions because it’s an assertive fragrance, but what many people don’t know is how versatile patchouli essential oil is. It adds depth and complexity to a variety of scents. It blends wonderfully with floral, citrus, vanilla, and minty notes.
In this Patchouli & Bentonite Clay Soap, it’s blended with a touch of lime essential oil. Together they create a bright and earthy scent that’s sure to please. Patchouli is the defining scent of the blend, so if you prefer you can add more lime and less patchouli.
In addition to essential oils, the bars are made with natural activated charcoal, indigo powder, and bentonite clay. Bentonite clay is created from volcanic ash. It gives bath and beauty products a nice slip. This texture is great for shaving soaps, as it helps the razor glide over the skin. Bentonite clay also has strong oil absorbing properties, making it a great choice for oily skin.

Indigo powder creates the lovely gray-blue shade. Promoting gel phase helps the color pop a bit. If you’re looking for a natural blue color, jagua extract is a great option. You can also add a touch of Ultramarine Blue Oxide.
Patchouli & Bentonite Clay Soap
What You Need:
10″ Silicone Loaf Mold
33 oz. Swirl Quick Mix
4.6 oz. Sodium Hydroxide Lye
10.9 oz. Distilled Water
1.5 oz. Patchouli Essential Oil
0.5 oz. Lime Essential Oil
Bentonite Clay
Activated Charcoal
Indigo Powder
Titanium Dioxide
Click below to add everything you need for this project to your Bramble Berry shopping cart!

If you’ve never made cold process soap before, stop here. We highly recommend checking out our FREE four-part SoapQueen.tv series on cold process soapmaking, especially the episode on lye safety. And if you’d rather do some reading, Bramble Berry carries a wide range of books on the topic, including Pure Soapmaking.
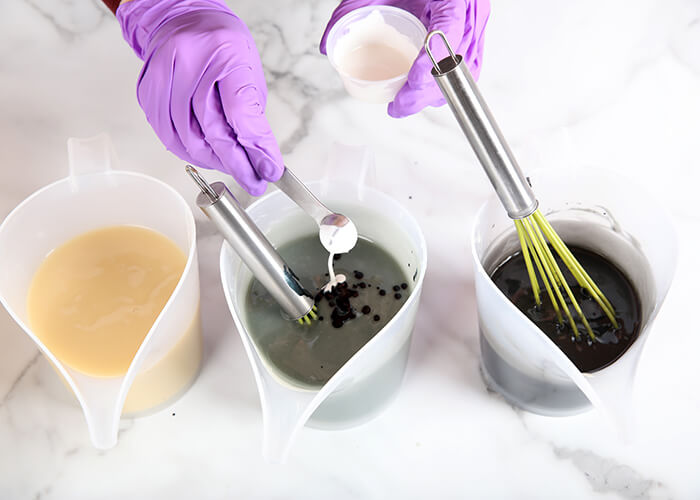
COLORANT PREP: Disperse 1 teaspoon of titanium dioxide into 1 tablespoon of a lightweight liquid oil such as sunflower or sweet almond. In a separate container, disperse 2 teaspoons of indigo powder into 2 tablespoons of lightweight liquid oil. Disperse 1 teaspoon of bentonite clay into 3 tablespoons of distilled water – this mixture will be quite thick. Finally, disperse 1/2 teaspoon of activated charcoal into 1/2 tablespoon of lightweight liquid oil. Use a mini mixer to get rid of clumps.
Optional: To ensure the titanium dioxide blends smoothly into the soap, we recommend micronizing it before dispersing it in oil. Use a coffee grinder to break up any clumps of color and prevent streaks of white from showing in the final soap. We like to use a coffee grinder that has a removable stainless steel mixing area for easy cleaning.
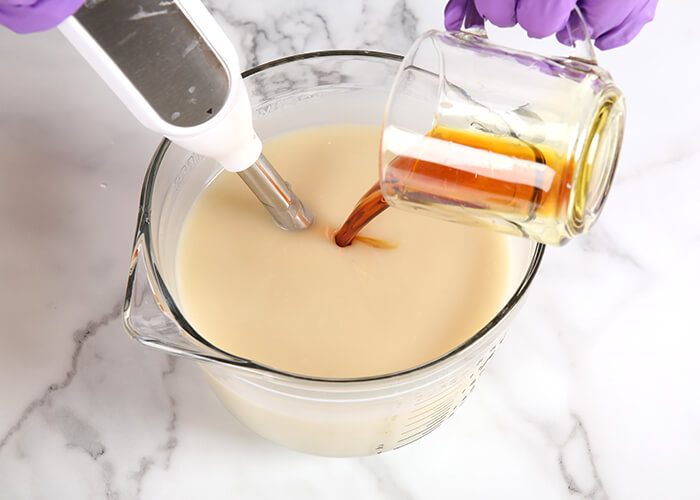
FRAGRANCE PREP: In a glass fragrance oil-safe container, measure out 1.5 ounces of patchouli essential oil and 0.5 ounces of lime essential oil. Set aside.
SAFETY FIRST: Suit up for safe handling practices. That means goggles, gloves, and long sleeves. Make sure kids, pets, other distractions, and tripping hazards are out of the house or don’t have access to your soaping space. Always soap in a well-ventilated area.
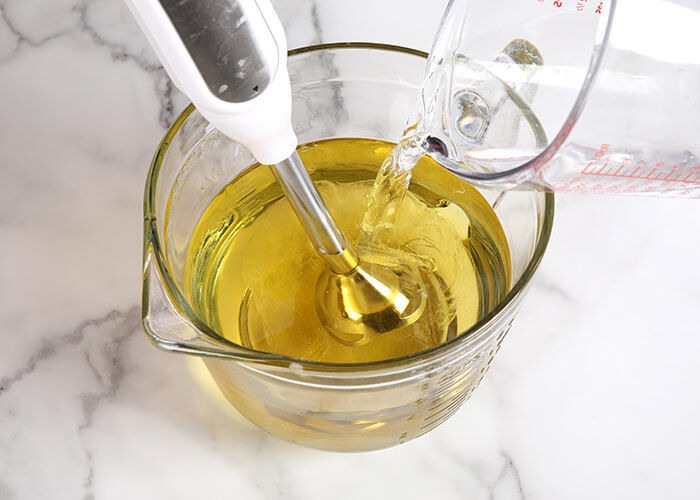
ONE: Slowly and carefully add 4.6 ounces of lye to 10.9 ounces of distilled water. Gently stir until the lye has fully dissolved. Set it aside to cool. If you’d like a harder bar of soap that releases faster from the mold, you can add sodium lactate to the cooled lye water. Use 1 teaspoon of sodium lactate per pound of oils in the recipe. For this recipe, you’d add 2 teaspoons sodium lactate.
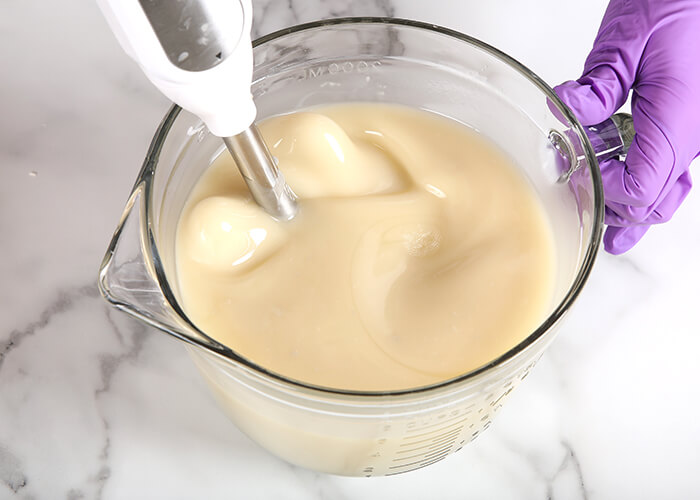
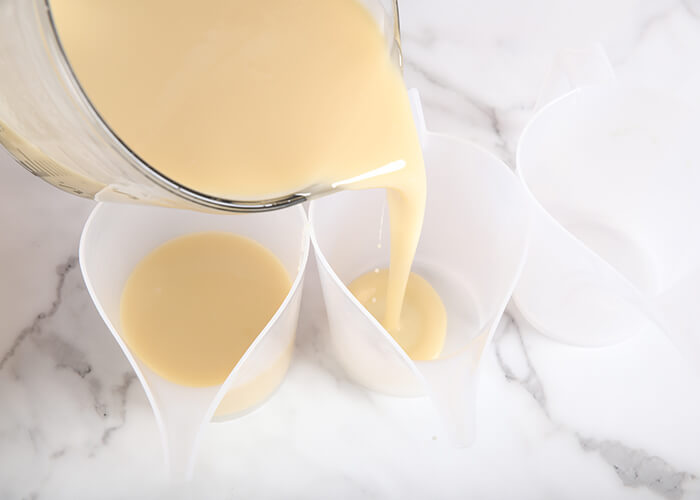
TWO: Fully melt the entire bag of Swirl Quick Mix until it’s completely clear. Shake the bag to mix up all the oils. Measure 33 ounces into a heat-safe bowl. Once the lye water and the oils have cooled to 130 degrees F or below (and are ideally within 10 degrees of each other), add the lye water to the oils and stick blend the mixture to a very thin trace.
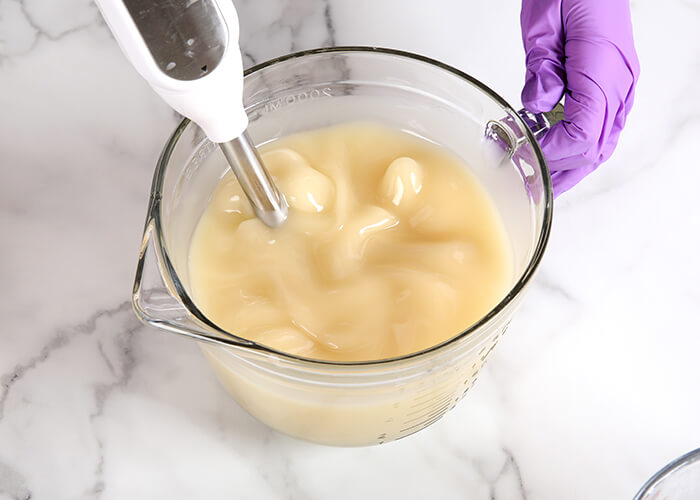
THREE: Add all of the bentonite clay mixture. Pulse and stir with the stick blender to fully incorporate. Clay tends to speed up trace, so be careful to not over blend during this stage.

FOUR: Add all of the essential oil blend and use a whisk to fully mix in.
FIVE: Split the soap into 3 separate containers. One container should hold 350 mL, and the remaining 2 should hold 600 mL. Add the following amounts of dispersed powders and whisk thoroughly.
- Container A (350 mL): 1 teaspoon dispersed activated charcoal
- Container B (600 mL): 1 tablespoon dispersed indigo powder + 1/2 teaspoon dispersed titanium dioxide
- Container C (600 mL): remaining dispersed titanium dioxide
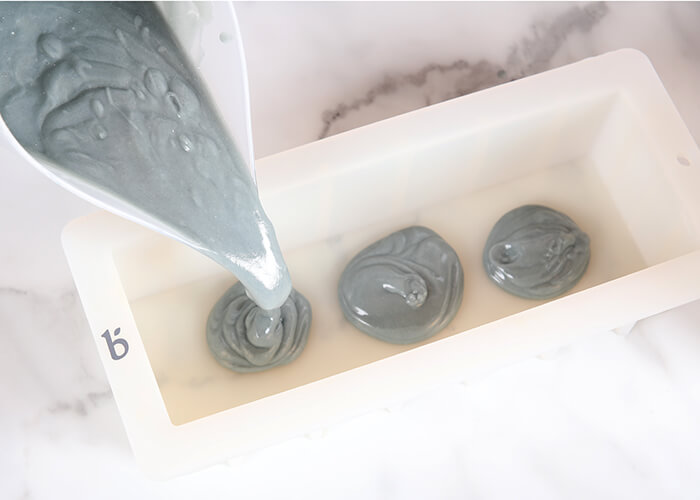
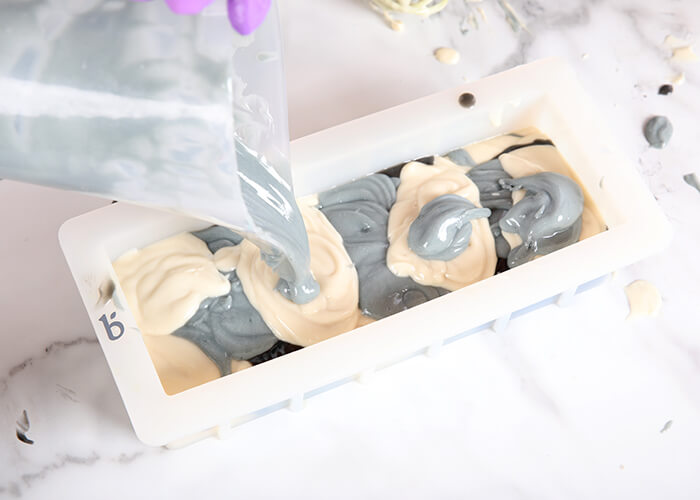
SIX: At this point you want the soap to be a medium trace – thin enough to pour, but thick enough that it slightly holds its shape. If it’s still thin, quickly pulse each container with the stick blender starting from lightest to darkest. Once you reach a good texture, begin pouring small dollops of the blue soap into the mold in different areas. Don’t worry too much about the placement of the plops or making them the same size.
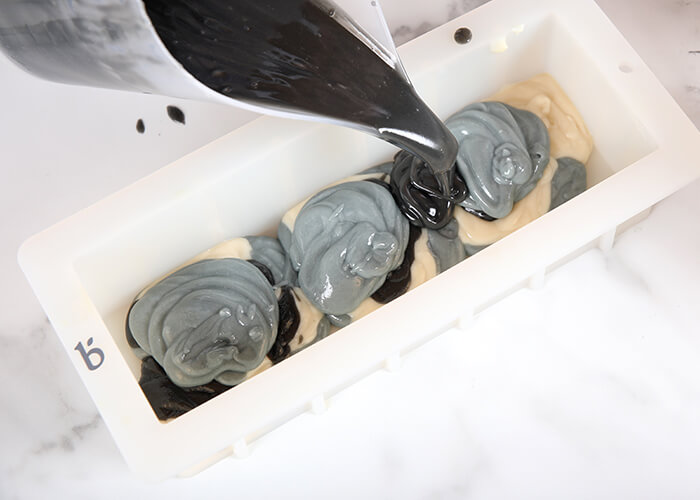
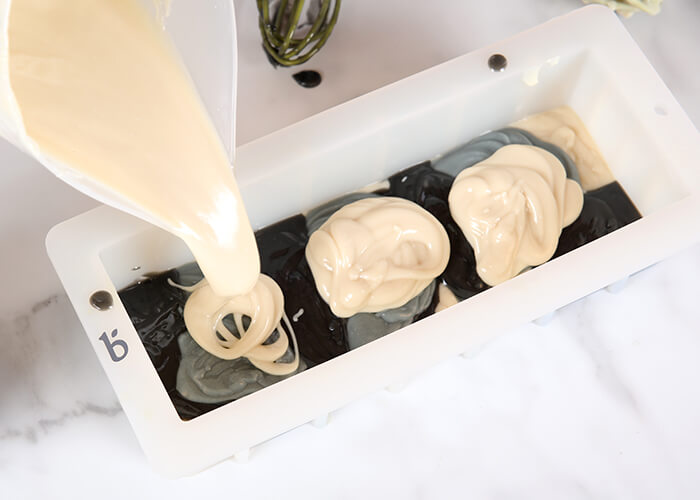
SEVEN: Pour plops of the white soap on top of the blue, followed by dollops of the black soap. Because you have less black soap, make these plops slightly smaller.
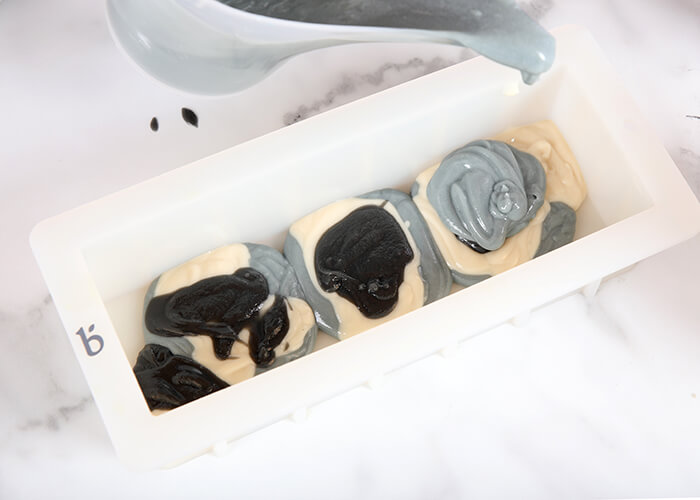
EIGHT: Continue to layer the various colors into the mold. The more dollops the more layers your soap will have. Alternating the spots you pour and the amounts will also create more variety in your bars. There’s really no right or wrong way to layer the colors, so have fun with it.
TIP: If your soap gets grainy, whisk until it’s smooth. If it gets too thick to pour, use a spoon to layer the soap.
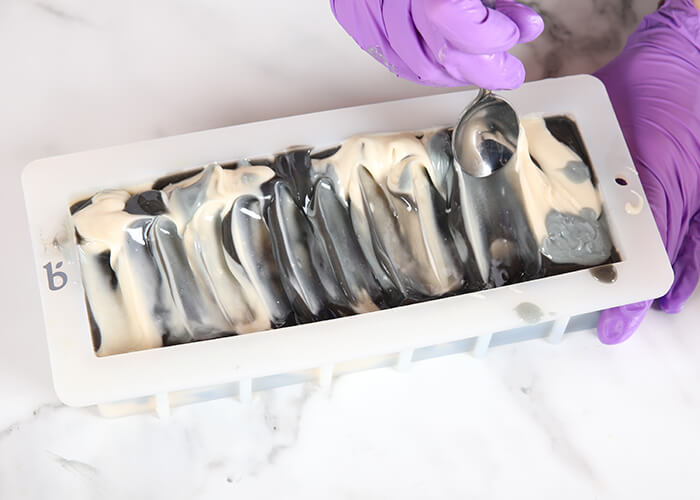
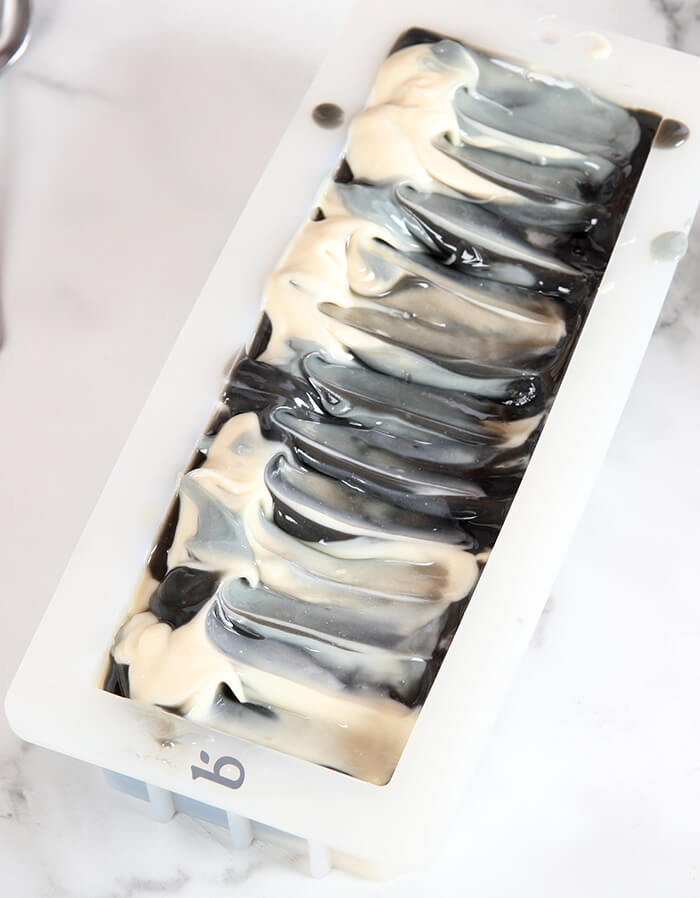
NINE: Once all the soap is in the mold, use a spoon to create texture on top. We created a side wave pattern by moving the spoon in one direction vertically down the mold.
TEN: Once you’re happy with the top, spritz it with 99% isopropyl alcohol. To help the indigo powder pop, we placed this soap on a heating pad set to medium high for about 2 hours to promote gel phase. Learn more about gel phase here.
Allow the soap to stay in the mold for 2-3 days. Unmold and cut into bars. Allow them to cure for 4-6 weeks and enjoy!


Patchouli & Bentonite Clay Soap
Ingredients
- 10 ″ Silicone Loaf Mold
- 33 oz. Swirl Quick Mix
- 4.6 oz. Sodium Hydroxide Lye
- 10.9 oz. Distilled Water
- 1.5 oz. Patchouli Essential Oil
- 0.5 oz. Lime Essential Oil
- Bentonite Clay
- Activated Charcoal
- Indigo Powder
- Titanium Dioxide
Instructions
COLORANT PREP: Disperse 1 teaspoon of titanium dioxide into 1 tablespoon of a lightweight liquid oil such as sunflower or sweet almond. In a separate container, disperse 2 teaspoons of indigo powder into 2 tablespoons of lightweight liquid oil. Disperse 1 teaspoon of bentonite clay into 3 tablespoons of distilled water – this mixture will be quite thick. Finally, disperse 1/2 teaspoon of activated charcoal into 1/2 tablespoon of lightweight liquid oil. Use a mini mixer to get rid of clumps. Optional: To ensure the titanium dioxide blends smoothly into the soap, we recommend micronizing it before dispersing it in oil. Use a coffee grinder to break up any clumps of color and prevent streaks of white from showing in the final soap. We like to use a coffee grinder that has a removable stainless steel mixing area for easy cleaning.
FRAGRANCE PREP: In a glass fragrance oil-safe container, measure out 1.5 ounces of patchouli essential oil and 0.5 ounces of lime essential oil. Set aside.
SAFETY FIRST: Suit up for safe handling practices. That means goggles, gloves, and long sleeves. Make sure kids, pets, other distractions, and tripping hazards are out of the house or don’t have access to your soaping space. Always soap in a well-ventilated area.
- Slowly and carefully add 4.6 ounces of lye to 10.9 ounces of distilled water. Gently stir until the lye has fully dissolved. Set it aside to cool. If you’d like a harder bar of soap that releases faster from the mold, you can add sodium lactate to the cooled lye water. Use 1 teaspoon of sodium lactate per pound of oils in the recipe. For this recipe, you’d add 2 teaspoons sodium lactate.
- Fully melt the entire bag of Swirl Quick Mix until it’s completely clear. Shake the bag to mix up all the oils. Measure 33 ounces into a heat-safe bowl. Once the lye water and the oils have cooled to 130 degrees F or below (and are ideally within 10 degrees of each other), add the lye water to the oils and stick blend the mixture to a very thin trace.
- Add all of the bentonite clay mixture. Pulse and stir with the stick blender to fully incorporate. Clay tends to speed up trace, so be careful to not over blend during this stage.
- Add all of the essential oil blend and use a whisk to fully mix in.
- Split the soap into 3 separate containers. One container should hold 350 mL, and the remaining 2 should hold 600 mL. Add the following amounts of dispersed powders and whisk thoroughly.<br>Container A (350 mL): 1 teaspoon dispersed activated charcoal<br>Container B (600 mL): 1 tablespoon dispersed indigo powder + 1/2 teaspoon dispersed titanium dioxide<br>Container C (600 mL): remaining dispersed titanium dioxide
- At this point you want the soap to be a medium trace – thin enough to pour, but thick enough that it slightly holds its shape. If it’s still thin, quickly pulse each container with the stick blender starting from lightest to darkest. Once you reach a good texture, begin pouring small dollops of the blue soap into the mold in different areas. Don’t worry too much about the placement of the plops or making them the same size.
- Pour plops of the white soap on top of the blue, followed by dollops of the black soap. Because you have less black soap, make these plops slightly smaller.
- Continue to layer the various colors into the mold. The more dollops the more layers your soap will have. Alternating the spots you pour and the amounts will also create more variety in your bars. There’s really no right or wrong way to layer the colors, so have fun with it. TIP: If your soap gets grainy, whisk until it’s smooth. If it gets too thick to pour, use a spoon to layer the soap.
- Once all the soap is in the mold, use a spoon to create texture on top. We created a side wave pattern by moving the spoon in one direction vertically down the mold.
- Once you’re happy with the top, spritz it with 99% isopropyl alcohol. To help the indigo powder pop, we placed this soap on a heating pad set to medium high for about 2 hours to promote gel phase. Learn more about gel phase here. Allow the soap to stay in the mold for 2-3 days. Unmold and cut into bars. Allow them to cure for 4-6 weeks and enjoy!