Today is the third tutorial in the Back to Basics Cold Process Series. The first two projects were designed to give you a “feel” for soaping, and did not feature color or any complex design elements. Now, we are ready to work with color, thick trace and gel phase! The Back to Basics Soapmaking Kit includes all the soaping ingredients you need to create all four recipes in this series, including the 10″ Silicone Loaf Mold. Now, let’s get soaping!
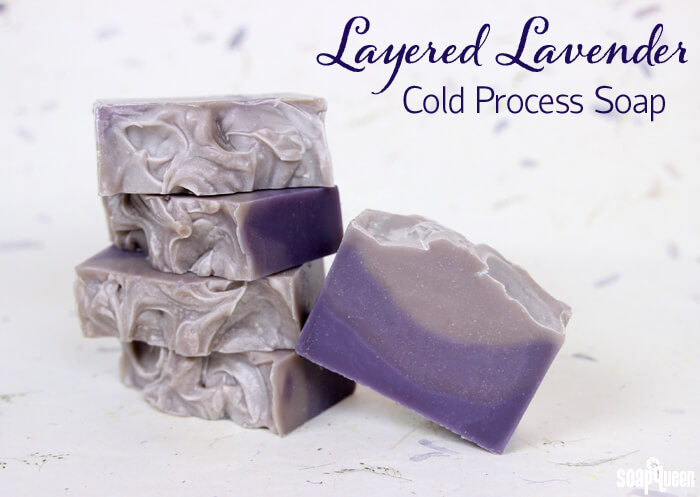
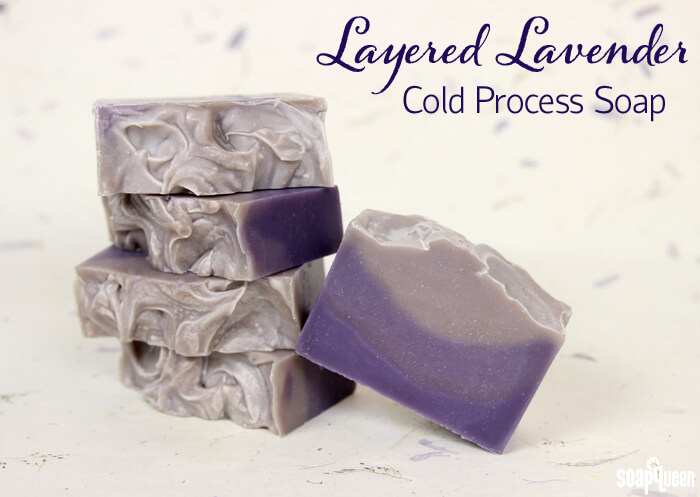
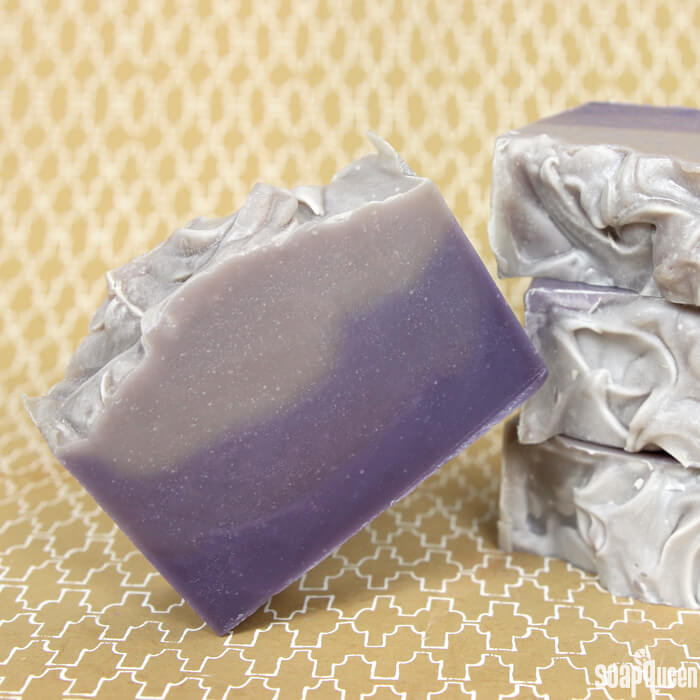
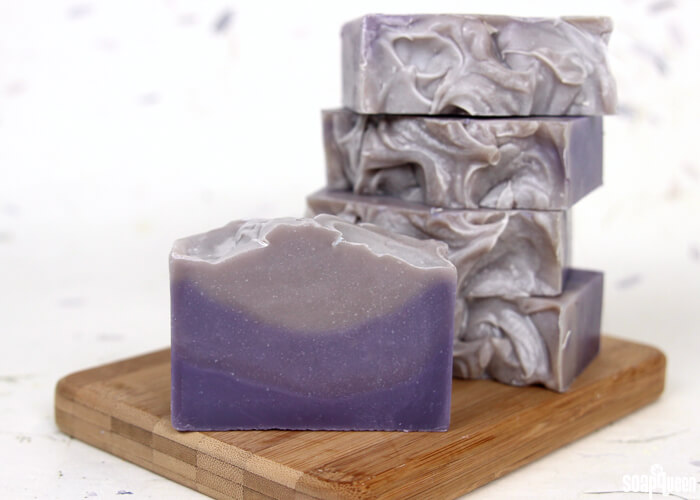
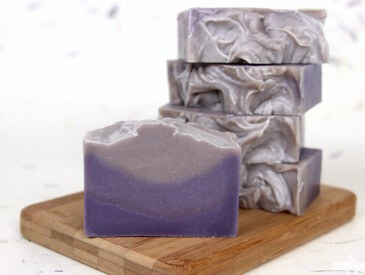
Basic layers are a fantastic design option for the beginner soaper. To make sure layers don’t blend together, the bottom layers of soap need to be thicker than the top layers. This Layered Lavender Cold Process Soap works with thick trace to ensure the layers stay separate. Thick trace soap has a texture similar to pudding, and holds its shape. To help give the soap its thick texture, this project uses Lavender & Cedar Fragrance Oil, which accelerates very slightly. To learn more about trace, check out the All About the Trace blog post.
In addition, this project uses LabColors to give the layers a purple ombre effect. LabColors are highly concentrated liquid dyes. In order to be used in water based projects, they first must be diluted in distilled water. Click here to learn more about LabColors, and how to dilute them. LabColors become more vibrant when the soap goes through gel phase. Gel phase refers to the part of the saponification process where the soap gets warm and gelatinous. Gelled soap looks slightly more transluscent and shiny than non-gelled soap. Click here to read more about gel phase, and see how gel phase affects LabColors.
Layered Lavender Cold Process Recipe (superfat 5%)
10″ Silicone Loaf Mold
5.1 oz Canola Oil (15%)
8.5 oz. Coconut Oil (25%)
10.2 oz. Olive Oil (30%)
10.2 oz. Palm Oil (30%)
4.8 oz. Sodium Hydroxide Lye
11.2 oz. Distilled Water
3 oz. Lavender & Cedar Fragrance Oil
Diluted Periwinkle High pH LabColor (small)
This tutorial is the third in the Back to Basics Cold Process Series. This series of tutorials includes four cold process recipes that are perfect for beginning soapers. The Back to Basics Soapmaking Kit includes all the soaping ingredients you need to create all four recipes, including the 10″ Silicone Mold. The only ingredient you need to buy separately is lye, and any tools you may need. A great way to receive the basic soaping tools is with the Beginner’s Soaping Tool Kit, or click the “Buy it Now” button for the tools necessary for this project, lye and kit to your cart to your cart separately.

Click here to add everything you need for this project to your Bramble Berry shopping cart!
If you’ve never made Cold Process soap before, stop here! I highly recommend checking out our FREE four part SoapQueen.tv series on Cold Process Soapmaking, especially the episode on lye safety. And if you’d rather do some reading, Bramble Berry carries a wide range of books on the topic, including my newest book, Soap Crafting. You can also checkout the digital downloads for that instant gratification factor. I also recommend reviewing the first blog post in this series, which is all about how to handle lye safely.
FRAGRANCE PREP: In a glass, fragrance safe container, measure 3 oz. Lavender & Cedar Fragrance Oil. Set aside.
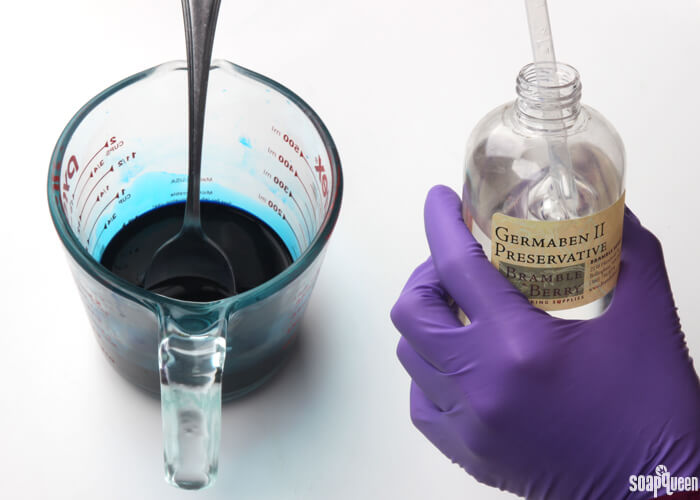
COLOR PREP: LabColors are super concentrated liquid dyes. In order to use them in cold process soap and other projects, they first need to be diluted. If you have never diluted Lab Colors before, check out this blog post. For this project, the small Periwinkle High pH LabColor needs to be diluted in 4 oz. distilled water. Don’t forget to add a preservative!
Set Up Your Area: Before soaping, it’s helpful to have your soaping area prepared before you start. While soaping, you don’t want to be running around looking for a spatula or whisk! This recipe requires a few whisks, and separate containers for the three colors. You will need your fully lined mold, prepared lye water, pre-mixed oils, stick blender, and a spatula. Check out the Soapy Session Preparation and Setup Guide for tips.
SAFETY FIRST: Suit up for safe handling practices! That means goggles, gloves and long sleeves. Make sure kids, pets, and other distractions and tripping hazards are out of the house or don’t have access to your soaping space. Always soap in a well-ventilated area.
ONE: Slowly and carefully add the lye to the water and gently stir until the lye has fully dissolved and the liquid is clear. Set aside to cool.
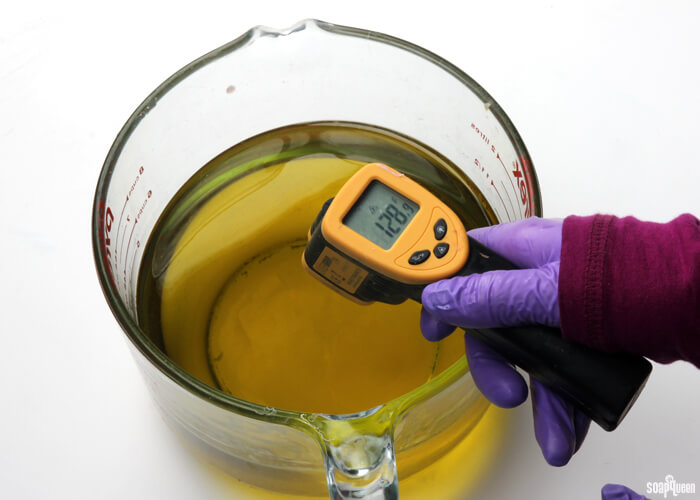
TWO: Combine the coconut oil, olive oil, palm oil and canola oils (remember to fully melt then mix your entire container of palm oil before portioning). Once the lye water and the oils have cooled to 130 degrees or below (and are ideally within 10 degrees of each other). If you’d like a harder bar of soap that releases faster from the mold, you can add sodium lactate to the cooled lye water. Use 1 teaspoon of sodium lactate per pound of oils in the recipe. For this recipe, add about 2 tsp. sodium lactate.
 THREE: Place your stick blender into the oils. Gently tap the blender on the bottom of the bowl several times to release any bubbles that got trapped by the stick blender head. This is called, “burping the stick blender.”
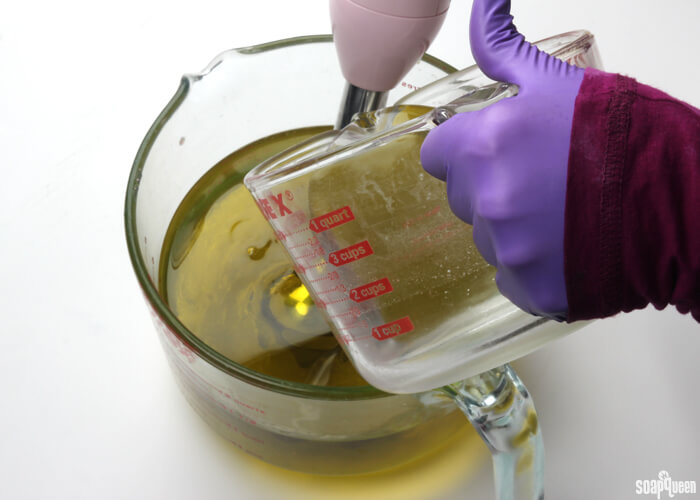
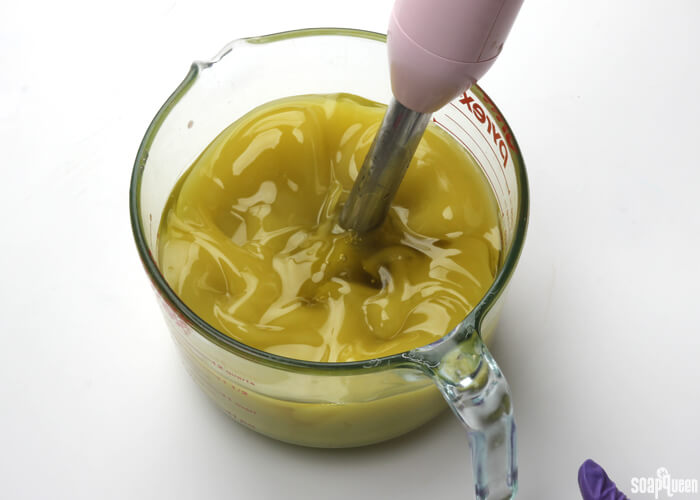
FOUR: Once bubbles no longer rise to the surface of the oils, gently pour the cooled lye water down the shaft of the stick blender and into the oils.
 FIVE: Turn on the stick blender and pulse several times. You will immediately see the lye and oils begin to come together, and begin to create a creamy yellow color. Alternate between using the stick blender to stir the mixture, and pulsing the stick blender. After about 20-30 seconds, test for trace.
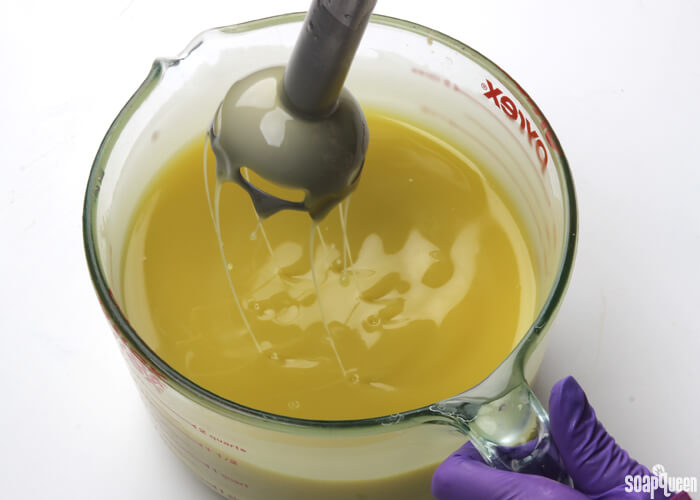
 Below, you can see that when the stick blender is pulled out of the mixture, the drips or trailings of soap do not suspend on the top. This soap is still a very thin trace. Later, this soap will be stick blended further for a thicker texture. To help mix in the colorant and fragrance easier, stop once you have reached this point.
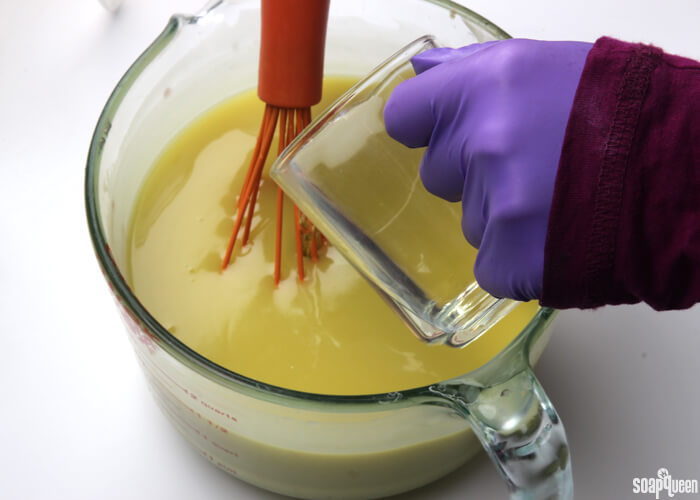
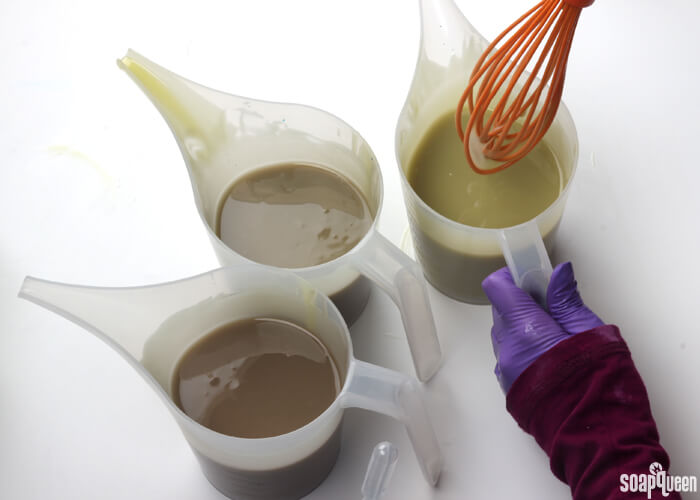
 SIX: Pour in the 3 oz. of Lavender & Cedar Fragrance Oil, and use a whisk to thoroughly stir in. Once the mixture is completely mixed into the soap, split the soap into three equal containers (it’s okay to eyeball it!) Each container will hold about 2 cups of soap.
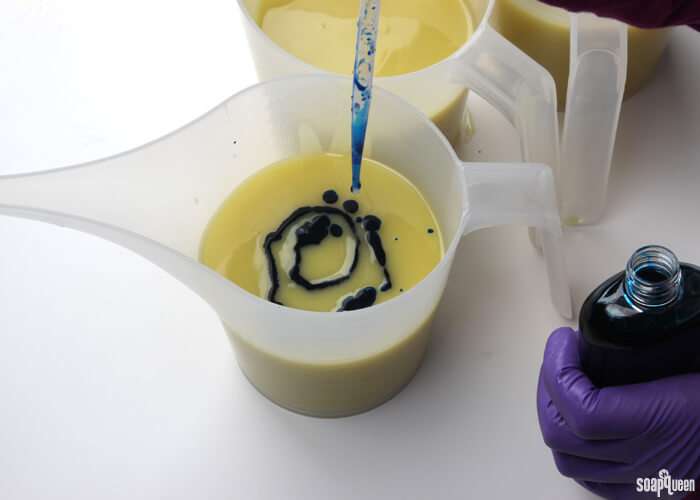
 SEVEN: Add the diluted Periwinkle High pH LabColor to each container in the amounts listed below. Use a whisk to mix in the LabColor. You will notice the LabColor will turn the soap a shade of blue/green, and soon morph into a gray color. Don’t worry! Once the soap fully saponifies and goes through gel phase, the grey will transform into purple. Check out this blog post to learn more about LabColors and gel phase.
- Container A (dark purple): 7 mL diluted Periwinkle LabColor
- Container B: (medium purple): 5 mL Periwinkle diluted LabColor
- Container C (light purple) 3 mL diluted Periwinkle LabColor
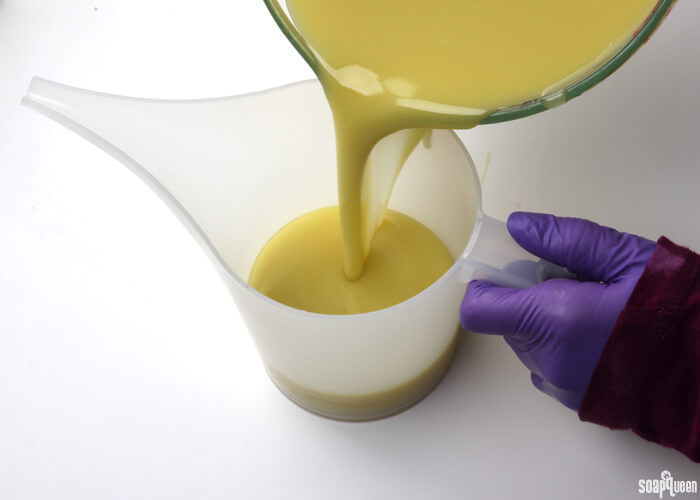
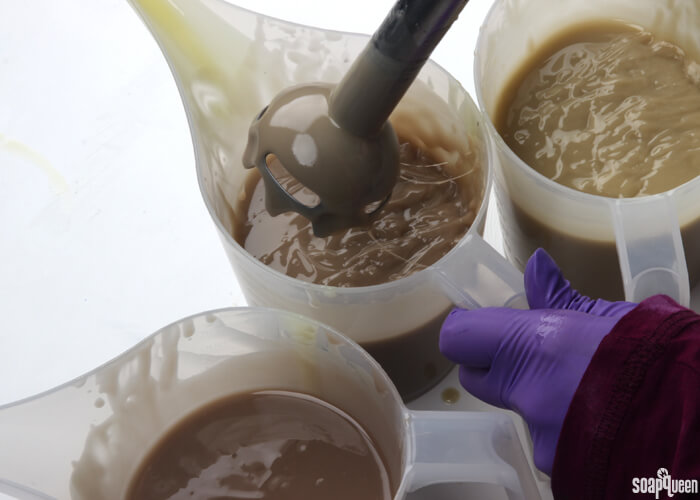
 NINE: Check the trace of your soap. In order to make the layers in this project, the soap needs to be a medium to thick trace. If your soap is still fairly liquid, stick blend each container for several seconds to thicken. You want the soap be the texture of the soap to be a thick pudding.
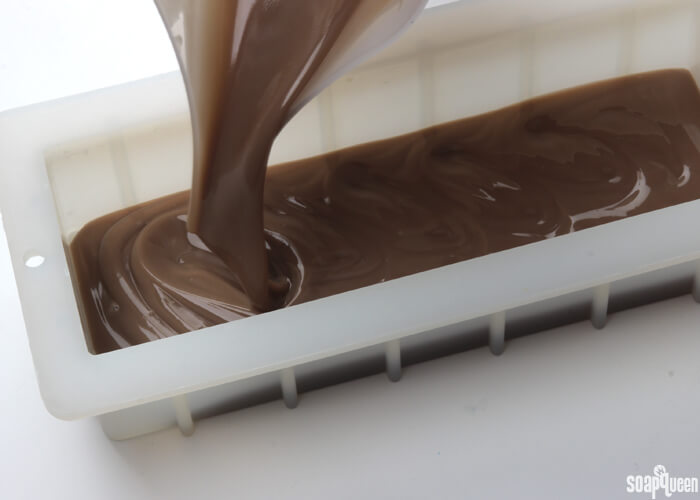
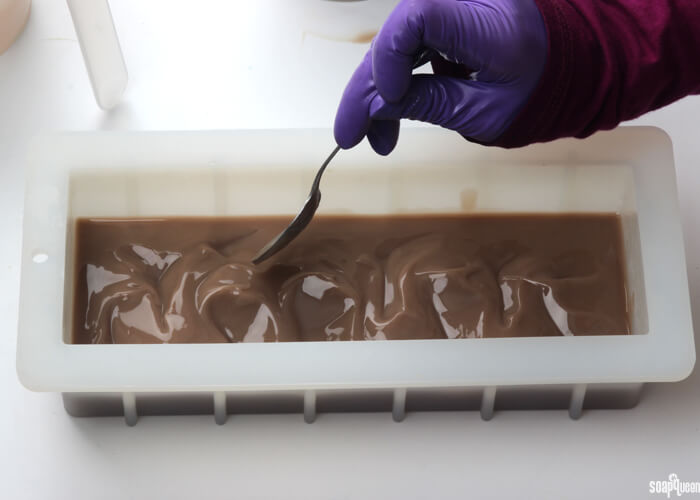
 TEN: Pour the entire container of the darkest soap into the mold, and tap it down on the counter to eliminate air bubbles. Use a spoon to smooth the texture and make peaks.
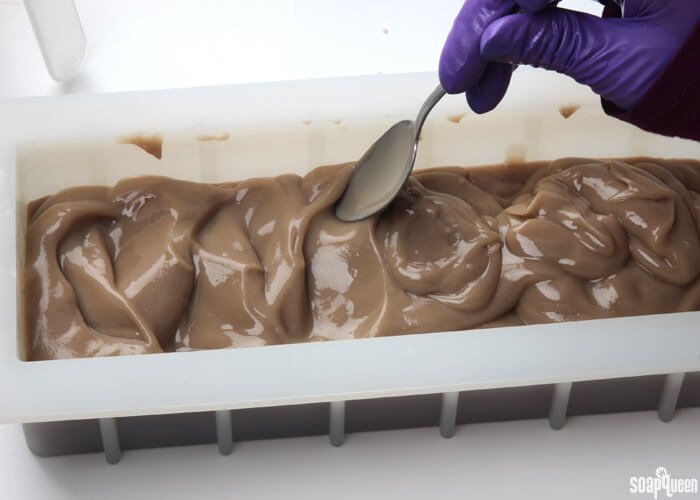
 ELEVEN: Use a spoon to gently place the medium purple (gray) color onto the bottom. Use a spoon to spread the soap throughout the mold and create subtle texture within the layer.

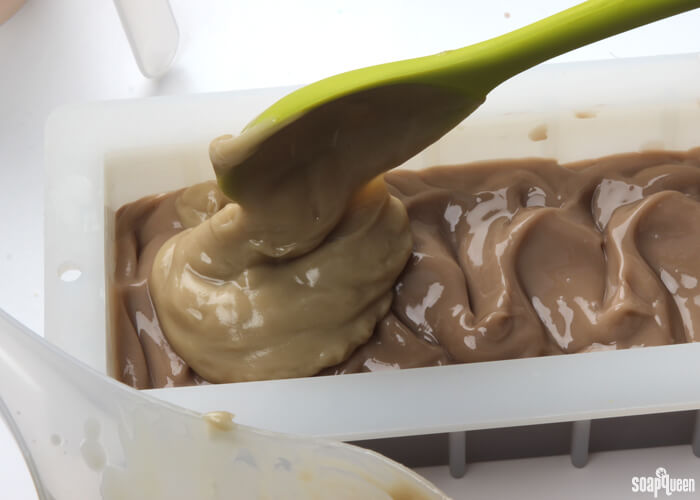
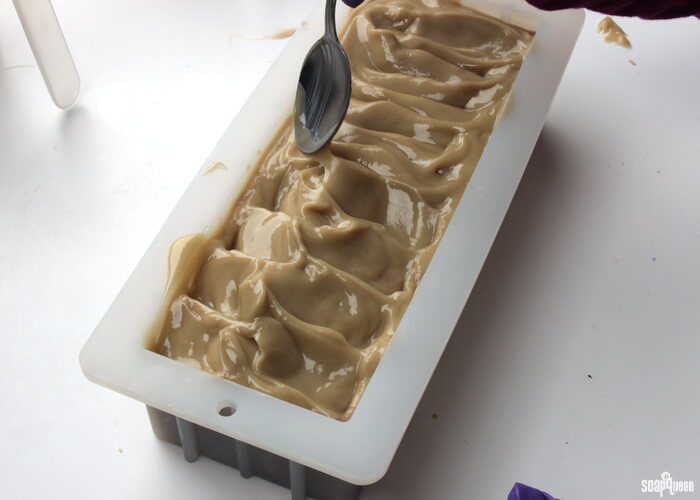
 THIRTEEN: Finally, spoon the lightest color of soap into the mold. Use a spoon to spread the mixture evenly throughout the mold, and to create texture. There is no right or wrong way to create a textured top, just have fun with it!
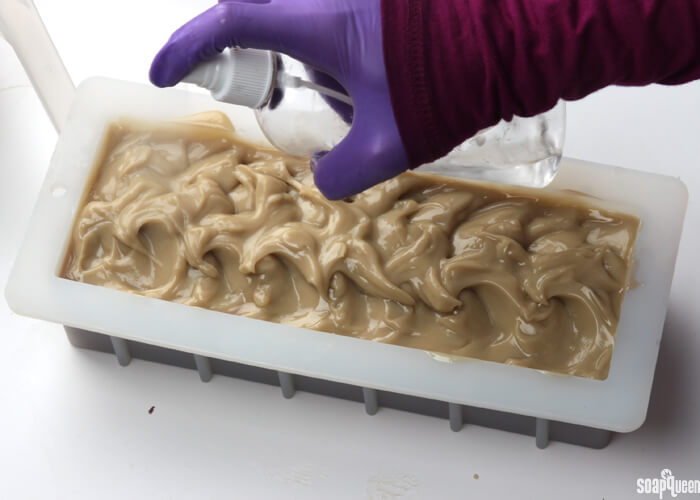
 FOURTEEN: Once you’re happy with how the top looks, spray the top with 99% isopropyl alcohol to avoid soda ash.
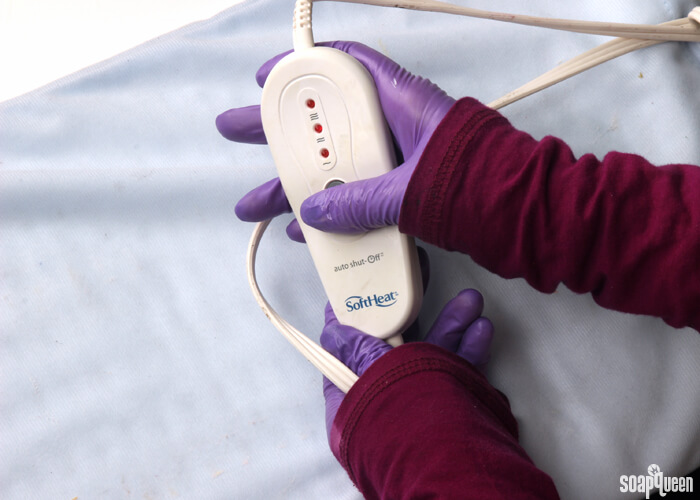
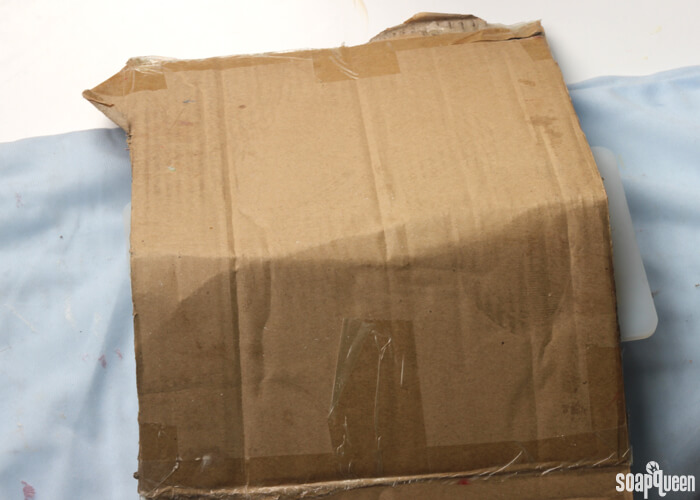
 FIFTEEN: This soap needs to go through gel phase in order to make the colors really pop. The difference between the wet soap (above) and the final soap is extraordinary – but it does depend on the soap going through gel phase (not sure what gel phase is? Click here to read all about it). Depending on your climate, you may need to help the soap heat up with a heating pad. Turn the heating pad on medium/high, and place the soap on top. Then, cover the soap. To avoid mashing the textured top, we created a cover out of cardboard, shaped like a tent. Place the tented cardboard on top of the mold, and cover with a blanket to insulate. After about 20-30 minutes, turn off the heating pad, but leave the blanket and cardboard on top. Allow to remain under the cardboard and blanket for 24 hours. Allow the soap to remain in the mold for 3-4 days. Remove from mold, cut into bars and allow to cure for 4-6 weeks. Enjoy!
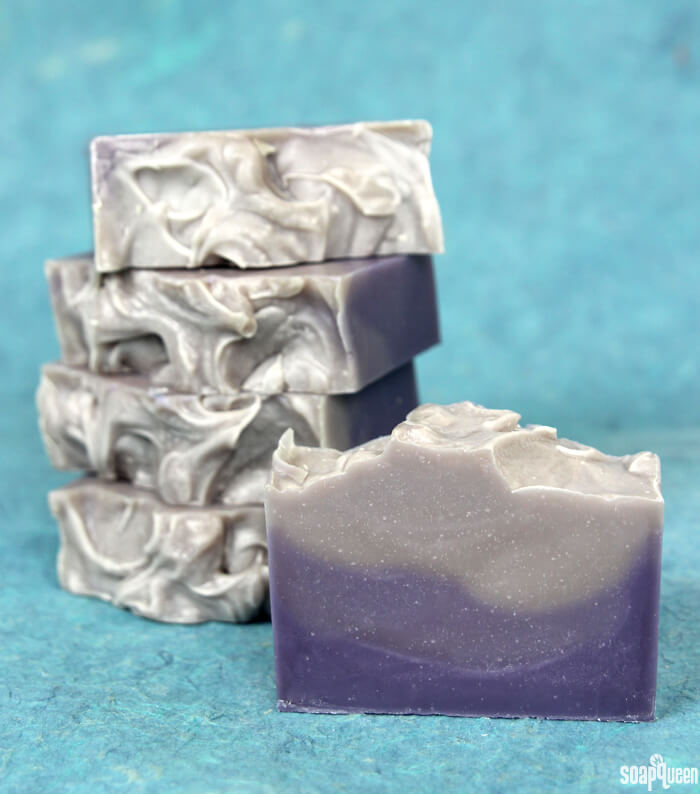
Have you worked with layers and LabColors to create an ombre effect? If you like the effect, check out the Striped Berry Champagne Cold Process tutorial!
Back to Basics: Layered Lavender Cold Process Tutorial
Ingredients
- 5.1 oz Canola Oil 15%
- 8.5 oz. Coconut Oil 25%
- 10.2 oz. Olive Oil 30%
- 10.2 oz. Palm Oil 30%
- 4.8 oz. Sodium Hydroxide Lye
- 11.2 oz. Distilled Water
- 3 oz. Lavender & Cedar Fragrance Oil
- Diluted Periwinkle High pH LabColor small
Instructions
FRAGRANCE PREP: In a glass, fragrance safe container, measure 3 oz. Lavender & Cedar Fragrance Oil. Set aside.
COLOR PREP: LabColors are super concentrated liquid dyes. In order to use them in cold process soap and other projects, they first need to be diluted. If you have never diluted Lab Colors before, check out this blog post. For this project, the small Periwinkle High pH LabColor needs to be diluted in 4 oz. distilled water. Don’t forget to add a preservative!
SAFETY FIRST: Suit up for safe handling practices! That means goggles, gloves and long sleeves. Make sure kids, pets, and other distractions and tripping hazards are out of the house or don’t have access to your soaping space. Always soap in a well-ventilated area.
- Slowly and carefully add the lye to the water and gently stir until the lye has fully dissolved and the liquid is clear. Set aside to cool.
- Combine the coconut oil, olive oil, palm oil and canola oils (remember to fully melt then mix your entire container of palm oil before portioning). Once the lye water and the oils have cooled to 130 degrees or below (and are ideally within 10 degrees of each other), add the lye water to the oils and stick blend until you reach a light trace. If you’d like a harder bar of soap that releases faster from the mold, you can add sodium lactate to the cooled lye water. Use 1 teaspoon of sodium lactate per pound of oils in the recipe. For this recipe, add about 2 tsp. sodium lactate.
- Place your stick blender into the oils. Gently tap the blender on the bottom of the bowl several times to release any bubbles that got trapped by the stick blender head. This is called, “burping the stick blender.”
- Once bubbles no longer rise to the surface of the oils, gentle pour the cooled lye water down the shaft of the stick blender and into the oils.
- Turn on the stick blender and pulse several times. You will immediately see the lye and oils begin to come together, and begin to create a creamy yellow color. Alternate between using the stick blender to stir the mixture, and pulsing the stick blender. After about 20-30 seconds, test for trace. Below, you can see that when the stick blender is pulled out of the mixture, the drips or trailings of soap do not suspend on the top. This soap is still a very thin trace. Later, this soap will be stick blended further for a thicker texture. But to help mix in the colorant and fragrance easier, stop once you have reached this point.
- Pour in the 3 oz. of Lavender & Cedar Fragrance Oil, and use a whisk to thoroughly stir in. Once the mixture is completely mixed into the soap, split the soap into three equal containers (it’s okay to eyeball it!) Each container will hold about 2 cups of soap.
- Add the diluted Periwinkle High pH LabColor to each container in the amounts listed below. Use a whisk to mix in the LabColor. You will notice the LabColor will turn the soap a shade of blue/green, and soon morph into a gray color. Don’t worry! Once the soap fully saponifies and goes through gel phase, the grey will transform into purple. Check out this blog post to learn more about LabColors and gel phase.<br>Container A (dark purple): 7 mL diluted LabColor<br>Container B: (medium purple): 5 mL diluted LabColor<br>Container C (light purple) 3 mL diluted LabColor
- Check the trace of your soap. In order to make the layers in this project, the soap needs to be a medium to thick trace. If your soap is still fairly liquid, stick blend each container for several seconds to thicken. You want the soap be the texture of the soap to be a thick pudding.
- Pour the entire container of the darkest soap into the mold, and tap it down on the counter to eliminate air bubbles. Use a spoon to smooth the texture and make peaks.
- Use a spoon to gently place the medium purple (gray) color onto the bottom. Use a spoon to spread the soap throughout the mold and create subtle texture within the layer.
- Finally, spoon the lightest color of soap into the mold. Use a spoon to spread the mixture evenly throughout the mold, and to create texture. There is no right or wrong way to create a textured top, just have fun with it!
- Once you’re happy with how the top looks, spray the top with 99% isopropyl alcohol to avoid soda ash.
- This soap needs to go through gel phase in order to make the colors really pop! Depending on your climate, you may need to help the soap heat up with a heating pad. Turn the heating pad on medium/high, and place the soap on top. Then, cover the soap. To avoid mashing the textured top, we created a cover out of cardboard, shaped like a tent. Place the tented cardboard on top of the mold, and cover with a blanket to insulate. After about 20-30 minutes, turn off the heating pad, but leave the blanket and cardboard on top. Allow to remain under the cardboard and blanket for 24 hours. Allow the soap to remain in the mold for 3-4 days. Remove from mold, cut into bars and allow to cure for 4-6 weeks. Enjoy!