Charcoal soap has become extremely popular, and for good reason – it has amazing skin benefits. Its powerful absorption properties make it especially beneficial for oily facial skin. Learn more about the skin benefits of charcoal here.
This Lavender & Charcoal Soap was designed primarily for use on the body, but it’s also suitable for the face. In particular, the olive oil and cocoa butter are moisturizing so they make it suitable for combination or drier skin. If you have oily facial skin, the Charcoal Facial Soap is for you.
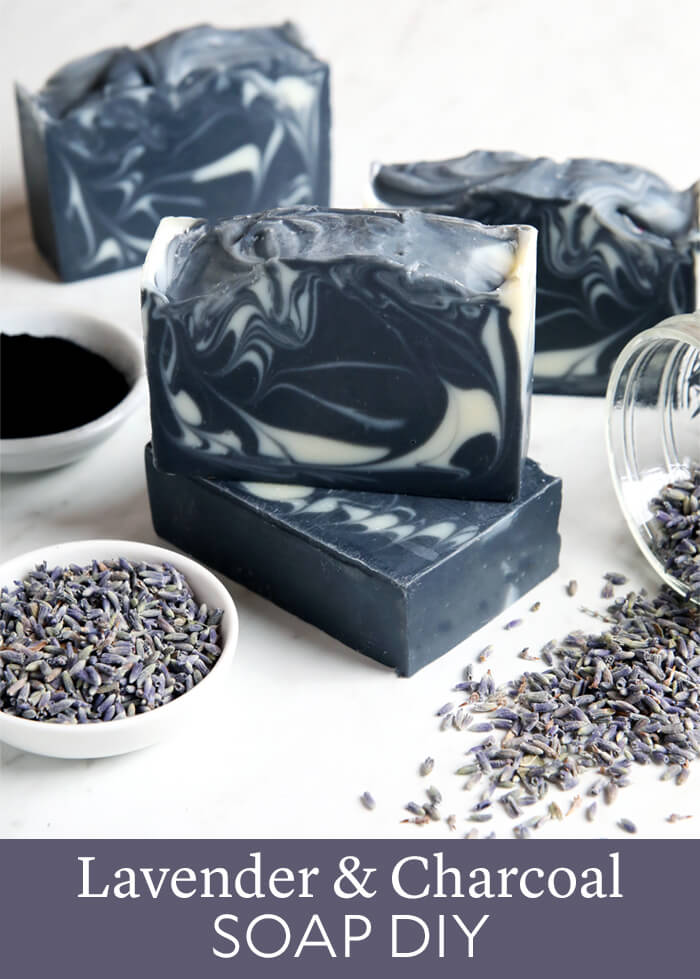
The activated charcoal gives part of the soap a striking gray color, while the rest of the soap is left uncolored. The two are poured into the mold in layers and then swirled together using the Hanger Swirl Tool. The lack of precision in the swirling technique creates different bars each time. It also makes it a great swirl for beginners because there is no right or wrong way to do it.
To help the activated charcoal mix into the batter smoothly, we dispersed it in a lightweight liquid oil. Sweet almond oil, sunflower oil, and avocado oil work well. For this recipe, mix 1 tablespoon charcoal with 1 tablespoon oil. Add the entire mixture at trace.
10” Silicone Loaf Mold
Hanger Swirl Tool
3.3 oz. Cocoa Butter (10%)
8.3 oz. Coconut Oil (25%)
13.2 oz. Olive Oil (40%)
8.3 oz. Palm Oil (25%)
4.6 oz. Sodium Hydroxide Lye
9.8 oz. Distilled Water (10% water discount)
1.75 oz. Lavender 40/42 Essential Oil
1 Tbsp. Activated Charcoal
Optional: 2 tsp. Sodium Lactate
Click below to add everything you need for this project to your Bramble Berry shopping cart!
Lavender & Charcoal Soap DIY
Ingredients
- 10 ” Silicone Loaf Mold
- Hanger Swirl Tool
- 3.3 oz. Cocoa Butter 10%
- 8.3 oz. Coconut Oil 25%
- 13.2 oz. Olive Oil 40%
- 8.3 oz. Palm Oil 25%
- 4.6 oz. Sodium Hydroxide Lye
- 9.8 oz. Distilled Water 10% water discount
- 1.75 oz. Lavender 40/42 Essential Oil
- 1 Tbsp. Activated Charcoal
- Optional: 2 tsp. Sodium Lactate
Instructions
FRAGRANCE PREP: Measure 1.75 ounces of Lavender 40/42 Essential Oil into a small glass container and set aside.
COLORANT PREP: Disperse 1 tablespoon of the activated charcoal into 1 tablespoon of sunflower or sweet almond oil (or any other liquid oil). Use a mini mixer to get rid of any clumps.
SAFETY FIRST: Suit up for safe handling practices. That means goggles, gloves, and long sleeves. Make sure kids, pets, other distractions, and tripping hazards are out of the house or don’t have access to your soaping space. Always soap in a well-ventilated area.
- Slowly and carefully add 4.6 ounces of lye to 9.8 ounces of water and gently stir until the lye has fully dissolved and the liquid is clear. Set aside to cool. If you’d like a harder bar of soap that releases faster from the mold, you can add sodium lactate to the cooled lye water. Use 1 teaspoon of sodium lactate per pound of oils in the recipe. For this recipe, you’d add 2 teaspoons sodium lactate.
- In a large glass bowl, combine and melt the coconut oil, cocoa butter, olive oil, and palm oil (remember to fully melt then mix your entire container of palm oil before portioning).
- Once the lye water and the oils have cooled to 130 degrees F or below (and are ideally within 10 degrees of each other), add the lye water to the oils and stick blend until thin trace.
- Whisk in the Lavender 40/42 Essential Oil. Split off about 300 mL of soap into a separate container.
- To the large container, add all of the dispersed activated charcoal and use a whisk to mix in.
- Alternate pouring the white and black soap into the mold, until all the soap has been poured into the mold.
- Insert the Hanger Swirl Tool into the soap, and create 5-6 loops within the soap. Remove the Hanger Swirl Tool and tap the mold on the counter to help get rid of bubbles.
- Use a spoon to create a textured top. There is no right or wrong way to do this, so have fun with it! If the soap does not hold its shape, allow it to harden in the mold for several minutes and try again.
- Once you’re happy with the look, spritz the top with alcohol to prevent soda ash. Allow it to stay in the mold for 2-3 days. Cut into bars and allow it to cure for 4-6 weeks before using. Enjoy!