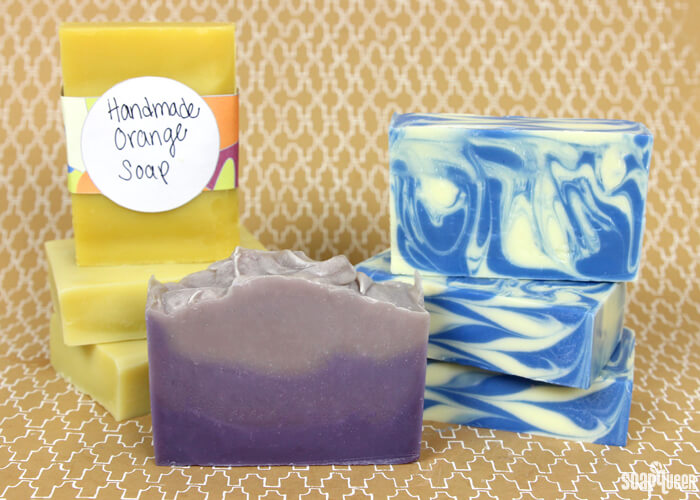
When starting to make cold process soap, it can be tempting to take the “go big, or go home,” approach. New soapers often want to dive in head first with layers, swirls and fragrances. While I completely understand the urge to make eye-catching soap, I always recommend starting with very basic recipe. A great place to start is a recipe that includes no colorants, design, or fragrance. I also highly recommend sticking to the three most basic soaping oils: olive, coconut and palm.

This might sound a little boring to some, but there is a lot to learn when making your first batch of cold process soap. First, you need to learn how to safely mix your lye solution. Then, you need to correctly mix and measure your soap making oils. Sometimes pouring the lye into your oils while holding your stick blender can feel a little funny, and your first batch of soap familiarizes you with this. Your first batch also teaches you what trace looks and “feels” like. In addition, you may need to line your mold.
All of this combined is plenty when just starting out! Don’t overload yourself. I have watched many beginner soapers become discouraged right off the bat, because they attempt techniques that even advanced soapers struggle with. Set yourself up for success, and keep it simple. Trust me =)
This tutorial is the first in the Back to Basics Cold Process Series. This series of tutorials includes four cold process recipes that are perfect for beginning soapers. The Back to Basics Soapmaking Kit includes all the soaping ingredients you need to create all four recipes, including the 10″ Silicone Mold. It’s also 35% off until July 31st! The only ingredient you need to buy separately is lye, and any tools you may need. A great way to receive the basic soaping tools is with the Beginner’s Soaping Tool Kit, or click the “Buy it Now” button for the tools necessary for this project, lye and kit to your cart to your cart separately.
![]()
Click here to add everything you need for this project to your Bramble Berry shopping cart!
 This project was designed for somebody who has never made cold process soap before. The recipe includes the three most common soaping oils, olive, palm and coconut. No colorants or fragrances are added. In addition, you can use almost any box or container that you may have on hand for your mold. We used a Medium Flat Rate Box from the USPS. This size created perfect thin bars that are easy to hold and use. Now, before we get started, let’s go over a few basic soaping terms. These words come up quite a bit in Soap Queen tutorials, and it’s helpful to have a solid grasp on them before moving forward with soap making.
Basic Cold Process Soap Terms
Saponification: Saponification refers to the chemical reaction that occurs when oil and lye molecules create new soap molecules.
Trace: Trace is a point in the soap making process when oils and lye water have emulsified and begins to thicken. Once the soap has reached thin trace, it will continue to thicken over time. Click here to read more about trace, including what thin, medium and thick trace looks like.
Emulsification/Emulsify: Emulsification is when the oils and lye solution have mixed together, and will not separate from each other. The term emulsify and trace are often used interchangeably.
Superfat: Soap is made by lye turning oil molecules into soap molecules. Any extra oil left in the soap and not attacked by the lye is called a ‘superfat.’ The terms ‘superfat’ and ‘lye discount’ can be used interchangeably. Click here to learn more about the term super fat.
Gel Phase: ‘Gelling’ and ‘gel phasing’ in cold process soap refers to a part of the saponification (soapmaking) process where the soap gets warm and gelatinous – up to 180 degrees. Gel phase results in brighter colors and a shinier, more translucent appearance. Click here to learn more about gel phase.
Soda Ash: Soda ash forms when unsaponified lye reacts with naturally occurring carbon dioxide in the air. The result is a white “ashy” appearance on the top of the soap. Soda ash is a harmless, and it’s most common on the surface of your cold process soaps, but sometimes soda ash can form throughout the middle of the bars. Click here to read more about soda ash, and how to avoid it.
Basic Cold Process Recipe (Super fat 5%):
8 oz. Coconut Oil (24%)
15 oz. Olive Oil (44%)
11 oz. Palm Oil (32%)
4.8 oz. Lye
11.2 oz. Distilled Water
This recipe is comprised of coconut oil, palm oil and olive oil. These three oils are some of the most common in soap making, and all offer something different to handmade soap. To learn more about properties of various common soap making oils, check out this blog post. Coconut and palm oil both give the soap firmness. Olive oil gives soap a mild and creamy lather. Coconut oil is very cleansing in nature, and gives the soap a large lather.
A very common soaping recipe is 33% coconut oil, 34% olive oil and 33% palm oil. Some people feel that soap containing more than 25-30% coconut oil is drying. This is a personal preference, but this recipe was formulated to accommodate sensitive skins. The olive oil was increased to ensure the bars are gentle. This recipe contains a 5% superfat. This means that 5% of the oils in this recipe were not turned into soap, and are “free floating” in the soap. In other words, this recipe contains 5% less lye than necessary to turn 100% of the oils into soap.
To learn more about formulating your cold process recipes, check out this blog post. The How to Substitute Oil in Cold Process Recipes also has some great information for formulating your own cold process recipes. Now, let’s get started making soap!
If you’ve never made Cold Process soap before, stop here! I highly recommend checking out our FREE four part SoapQueen.tv series on Cold Process Soapmaking, especially the episode on lye safety. And if you’d rather do some reading, Bramble Berry carries a wide range of books on the topic, including my newest book, Soap Crafting. You can also checkout the digital downloads for that instant gratification factor. I also recommend reviewing the first blog post in this series, which is all about how to handle lye safely.
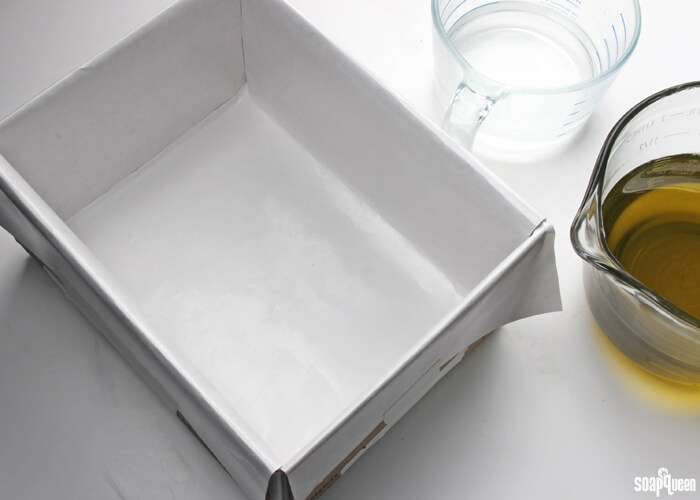
Prepare your Mold: For this recipe, we are going to use a box rather than a mold. To turn any box into a soap making mold, it first needs to be lined with freezer paper. Freezer paper is heavy duty and durable, and has one side that is shiny. This side needs to be facing up. Learn how to line molds including recycled boxes in this blog post. In particular, we are using a USPS Medium Flat Rate Box. The inside dimensions are 11″ x 8-1/2″ x 5-1/2″.
Set Up Your Area: Before soaping, it’s helpful to have your soaping area prepared before you start. While soaping, you don’t want to be running around looking for a spatula or whisk! Because this recipe does not have any complicated designs, the tools are minimal. But you will need your fully lined mold, prepared lye water, pre-mixed oils, stick blender, and a spatula. Check out the Soapy Session Preparation and Setup Guide for tips.
SAFETY FIRST: Suit up for safe handling practices! That means goggles, gloves and long sleeves. Make sure kids, pets, and other distractions and tripping hazards are out of the house or don’t have access to your soaping space. Always soap in a well-ventilated area.
ONE: Slowly and carefully add the lye to the water and gently stir until the lye has fully dissolved and the liquid is clear. Set aside to cool.
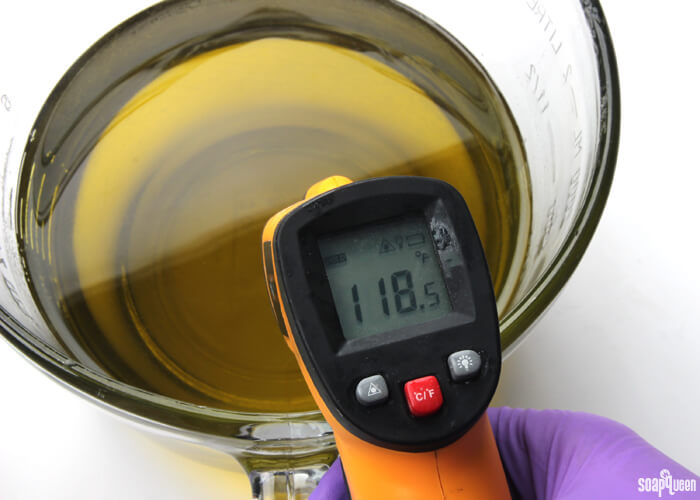
TWO: Combine the coconut oil, olive oil and palm oil (remember to fully melt then mix your entire container of palm oil before portioning). Allow the lye water and the oils to cool to 130°F or below (and are ideally within 10 degrees of each other). For this recipe, both the oils and lye were around 120°F.
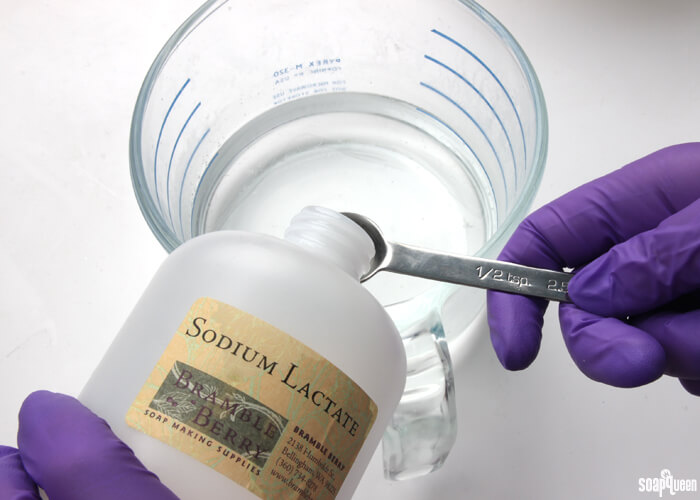
If you’d like a harder bar of soap that releases faster from the mold, you can add sodium lactate to the cooled lye water. Use 1 teaspoon of sodium lactate per pound of oils in the recipe. For this recipe, you’d add about 2 tsp. sodium lactate.
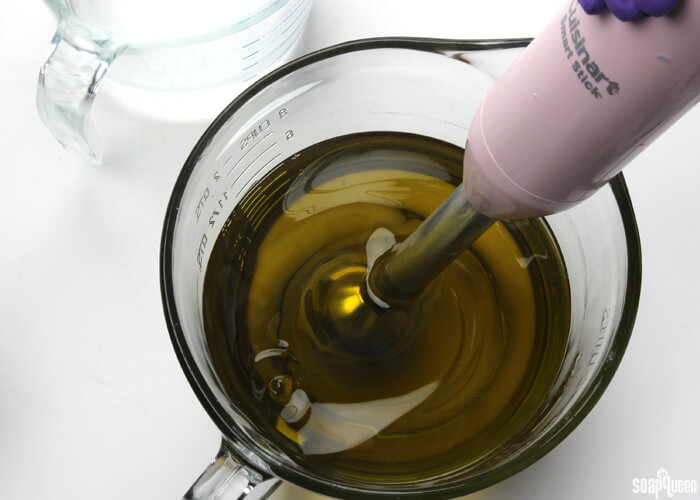
 THREE: Place your stick blender into the oils. Gently tap the blender on the bottom of the bowl several times to release any bubbles that got trapped by the stick blender head. This is called, “burping the stick blender.”
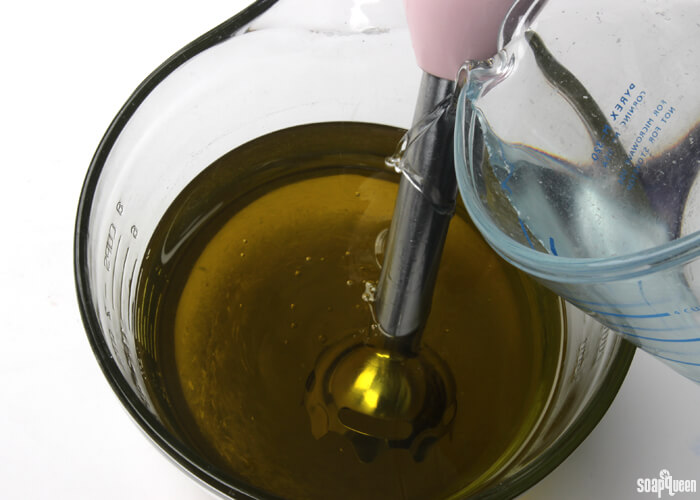
 FOUR: Once bubbles no longer rise to the surface of the oils, gentle pour the cooled lye water down the shaft of the stick blender and into the oils.
 FIVE: Turn on the stick blender and pulse several times. You will immediately see the lye and oils begin to come together, and begin to create a creamy yellow color. Alternate between using the stick blender to stir the mixture, and pulsing the stick blender. After about 30 seconds, test for trace. Because this recipe contains a large amount of olive oil, it will stay at a thin trace longer than recipes with fast moving oils such as butters.
 Below, you can see that when the stick blender is pulled out of the mixture, the drips or trailings of soap do not suspend on the top. This soap is still a very thin trace. For some recipes, you may want to stop here. Because this recipe does not need color or fragrance, keep pulsing and stirring with the stick blender.
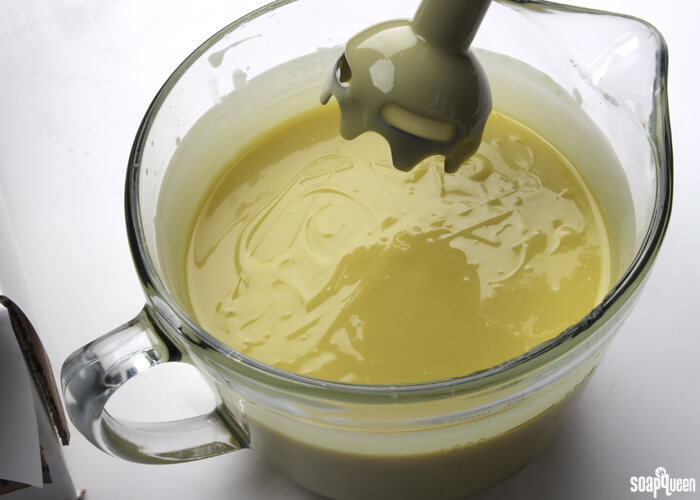
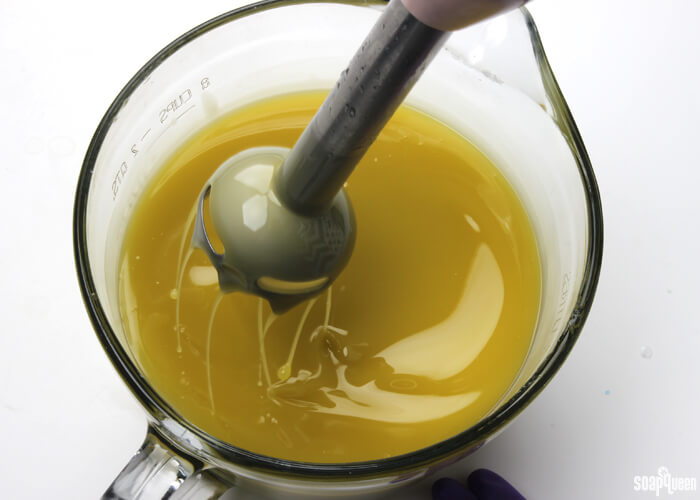 SIX: As you continue to pulse and stir with the stick blender, you may notice the soap starting to lighten in color. It will also start to become thicker. Below is a good example of medium trace. The soap is thick enough to support the trailings and drops on the surface. It’s slightly thinner than pudding. This is a great consistency!
https://instagram.com/p/5aQps4A5lW
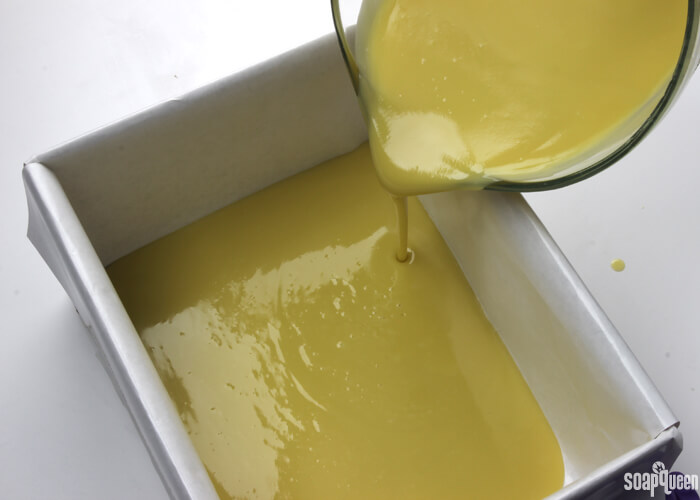
SEVEN: Once your soap has reached medium trace, pour it into the mold until all the soap is in the mold. Scrape the sides of the bowl to ensure you get every last bit of soap!

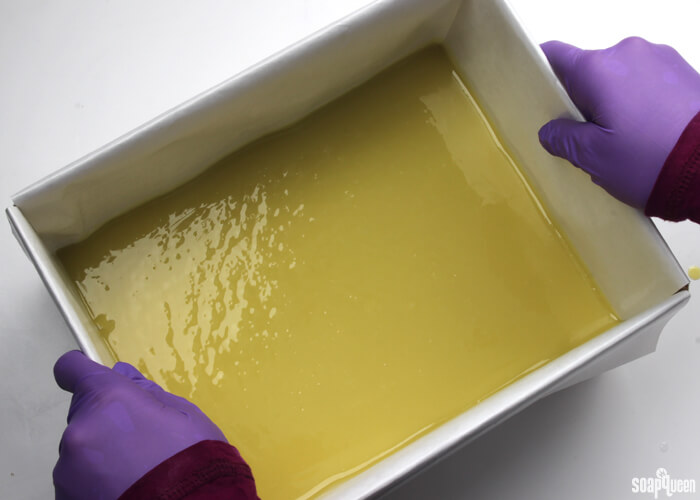
 EIGHT: Once the soap is all poured into the mold, firmly tap the box on the counter. Doing so will help bubbles within the soap to come to the surface. Make sure you still have your goggles on! Sometimes soap can jump up during this process =) Spray the top of the soap with 99% isopropyl alcohol. Doing so helps to avoid soda ash from forming. Allow the soap to sit in the mold for 3-4 days. Unmold, and cut into bars. Allow the soap to cure for 4-6 weeks. During this time, water evaporates from the soap making it firmer and longer lasting in the shower. The soap can be used before the full cure time, but will not last as long. It’s best to wait!
Seasoned soapers, what kind of recipe did you make for your first cold process project? Did you bite off more than you could chew? I would love to hear about your experience! If you are a newbie, I hope you give this project a try =)

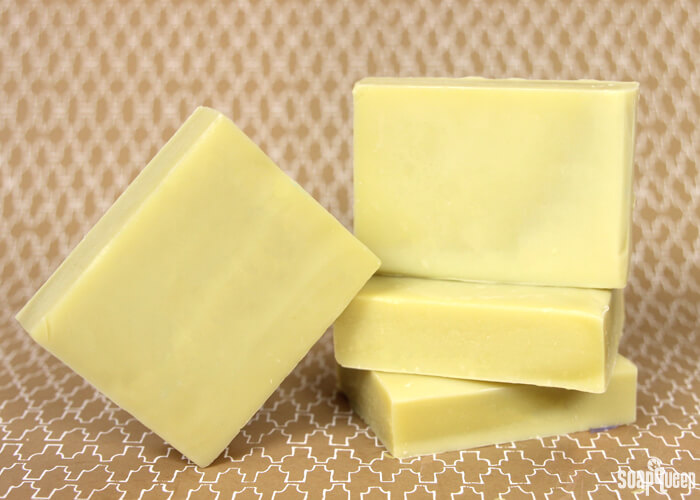
Back to Basics: Simple & Gentle Cold Process Soap
Ingredients
- 8 oz. Coconut Oil 24%
- 15 oz. Olive Oil 44%
- 11 oz. Palm Oil 32%
- 4.8 oz. Lye
- 11.2 oz. Distilled Water
Instructions
Prepare your Mold: For this recipe, we are going to use a box rather than a mold. To turn any box into a soap making mold, it first needs to be lined with freezer paper. Freezer paper is heavy duty and durable, and has one side that is shiny. This side needs to be facing up. Learn how to line molds including recycled boxes in this blog post.
Set Up Your Area: Before soaping, it’s helpful to have your soaping area prepared before you start. While soaping, you don’t want to be running around looking for a spatula or whisk! Because this recipe does not have any complicated designs, the tools are minimal. But you will need your fully lined mold, prepared lye water, pre-mixed oils, stick blender, and a spatula. Check out the Soapy Session Preparation and Setup Guide for tips.
SAFETY FIRST: Suit up for safe handling practices! That means goggles, gloves and long sleeves. Make sure kids, pets, and other distractions and tripping hazards are out of the house or don’t have access to your soaping space. Always soap in a well-ventilated area.
- ONE: Slowly and carefully add the lye to the water and gently stir until the lye has fully dissolved and the liquid is clear. Set aside to cool.
- Combine the coconut oil, olive oil and palm oil (remember to fully melt then mix your entire container of palm oil before portioning). Allow the lye water and the oils to cool to 130 degrees or below (and are ideally within 10 degrees of each other). For this recipe, both the oils and lye were around 120 degrees. If you’d like a harder bar of soap that releases faster from the mold, you can add sodium lactate to the cooled lye water. Use 1 teaspoon of sodium lactate per pound of oils in the recipe. For this recipe, you’d add about 2 tsp. sodium lactate.
- Place your stick blender into the oils. Gently tap the blender on the bottom of the bowl several times to release any bubbles that got trapped by the stick blender head. This is called, “burping the stick blender.”
- Once bubbles are no longer rising to the surface of the oils, gentle pour the cooled lye water down the shaft of the stick blender and into the oils.
- Turn on the stick blender and pulse several times. You will immediately see the lye and oils begin to come together, and begin to create a creamy yellow color. Alternate between using the stick blender to stir the mixture, and pulsing the stick blender. After about 30 seconds, test for trace. Because this recipe contains a large amount of olive oil, it will stay at a thin trace longer than recipes with fast moving oils such as butters.
- As you continue to pulse and stir with the stick blender, you may notice the soap starting to lighten in color. It will also start to become thicker. Below is a good example of medium trace. The soap is thick enough to support the trailings and drops on the surface. It’s slightly thinner than pudding. This is a great consistency!
- Once your soap has reached medium trace, pour it into the mold until all the soap is in the mold. Scrape the sides of the bowl to ensure you get every last bit of soap!
- Once the soap is all poured into the mold, firmly tap the box on the counter. Doing so will help bubbles within the soap to come to the surface. Make sure you still have your goggles on! Sometimes soap can jump up during this process =)
- Spray the top of the soap with 99% isopropyl alcohol. Doing so helps to avoid soda ash from forming. Allow the soap to sit in the mold for 3-4 days. Unmold, and cut into bars. Allow the soap to cure for 4-6 weeks. During this time, water evaporates from the soap making it firmer and longer lasting in the shower. The soap can be used before the full cure time, but will not last as long. It's best to wait!