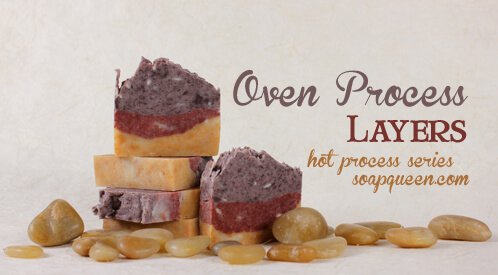
Ever wondered what the difference is between CPOP, HPOP, and CPHP? I’m hoping to set the record straight when it comes to various methods of using heat to aid in the soapmaking process. Or, at the very least, I’ve set out to tell my own accounts of what happens when I soap with these different methods. I’ve already rocked out some CPOP and CPHP tutorials, and today we’ll be visiting HPOP.
HPOP: Hot Process Oven Process. This method of using hot process calls for heat being applied while the soap spends time in the oven. Like the oven’s purpose in CPOP, and the crock pot’s purpose in CPHP, the oven facilitates holding the temperature of the soap at or above 160 degrees, speeding up the saponification process. Remember from the CPOP post that according to Professor Kevin M. Dunn, author of Caveman Chemistry and Scientific Soapmaking, heat speeds along the saponification process. The major difference is that HPOP cooks the soap in oven before it goes into the mold instead of after, which gives the finished soap a more rustic look. Questions? Check out the FAQs at the end of the post!
Click here to tweet this tutorial!
Recipe:
0.2 oz. Castor Oil
4.6 oz. Coconut Oil
2.3 oz. Hempseed Oil
5.8 oz. Olive Oil
4.6 oz. Palm Oil
5.5 oz. Rice Bran Oil
3.14 oz. Sodium Hydroxide (Lye)
7.6 oz. Distilled Water
1.5 tsp. Sodium Lactate
0.4 oz. Gardenia Fragrance Oil
0.4 oz. Lemongrass Essential Oil
0.4 oz. Patchouli Essential Oil
2 teaspoons Purple Brazilian Clay
2 teaspoons Yellow Brazilian Clay
2 teaspoons Dark Red Brazilian Clay
2 pound Wood Loaf Mold with Wingnuts
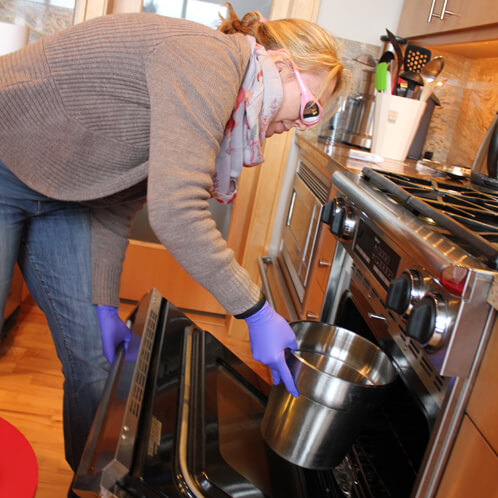
Oven-safe Container (I used the stainless steel vessel from a Crock Pot)
Click here to add everything you need for this recipe to your Bramble Berry shopping cart!
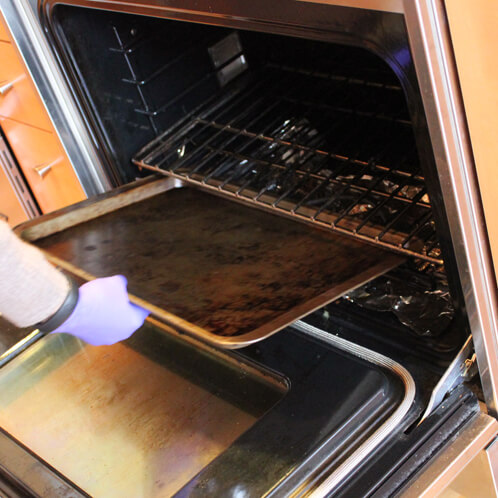
OVEN PREP: Adjust the racks in the oven so that there is one rack on the lowest notch, and one rack just above it. Be sure that the central rack isn’t too close to any heating elements. Line the bottom of the oven with foil, or place an old cookie sheet on the bottom rack (in case of soap overflow). Preheat the oven to 170 degrees Fahrenheit.
COLOR PREP: Disperse the clays in water. The Yellow and Dark Red Clays get 1.5 Tablespoons of water, and the Purple gets 1 Tablespoon of water. Use a mini mixer to make quick work of the dispersing, but be sure to saturate the clays in the water with the tip of the mixer before turning it on (or you’ll wind up with a bit of a mess!). The reason we disperse the clays in water is to make them easier to mix in. Also, clays absorb water so they can make your soap crack (if they absorb the water in your soap).
MOLD PREP: Line the Wood Mold with freezer paper shiny side up. In this tutorial, I used an early-release exclusive-to-Bramble Berry silicone liner for the 2 pound molds.
SAFETY FIRST: Suit up for safe handling practices! Goggles, gloves, and long sleeves are your soap making uniform. Be sure that kids and pets are out of the house or unable to access your soaping space, and always soap in a well-ventilated area. Make sure the soap volume will not fill up more than half of your crock pot. If you have never made cold process soap before, I highly recommend you get a couple of basic recipes under your belt before trying out this tutorial. Check out this (free!) 4-part series on cold process soap making, especially the episode on lye safety. Bramble Berry carries quite a few books on the topic as well, including this downloadable e-book on making cold process soap.
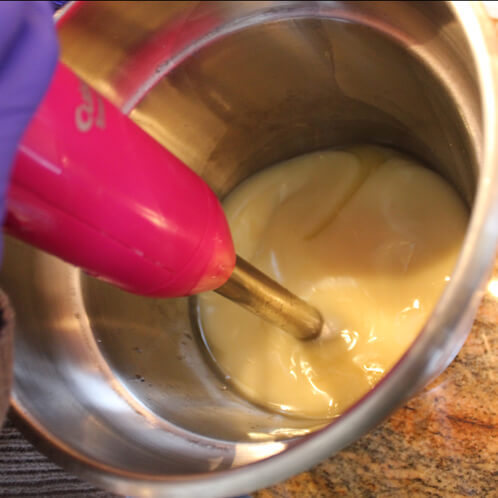
ONE: Carefully add the lye to the water and stir until clear. Set aside to cool.
TWO: Melt and combine the Coconut and Palm Oils in your oven-safe container or the microwave. Add the Castor, Hempseed, Olive, and Rice Bran Oils and stir well.
THREE: Once the lye water and oils have cooled to 130 degrees Fahrenheit, slowly and carefully add the lye water to the oils. You can pour down the shaft of your stick blender or spatula to prevent bubbles. Stick blend the mixture until light trace is achieved. Do not fill your pot over half full. Every so often, the soap can foam up during this process and make a mess in your stove. More headspace will help to prevent this.
FOUR: Place the soap in your pre-heated oven and set the timer for 15 minutes. I took the opportunity to write some Christmas cards!
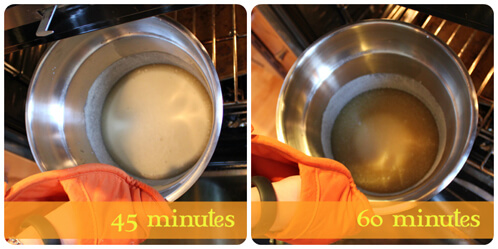
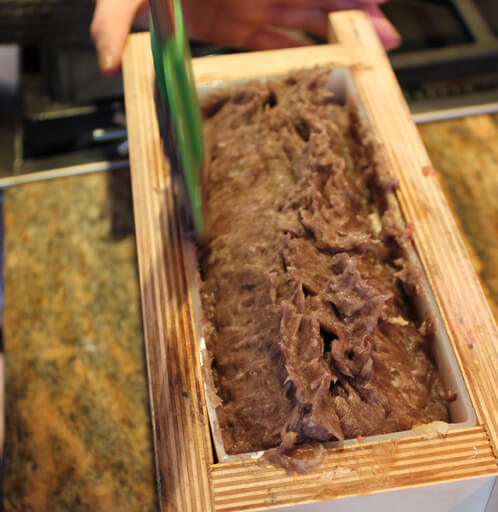
FIVE: Check the status after 15 minutes. Has the soap started to gel yet? You can tell that the soap is starting to gel when you see a darker-hued and gelatinous-looking ring starting to form. Nothing yet? Stick that batch back in the oven for another 15 minutes. My soap wasn’t even hinting at gel phase after the first 15 minutes.
SIX: Repeat step five until your soap has gone through a full gel phase, meaning the entire soap has taken on the darker-hued and gelatinous look. My soap reached partial gel phase (darker-hued and gelatinous-looking ring around the outside) after 45 minutes, and full gel phase after 60 minutes.
SEVEN: Once your soap has fully gelled, remove the soap from the oven (note: I am wearing hot pad gloves; you should too) and add 1.5 teaspoons Sodium Lactate. Stir up the soap; it should have the consistency of mashed potatoes when it mixes, not too wet and not too dry. Add the Patchouli Essential Oil, Lemongrass Essential Oil, and Gardenia Fragrance Oil and mix well.
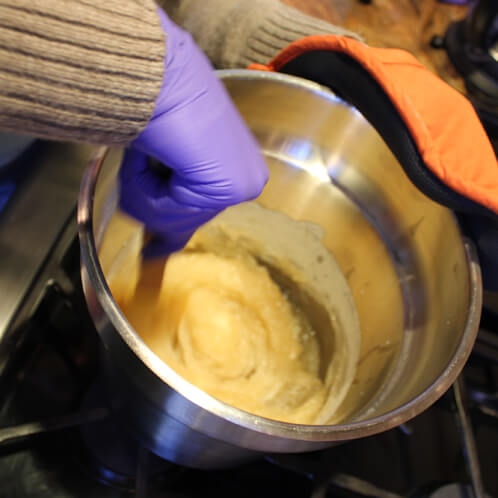
NOTE: For the next steps, be prepared to move quickly! The soap may start to harden/dry up, and you want to be able to get all of your colors mixed in and the soap in the mold before that happens.
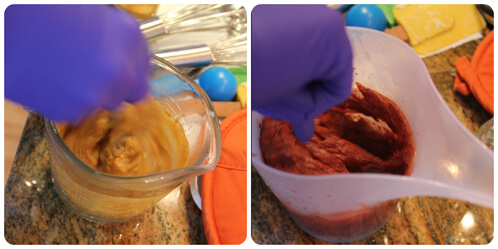
EIGHT: Split the soap into three equal parts. You can just eyeball each portion. Color each of the parts as follows: 3.5 teaspoons dispersed Yellow Clay, 1.5 Tablespoons dispersed Dark Red Clay, and all of the dispersed Purple Clay. Mix in well.
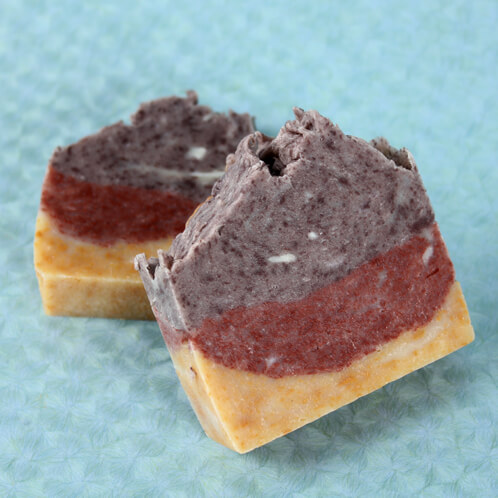
NINE: Pour (or plop) the soap into the mold, starting with the Yellow colored soap. Once all of the Yellow soap is in the mold, spread it out using a spatula to create a perfectly imperfect layer, then tamp the mold on the table to eliminate air bubbles. Follow the Yellow soap with the Dark Red soap, plopping the soap on top of the Yellow layer then spreading it out with a spatula. Tamp the mold to remove air bubbles, then pour the final Purple layer.
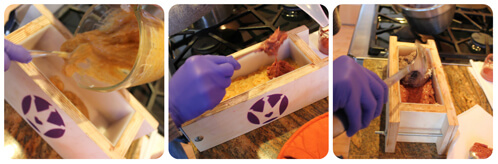
TEN: Use a spatula on the final layer to create soapy peaks. Allow the soap to sit in the mold for 24 – 48 hours. Unmold, cut, and this soap is ready to use right away (but it will last longer in the shower if you allow it the standard 4-6 week drying time).
FAQ section
Q: Why sodium lactate?
A: I find that it helps to keep the soap workable, longer. It’s optional.
Q: How is this different than traditional hot process?
A: The concept is the same but the method of heat delivery is different. You don’t need to buy a crockpot (yay!). The soap turns out remarkably similar looking.
Q: I simply hate that rustic look. How can I make this smoother?
A: You can make it smoother by adding more liquids at the end – liquid oils, water, teas etc… Keep in mind that more liquid = longer curing and drying time.
Q: What molds can I use?
A: Any mold that can sustain temps of 170 degrees. All of the Heavy Duty Molds, Milky Way Molds, Silicone molds and most wooden molds can easily sustain these temperatures.
Q: What fragrance oils and essential oils can I use?
A: Anything that is safe for skin – no potpourri or candle fragrances. Some more delicate essential oils, like orange essential oil, for example, may not make it with the extra heat