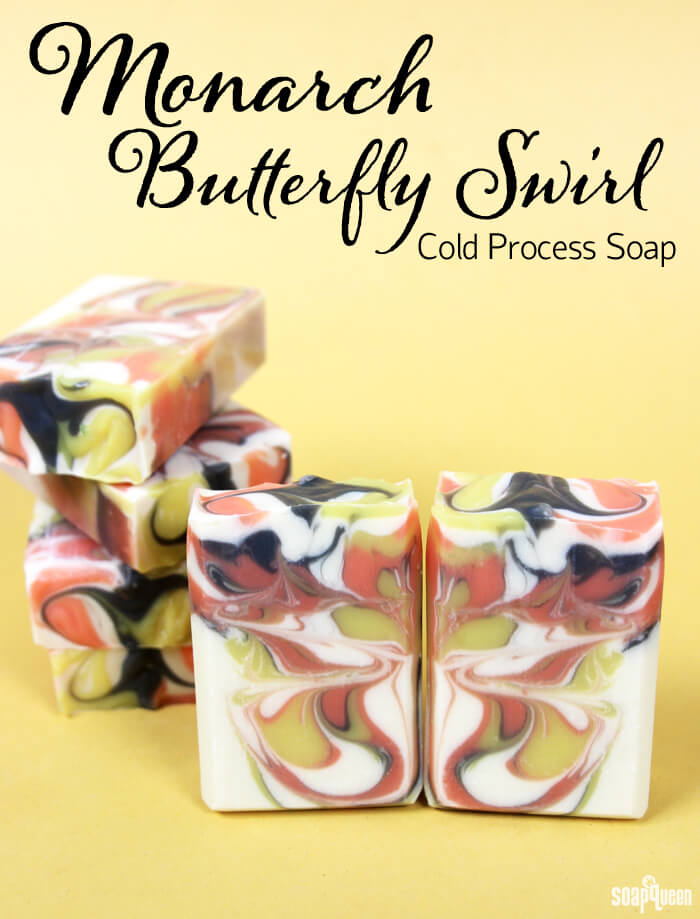
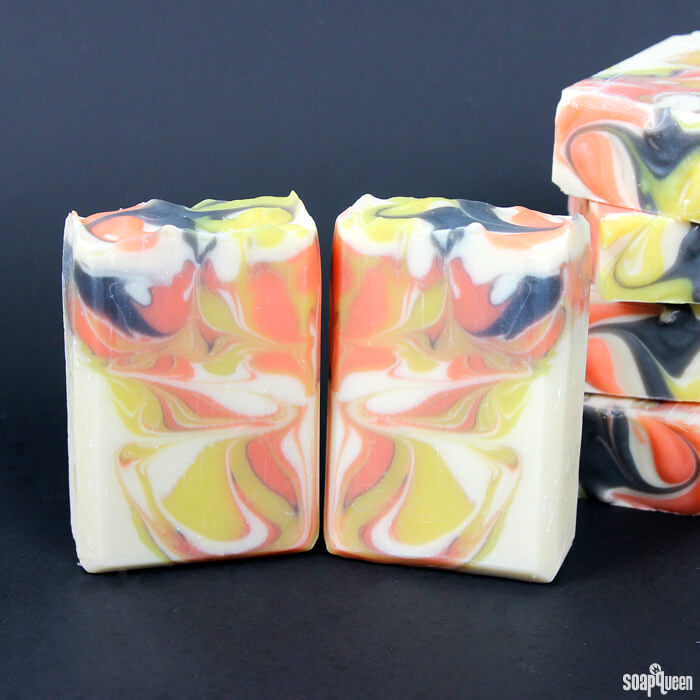
With gorgeous orange, yellow and black wings, the monarch may be the most recognizable type of butterfly. It lives in warm climates such as Mexico, California and along the Gulf Coast, and is known for its annual migration from Eastern North America to Mexico. This Monarch Butterfly Swirl Cold Process was inspired by these gorgeous insects. Layers of monarch-colored soap are poured into the mold and swirled with a hanger swirl tool to create the effect of butterfly wings.
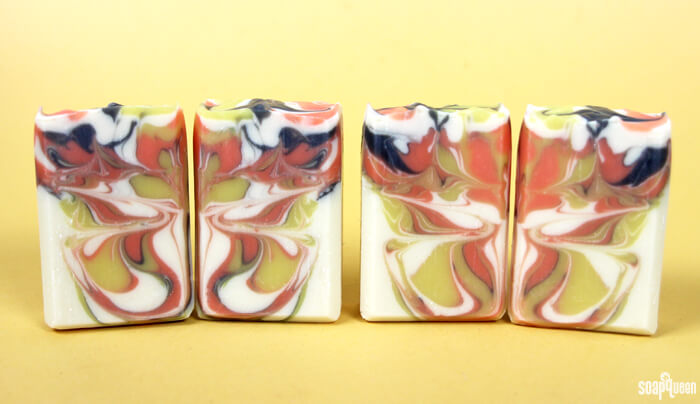
The fun part about the butterfly swirl is that every bar looks unique. When the bars are placed side by side, the butterfly image really pops. This technique was created by Zahida of Handmade in Florida, click here to read our interview with her.

What You’ll Need:
Tall Narrow Wood Loaf Mold
Hanger Swirl Tool
38 oz. Swirl Quick Mix
5.2 oz. Sodium Hydroxide Lye
12.5 oz. Distilled Water
2.7 oz. Pure Honey Fragrance Oil
Titanium Dioxide
Tangerine Wow! Colorant
Black Oxide Pigment
Fizzy Lemonade Colorant
Yellow Oxide

Click here to add everything you need for this project to your Bramble Berry shopping cart!
If you’ve never made Cold Process soap before, stop here! I highly recommend checking out our FREE four part SoapQueen.tv series on Cold Process Soapmaking, especially the episode on lye safety. And if you’d rather do some reading, Bramble Berry carries a wide range of books on the topic, including my newest book, Soap Crafting. You can also checkout the digital downloads for that instant gratification factor.
SAFETY FIRST: Suit up for safe handling practices! That means goggles, gloves and long sleeves. Make sure kids, pets, and other distractions and tripping hazards are out of the house or don’t have access to your soaping space. Always soap in a well-ventilated area.
COLOR PREP: To ensure that the Titanium Dioxide blends smoothly into the soap batter, we recommend micronizing it before dispersing it in oil. Please note this is an optional tip but it does help with the titanium dioxide clumping in the soap =) To micronize colorant, simply use a coffee grinder to blend the colorant to break up any clumps of color and prevent streaks of white from showing in the final soap. We like to use a coffee grinder that has a removable, stainless steel mixing area for easy cleaning. Then, disperse 2 teaspoons of the colorant into 2 tablespoons of sunflower or sweet almond oil (or any other liquid oil). In separate containers, disperse 1 teaspoon of the Black Oxide, 1 teaspoon Yellow Oxide, 1 teaspoon Fizzy Lemonade Colorant, and 1 teaspoon Tangerine Wow! Colorant into 1 tablespoon of a light liquid oil. Use a mini mixer to get the clumps of color worked out smoothly.
MOLD & TOOL PREP: Line the Tall Narrow Wood Loaf Mold with freezer paper with the shiny side up. For tips on how to line the mold, click here. Bend your hanger tool so it fits the mold perfectly by length.
ONE: Slowly and carefully add the lye to the water and gently stir until the lye has fully dissolved and the liquid is clear. Set aside to cool.
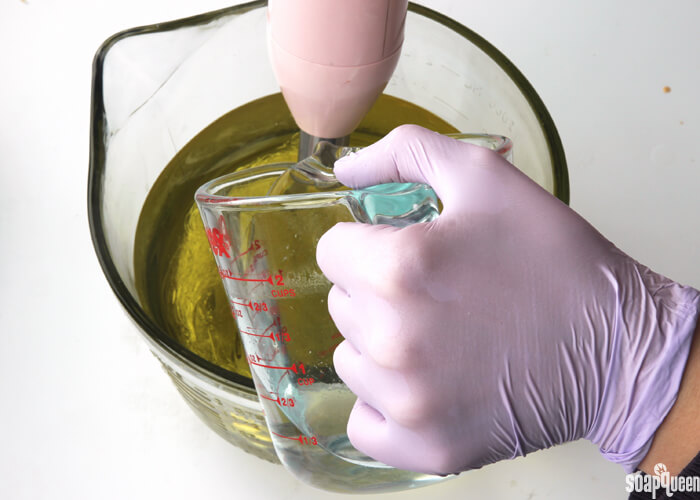
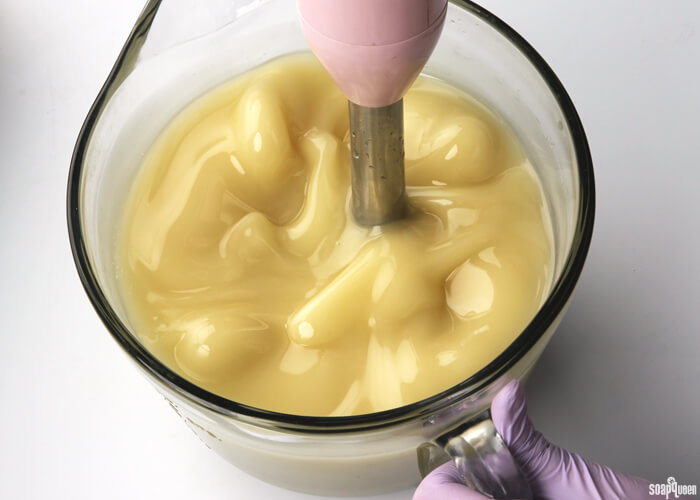
TWO: Melt the Swirl Quick Mix completely. Once the lye water and the oils have cooled to 130 degrees or below (and are ideally within 10 degrees of each other), add the lye water to the oils and stick blend until thin trace. If you’d like a harder bar of soap that releases faster from the mold, you can add sodium lactate to the cooled lye water. Use 1 teaspoon of sodium lactate per pound of oils in the recipe. For this recipe, you’d add about 3 tsp. sodium lactate.
 THREE: Once the batter has reached a light trace, split the batch into four separate containers. The largest container should contain about 700 mL, two containers should contain about 400 mL and the last container should contain about 150 mL. To the containers, add the colorants listed below:
- Container A (700 mL): 2 Tbs. dispersed Titanium Dioxide
- Container B (400 mL) 1 tsp. dispersed Fizzy Lemonade Colorant + 1/4 tsp. dispersed Yellow Oxide
- Container C (400 mL) 2 tsp. Tangerine Wow! Colorant + 1/2 tsp. dispersed Yellow Oxide
- Container D (150 mL): 1/2 tsp. dispersed Black Oxide
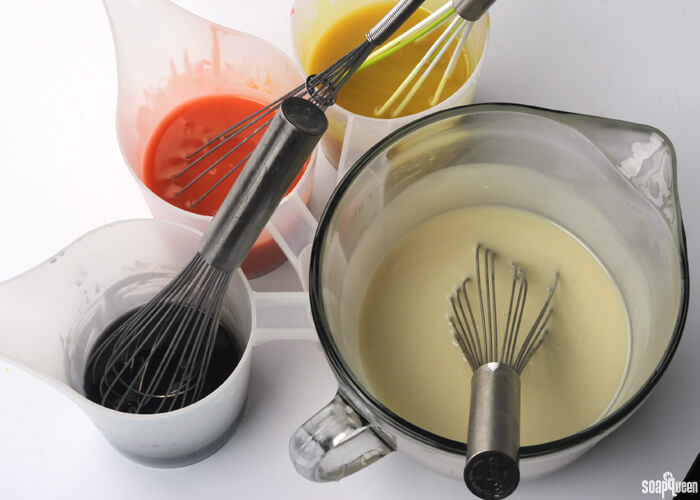
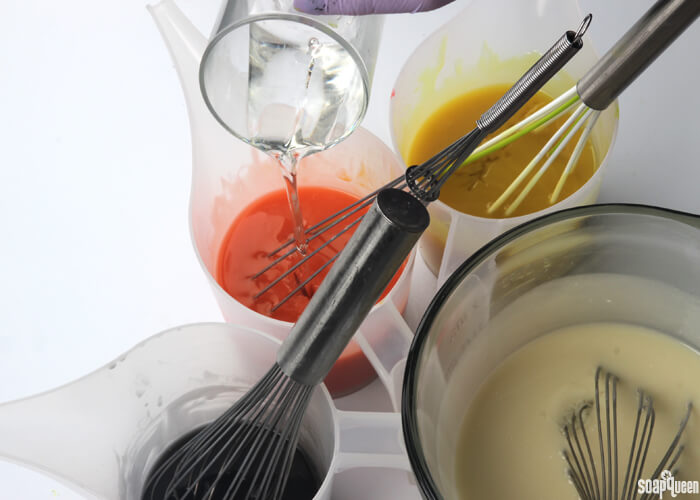
FOUR: Add the fragrance oil proportionately into each container. It’s okay to eyeball it! Use a whisk to thoroughly mix in in fragrance oil.
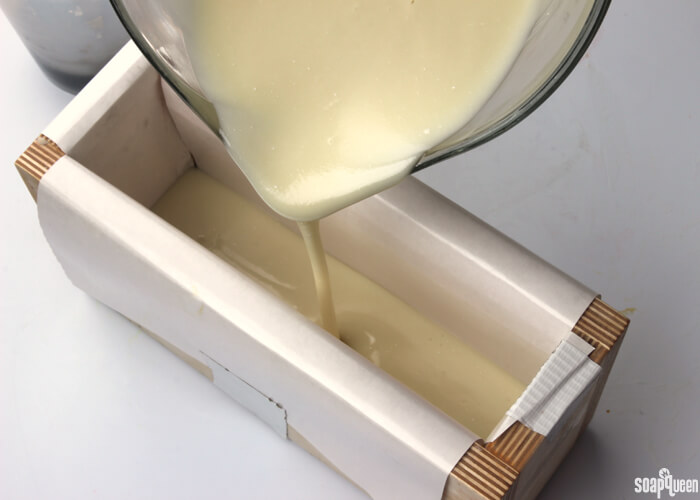
FIVE: Pour about 1/3 of the white soap into the mold. Tap the mold on the counter to get rid of any bubbles.
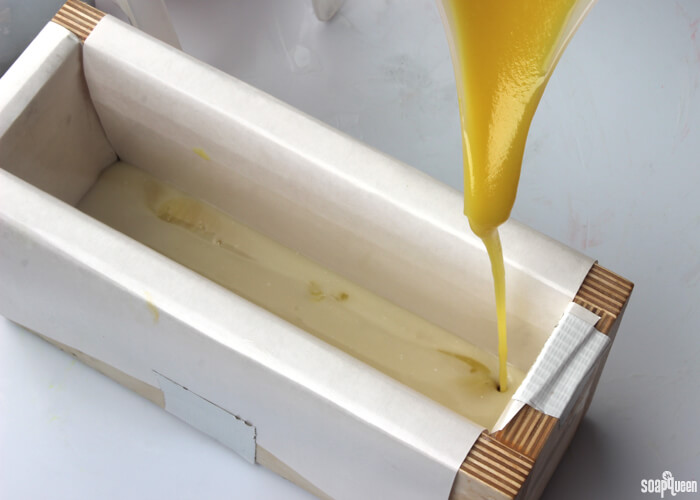
SIX: Holding the yellow soap several inches above the mold, pour about 1/3 of the yellow soap into the mold, allowing the yellow soap to break through into the white. Concentrate the pour into one side of the mold. Pouring the colors into one side helps produce the butterfly wings in the final cut.
 SEVEN: Holding the black soap above the mold, pour about 1/3 of the soap directly over the yellow soap pour. Again from several inches above the mold, pour about 1/3 of the orange soap and the white soap.
EIGHT: Cycle through the yellow, white, black and orange colors until the majority of all the soap has been poured. Save a small amount of white to cover the top, and a small amount of each color to create a swirl on top.
 NINE: Firmly tap the mold on the counter to settle the soap and release any air bubbles. Line the hanger tool up alongside the length of the mold on the side closest to you. Insert it all the way to the bottom of the mold. Then, move the hanger in circular motions toward yourself starting at the bottom and spiraling towards the top. After you have completed about 4-5 circles, pull the hanger toward you and out of the mold.
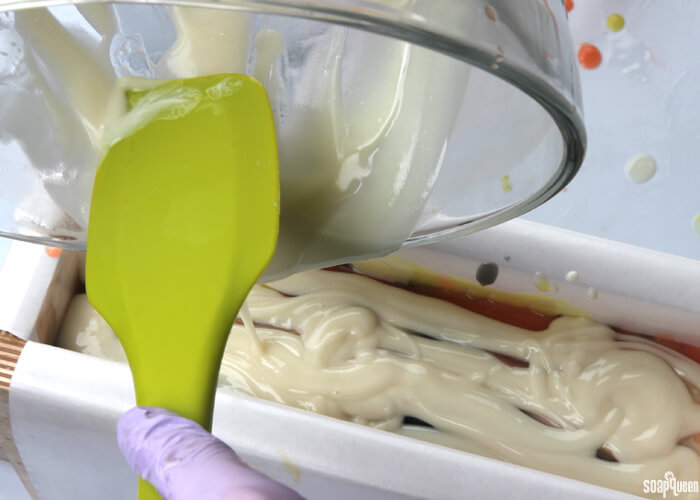
TEN: Tap the mold firmly on the counter to release air bubbles. Gently pour the remaining white soap on top. Use a spoon or spatula to even out the white soap.
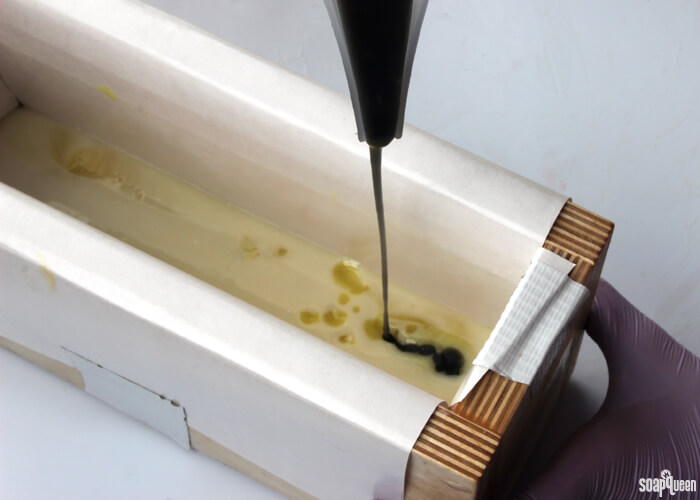
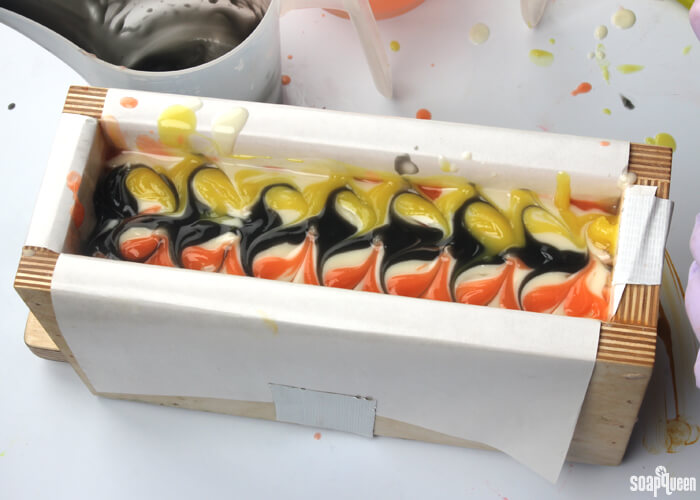
 ELEVEN: Carefully pour a line of black soap down the center of the mold on top of the white soap. Don’t worry about the line looking perfect. Then, create a line of orange and yellow soap on either side of the black line, leaving a small amount of white in between each line.
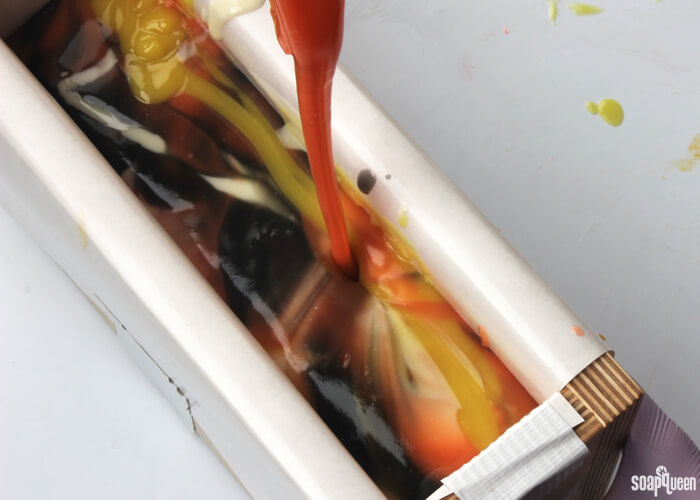
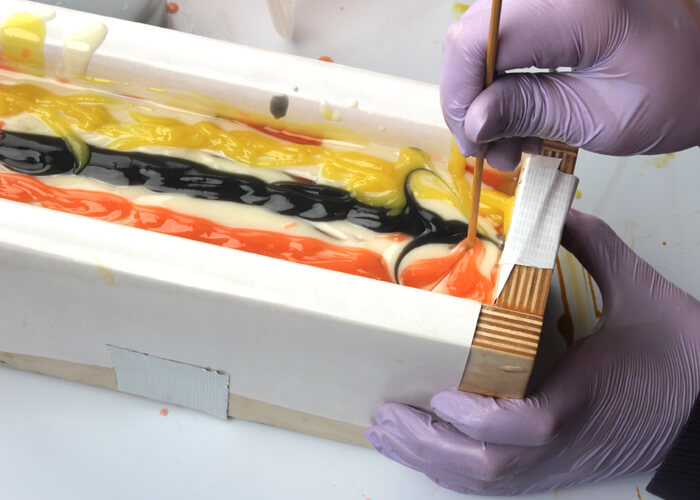
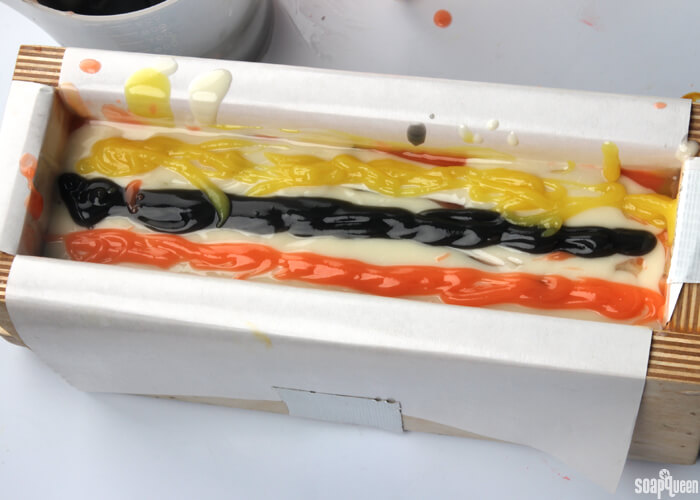 TWELVE: Insert the tip of a dowel or chopstick into the very top layer of the black soap. Drag the chopstick up and through the yellow soap, creating a half-heart shape. Repeat this motion into the orange soap. Imagine you are creating small hearts, or butterflies in the top of the soap.
 THIRTEEN: Repeat this swirl process until you reach the end of the mold. Tap the mold firmly on the counter to release any air bubbles, and spray with 99% isopropyl alcohol to prevent soda ash. Cover with the lid of the mold. Insulate the mold for 24 hours. Unmold after 3-4 days, cut into bars, and allow to cure for 4-6 weeks.

Monarch Butterfly Swirl Cold Process Tutorial
Ingredients
- Tall Narrow Wood Loaf Mold
- Hanger Swirl Tool
- 38 oz. Swirl Quick Mix
- 5.2 oz. Sodium Hydroxide Lye
- 12.5 oz. Distilled Water
- 2.7 oz. Pure Honey Fragrance Oil
- Titanium Dioxide
- Tangerine Wow! Colorant
- Black Oxide Pigment
- Fizzy Lemonade Colorant
- Yellow Oxide
Instructions
SAFETY FIRST: Suit up for safe handling practices! That means goggles, gloves and long sleeves. Make sure kids, pets, and other distractions and tripping hazards are out of the house or don’t have access to your soaping space. Always soap in a well-ventilated area.
COLOR PREP: To ensure that the Titanium Dioxide blends smoothly into the soap batter, we recommend micronizing it before dispersing it in oil. Please note this is an optional tip but it does help with the titanium dioxide clumping in the soap =) To micronize colorant, simply use a coffee grinder to blend the colorant to break up any clumps of color and prevent streaks of white from showing in the final soap. We like to use a coffee grinder that has a removable, stainless steel mixing area for easy cleaning. Then, disperse 2 teaspoons of the colorant into 2 tablespoon of sunflower or sweet almond oil (or any other liquid oil). In separate containers, disperse 1 teaspoon of the Black Oxide, 1 teaspoon Yellow Oxide, 1 teaspoon Fizzy Lemonade Colorant, and 1 teaspoon Tangerine Wow! Colorant into 1 tablespoons of a light liquid oil. Use a mini mixer to get the clumps of color worked out smoothly.
MOLD & TOOL PREP: Line the Tall Narrow Wood Loaf Mold with freezer paper with the shiny side up. For tips on how to line the mold, click here. Bend your hanger tool so it fits the mold perfectly by length. Bend your hanger tool so it fits the mold perfectly by length.
- Slowly and carefully add the lye to the water and gently stir until the lye has fully dissolved and the liquid is clear. Set aside to cool.
- Melt the Swirl Quick Mix completely. Once the lye water and the oils have cooled to 130 degrees or below (and are ideally within 10 degrees of each other), add the lye water to the oils and stick blend until thin trace. If you’d like a harder bar of soap that releases faster from the mold, you can add sodium lactate to the cooled lye water. Use 1 teaspoon of sodium lactate per pound of oils in the recipe. For this recipe, you’d add about 3 tsp. sodium lactate.
- Once the batter has reached a light trace, split the batch into four separate containers. The largest container should contain about 700 mL, two containers should contain about 400 mL and the last container should contain about 150 mL. To the containers, add the colorants listed below:
Container A (700 mL): 2 Tbs. dispersed Titanium Dioxide
Container B (400 mL) 1 tsp. dispersed Fizzy Lemonade Colorant + 1/4 tsp. dispersed Yellow Oxide
Container C (400 mL) 2 tsp. Tangerine Wow! Colorant + 1/2 tsp. dispersed Yellow Oxide
Container D (150 mL): 1/2 tsp. dispersed Black Oxide - Add the fragrance oil proportionately into each container. It’s okay to eyeball it! Use a whisk to thoroughly mix in in fragrance oil.
- Pour about 1/3 of the white soap into the mold. Tap the mold on the counter to get rid of any bubbles.
- Holding the yellow soap several inches above the mold, pour about 1/3 of the yellow soap into the mold, allowing the yellow soap to break through into the white. Concentrate the pour into one side of the mold. Pouring the colors into one side helps produce the butterfly wings in the final cut.
- Holding the black soap above the mold, pour about 1/3 of the soap directly over the yellow soap pour. Again from several inches above the mold pour about 1/3 of the orange soap and the white soap.
- Cycle through the yellow, white, black and orange colors like this until the majority of all the soap has been poured. Save a small amount of white to cover the top, and a small amount of each color to create a swirl on top.
- Firmly tap the mold on the counter to settle the soap and release any air bubbles. Line the hanger tool up alongside the length of the mold on the side closest to you. Insert it all the way to the bottom of the mold then move the hanger in circular motions towards yourself starting at the bottom spiraling towards the top. After you have completed about 4-5 circles, pull the hanger towards you and out of the mold.
- Tap the mold firmly on the counter to release air bubbles. Gently pour the remaining white soap on top. Use a spoon or spatula to even out the white soap.
- Carefully pour a line of black soap down the center of the mold on top of the white soap. Don’t worry about the line looking perfect. Then, create a line of orange and yellow soap on either side of the black line, leaving a small amount of white in between each line.
- Insert the tip of a dowel or chopstick into the very top layer of the black soap. Drag the chopstick up and through the yellow soap, creating a half-heart shape. Repeat this motion into the orange soap. Imagine you are creating small hearts, or butterflies in the top of the soap.
- Repeat this swirl process until you reach the end of the mold. Tap the mold firmly on the counter to release any air bubbles, and spray with 99% isopropyl alcohol to prevent soda ash. Cover with the lid of the mold. Insulate the mold for 24 hours. Unmold after 3-4 days, cut into bars, and allow to cure for 4-6 weeks.