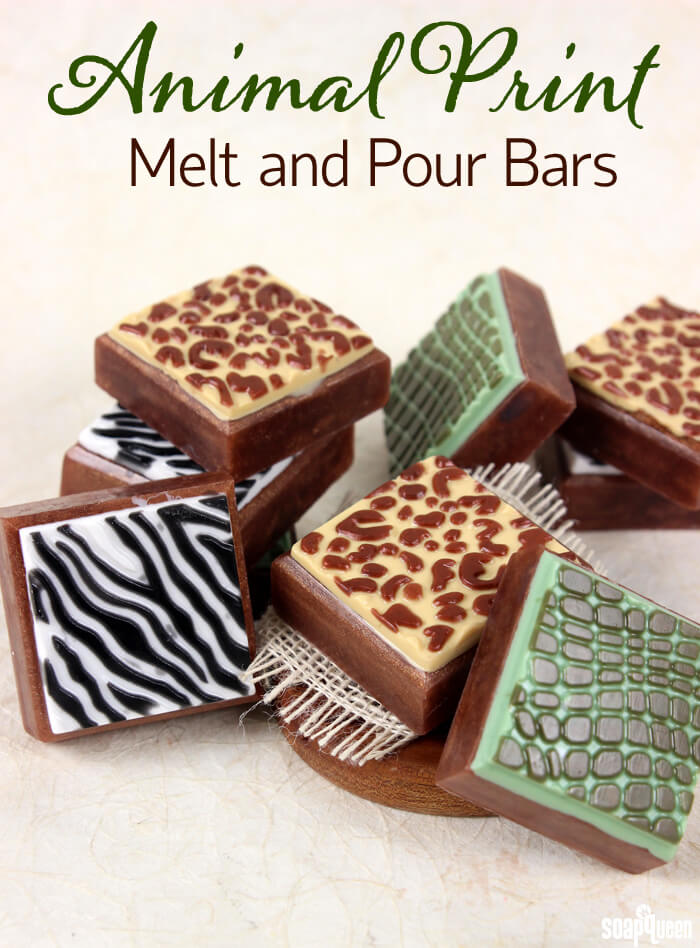
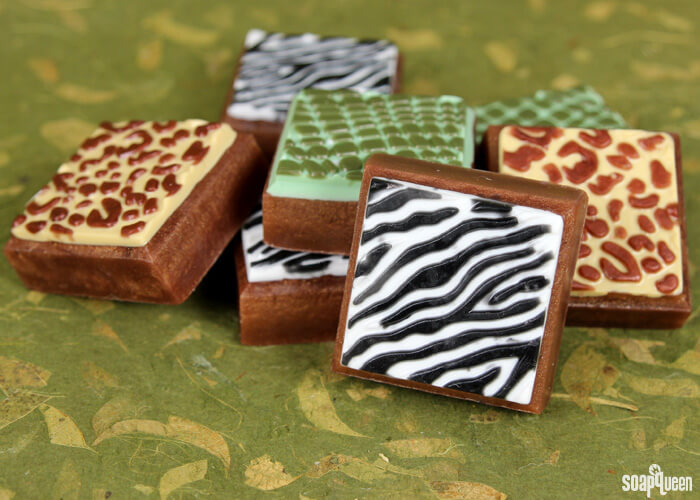
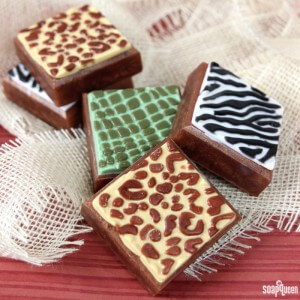
Zebras, alligators and leopards…oh my! This melt and pour project is straight from an African safari. Made with the Animal Print Tray Mold, this project creates nine bars of soap with three different animal prints. Each print is filled in with various colors using a dropper for precise color placement. Scented with Sandalwood Vanilla Fragrance Oil, these bars smell warm, creamy and woodsy.
For this project, having a spray bottle of 99% isopropyl alcohol is a must. Rubbing alcohol helps layers of melt and pour stick together. The alcohol also helps disperse any bubbles that can occur after pouring. I recommend putting it into a spray bottle to make spraying easy.
What You’ll Need:
Tray Animal Prints Mold
15 oz. White Melt and Pour Base
36 oz. Clear Melt and Pour Base
.7 oz. Sandalwood Vanilla Fragrance Oil
.7 oz. Vanilla Color Stabilizer
Shimmer Cappuccino Color Block
Black Oxide Color Block
Yellow Oxide Color Block
Super Pearly White Color Block
Chrome Green Color Block
Shimmer Sparkle Gold Color Block
99% Isopropyl Alcohol
Droppers

Click here to add everything you need for this project to your Bramble Berry shopping cart!
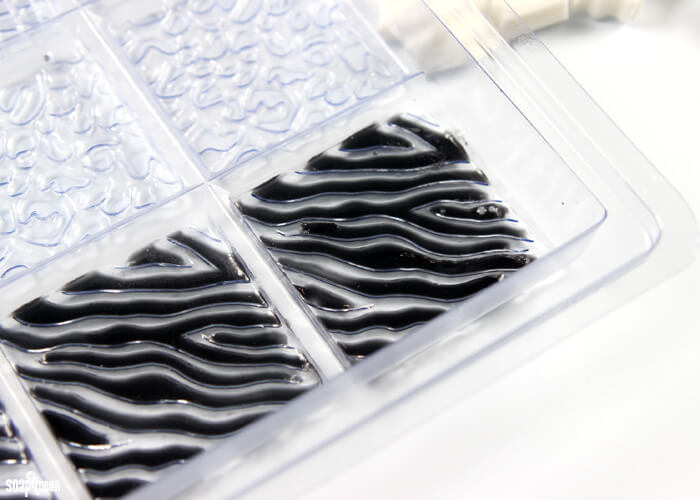
ONE: Chop and melt 2 oz. of the Palm Free Melt and Pour base in the microwave using 10 second bursts. Note: The Palm Free Base has been discontinued. It has been replaced with Clear Melt and Pour Base. Using very short bursts will help prevent burning such a small amount of melt and pour. Once melted, add shavings of the Black Oxide Color Block until you achieve a rich black color. Spray the mold with rubbing alcohol, and use the droppers to fill in the zebra stripes. Spritz while filling in the stripes to help break apart any bubbles.

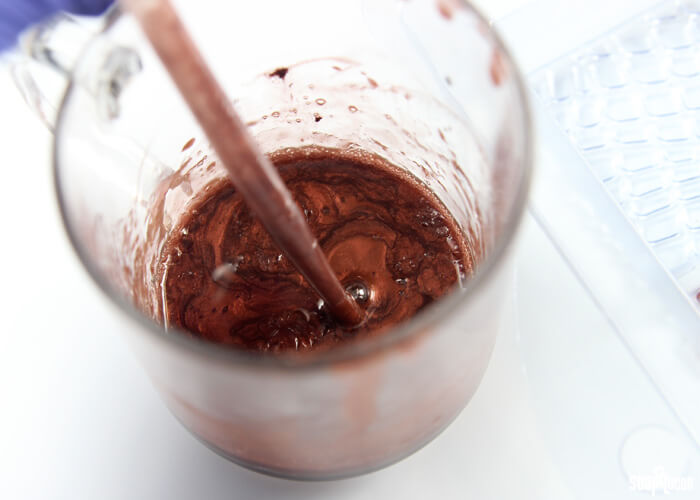
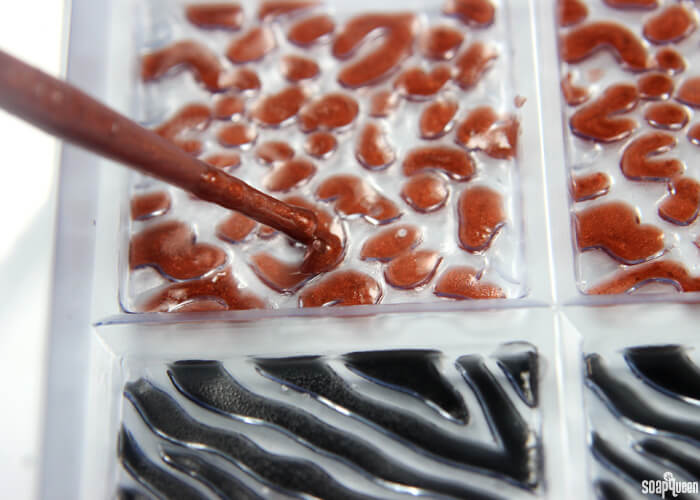
TWO: Chop and melt 2 oz. of the Clear Melt and Pour base in the microwave using 10 second bursts. Using very short bursts will help prevent burning such a small amount of melt and pour. Once melted, add shavings of the Shimmer Cappuccino Color Block until you achieve a rich bronze color. Spray the mold with rubbing alcohol, and use the droppers to fill in the leopard spots. Spritz while filling in the stripes to help break apart any bubbles.
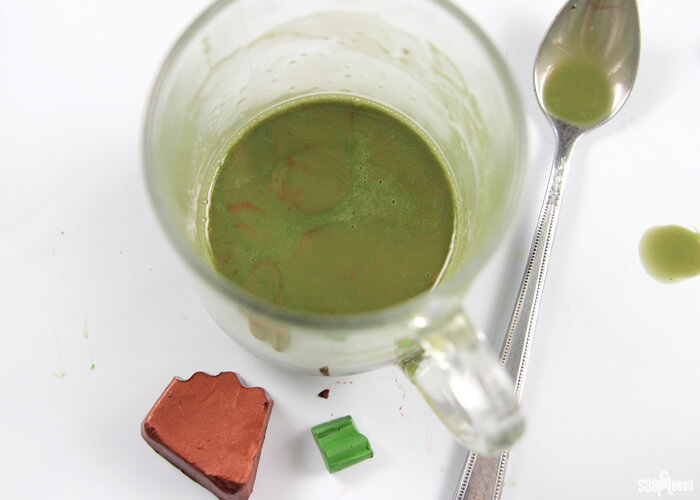
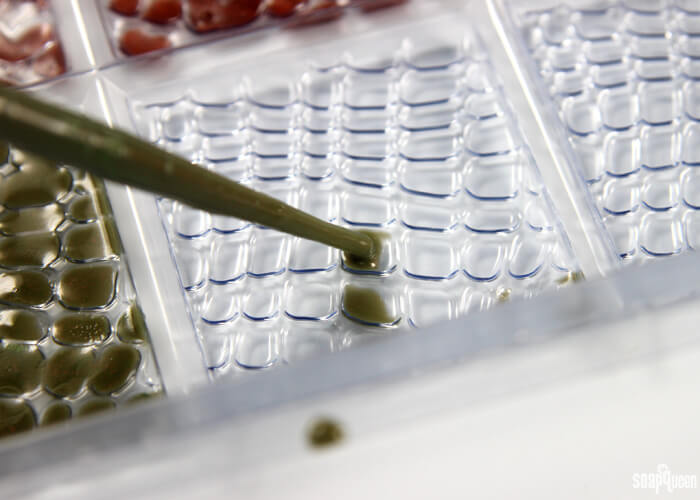
THREE: Chop and melt 2 oz. of the Clear Melt and Pour base in the microwave using 10 second bursts. Using very short bursts will help prevent burning such a small amount of melt and pour. Once melted, add shavings of the Chrome Green Color Block and shavings of the Shimmer Cappuccino Color Block. We used about twice the amount of the green color block to achieve the color below. Once you have developed a deep earthy green, spray the mold with rubbing alcohol. Use the droppers to fill in the alligator print. Spritz while filling in the stripes to help break apart any bubbles.
FOUR: Allow the small details to cool and harden completely. This will happen rather quickly, about 20 minutes or so.
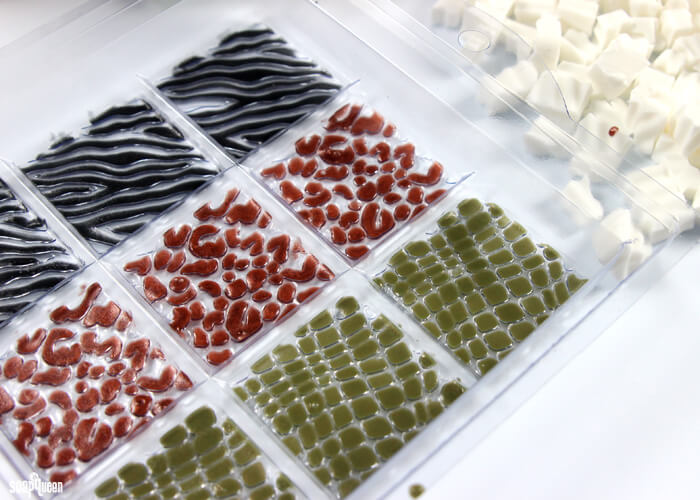
FIVE: Chop and melt 5 ounces of the white melt and pour in the microwave using 15 second bursts. Add shavings of the Super Pearly White Color Block to give the soap a light shimmer. Once the soap is below 130 ° F, spray the mold with 99% alcohol and gently pour the white soap into the zebra squares. Do not allow the white soap to pour into the other cavities. Spritz the top with alcohol to disperse any bubbles. Allow to cool and harden.
Repeat this process with the leopard and animal squares. For the alligator print, add shavings of the Chrome Green Oxide to achieve a light green color. For the leopard squares, add shavings of the Yellow Oxide Color Block to achieve a light yellow color. Before pouring each layer, don’t forget to spray with alcohol to help them adhere. Also, be sure to allow the soap to cool to 130 ° or below so it does not melt and small details. Allow all the cavities to cool and harden completely.

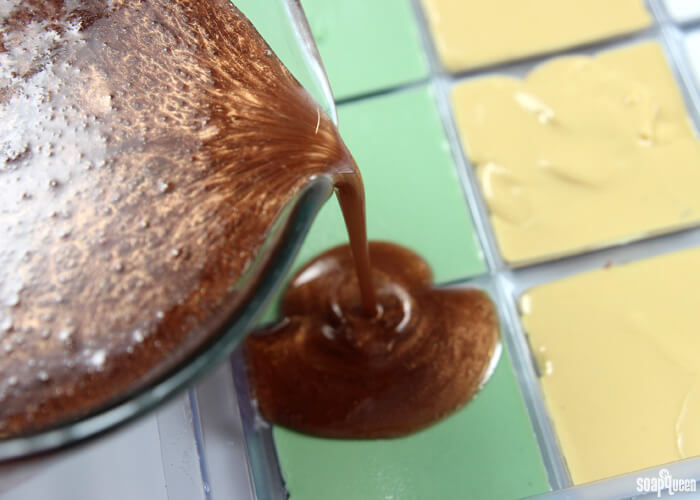
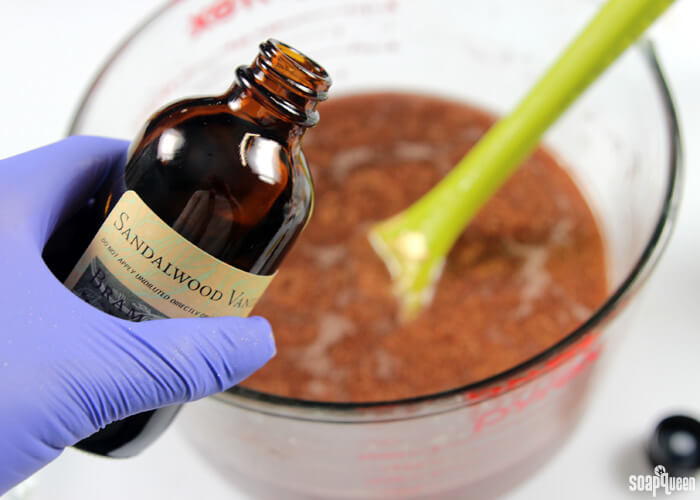
SIX: Once the cavities have melted, chop and melt 30 ounces of Clear Melt and Pour Base in the microwave using 30 second bursts. Stir in between each burst to help the soap melt evenly. Add shavings of the Gold Sparkle Color Block and Shimmer Cappuccino Color Block until you achieve a rich, sparkly copper color. Add the Sandalwood Vanilla Fragrance Oil and Vanilla Color Stabilizer and stir to fully combine. Adding Vanilla Color Stabilizer helps keep the soap a lighter brown color. Learn more in the Why Did My Soap Turn Brown post. Once the soap has reached 130 ° or below, spray the bottom layer with rubbing alcohol. Gently pour the melted soap into the mold, and spritz with alcohol to disperse any bubbles. Allow to fully cool and harden.
Once the soap is completely cool, remove the entire block from the mold by breaking the airlock. To do this, use your palm to firmly press the front of the mold. Once the entire block is removed, use a sharp knife to cut along the scores into bars. Enjoy!

Do you have a favorite animal print? I love leopard! =)
Animal Print Melt and Pour Bars Tutorial
Ingredients
- Tray Animal Prints Mold
- 15 oz. White Melt and Pour Base
- 36 oz. Clear Melt and Pour Base Clear
- .7 oz. Sandalwood Vanilla Fragrance Oil
- .7 oz. Vanilla Color Stabilizer
- Shimmer Cappuccino Color Block
- Black Oxide Color Block
- Yellow Oxide Color Block
- Super Pearly White Color Block
- Chrome Green Color Block
- Shimmer Sparkle Gold Color Block
- 99 % Isopropyl Alcohol
- Droppers
Instructions
- Chop and melt 2 oz. of the Clear Melt and Pour base in the microwave using 10 second bursts. Using very short bursts will help prevent burning such a small amount of melt and pour. Once melted, add shavings of the Black Oxide Color Block until you achieve a rich black color. Spray the mold with rubbing alcohol, and use the droppers to fill in the zebra stripes. Spritz while filling in the stripes to help break apart any bubbles.
- Chop and melt 2 oz. of the Clear Melt and Pour base in the microwave using 10 second bursts. Using very short bursts will help prevent burning such a small amount of melt and pour. Once melted, add shavings of the Shimmer Cappuccino Color Block until you achieve a rich bronze color. Spray the mold with rubbing alcohol, and use the droppers to fill in the leopard spots. Spritz while filling in the stripes to help break apart any bubbles.
- Chop and melt 2 oz. of the ClearMelt and Pour base in the microwave using 10 second bursts. Using very short bursts will help prevent burning such a small amount of melt and pour. Once melted, add shavings of the Chrome Green Color Block and shavings of the Shimmer Cappuccino Color Block. We used about twice the amount of the green color block to achieve the color below. Once you have developed a deep earthy green, spray the mold with rubbing alcohol. Use the droppers to fill in the alligator print. Spritz while filling in the stripes to help break apart any bubbles.
- Allow the small details to cool and harden completely. This will happen rather quickly, it will take about 20 minutes.
- Chop and melt 5 ounces of the white melt and pour in the microwave using 15 second bursts. Add shavings of the Super Pearly White Color Block to give the soap a light shimmer. Once the soap is below 130 ° F, spray the mold with 99% alcohol and gently pour the white soap into the zebra squares. Do not allow the white soap to pour into the other cavities. Spritz the top with alcohol to disperse any bubbles. Allow to cool and harden.
- Repeat this process with the leopard and animal squares. For the alligator print, add shavings of the Chrome Green Oxide to achieve a light green color. For the leopard squares, add shavings of the Yellow Oxide Color Block to achieve a light yellow color. Before pouring each layer, don’t forget to spray with alcohol to help them adhere. Also, be sure to allow the soap to cool to 130 ° or below so it does not melt and small details. Allow all the cavities to cool and harden completely.
- Once the cavities have melted, chop and melt 30 ounces of Clear Melt and Pour Base in the microwave using 30 second bursts. Stir in between each burst to help the soap melt evenly. Add shavings of the Gold Sparkle Color Block and Shimmer Cappuccino Color Block until you achieve a rich, sparkly copper color. Add the Sandalwood Vanilla Fragrance Oil and Vanilla Color Stabilizer and stir to fully combine. Once the soap has reached 130 ° or below, spray the bottom layer with rubbing alcohol. Gently pour the melted soap into the mold, and spritz with alcohol to disperse any bubbles. Allow to fully cool and harden.
- Once the soap is completely cool, remove the entire block from the mold by breaking the airlock. To do this, use your palm to firmly press the front of the mold. Once the entire block is removed, use a sharp knife to cut along the scores into bars. Enjoy