
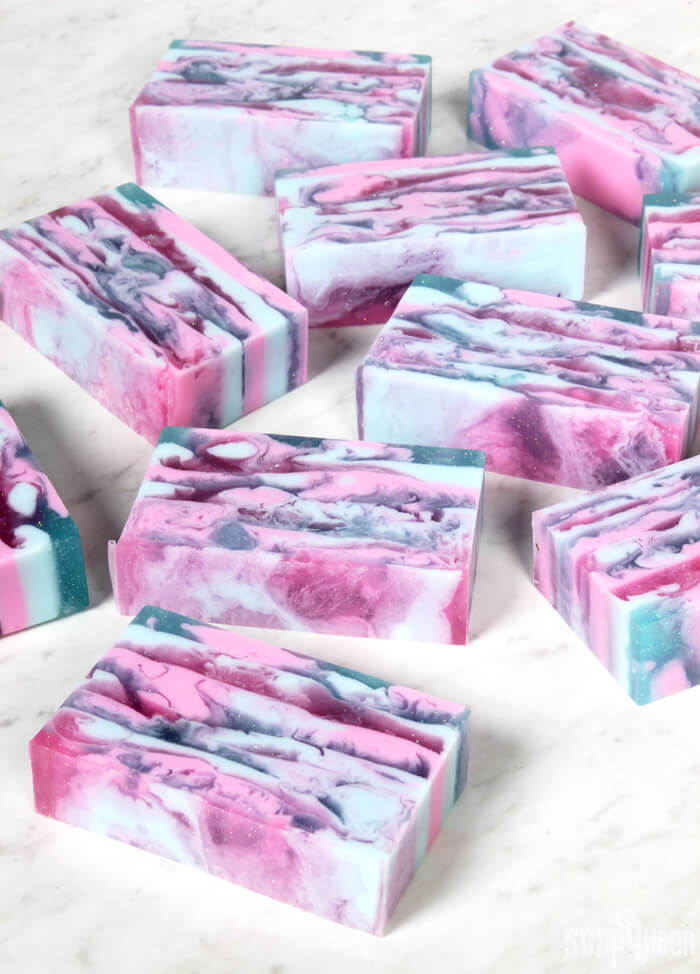
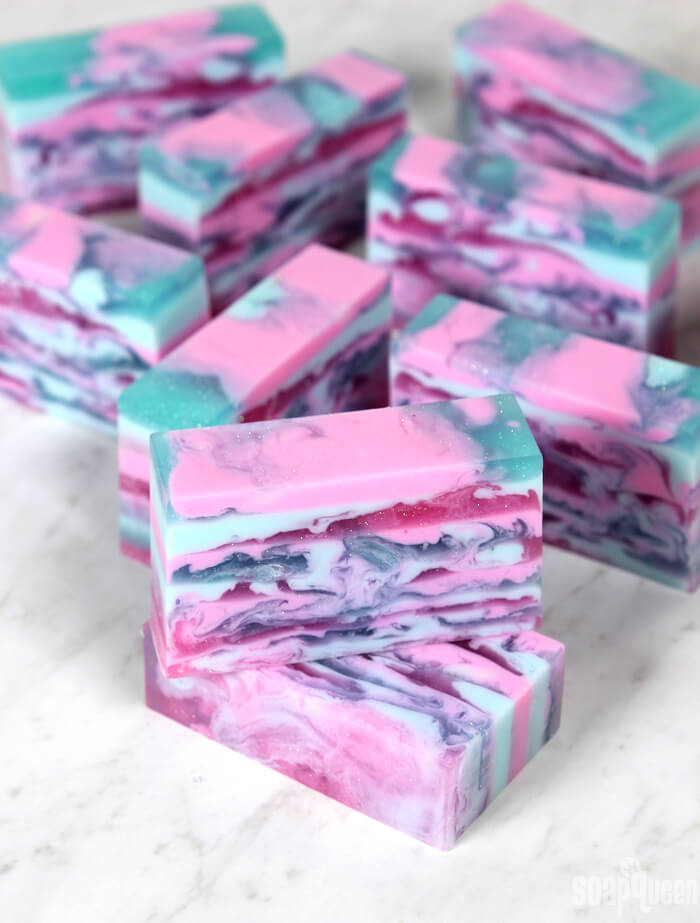
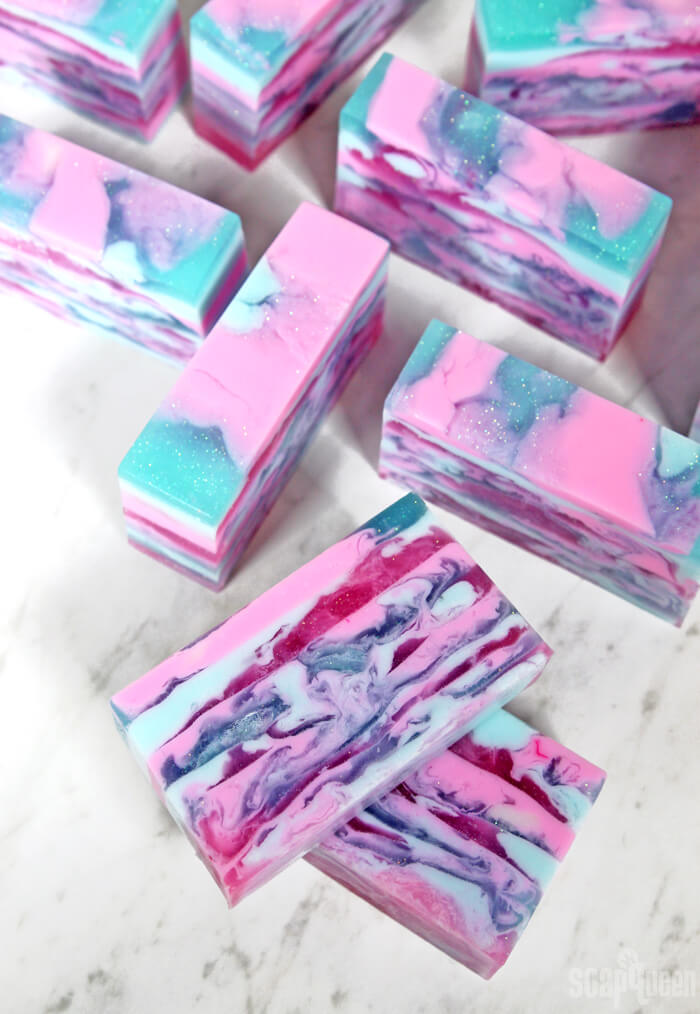
When I think of cotton candy, memories of eating the sticky treat at the fair instantly come to mind. I also think about the dreamy pink and blue pastel shades (Pantone 2016 colors of the year anybody?). The Cotton Candy Fragrance Oil smells just like the real thing. So much so that I had to create soap with cotton candy inspired pink and blue pastel colors.
The pink and blue shades are created by mixing Neon Blue Raspberry Color Block and Electric Bubble Gum Color Block with White Melt and Pour Soap Base. For contrast, I also added the Color Blocks to Clear Melt and Pour Soap Base, along with plenty of glitter. The soap is swirled together while layering for an eye-catching effect. It looks a little space-like, don’t you think? Like a cotton candy galaxy! =)
This melt and pour project isn’t difficult necessarily, but it does require an understanding of how melt and pour soap behaves at different temperatures. If you’ve never swirled melt and pour soap before, see my tips here. I definitely recommend having a thermometer for this project to check temperatures. A spray bottle of 99% isopropyl alcohol is also a must. Without spraying alcohol before each layer, they may not stick together. This project is great for making with a friend! It can be nice to have somebody keeping an eye on melt and pour temperatures, and to help spray the alcohol after each step.
What You’ll Need:
10″ Silicone Loaf Mold
26 oz. Clear Melt and Pour Soap Base
26 oz. White Melt and Pour Soap Base
0.4 oz. Cotton Candy Fragrance Oil
0.4 oz. Vanilla Color Stabilizer
Neon Blue Raspberry Color Block
Electric Bubble Gum Color Block
1/2 tsp. Fine Iridescent Glitter
99% Isopropyl Alcohol in Spray Bottle

Click here to add everything you need for this project to your Bramble Berry shopping cart!

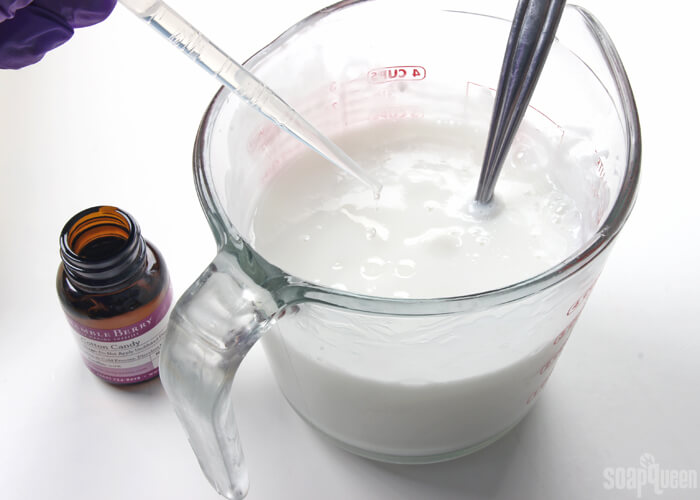
ONE: Chop 26 ounces of White Melt and Pour Soap Base and 26 ounces of Clear Melt and Pour Soap Base into small uniform cubes. Place them in the microwave and melt both containers using 30-60 second bursts. Once melted, add 0.2 ounces of Cotton Candy Fragrance Oil and 0.2 ounces Vanilla Color Stabilizer to both containers and use a spoon to mix in thoroughly.
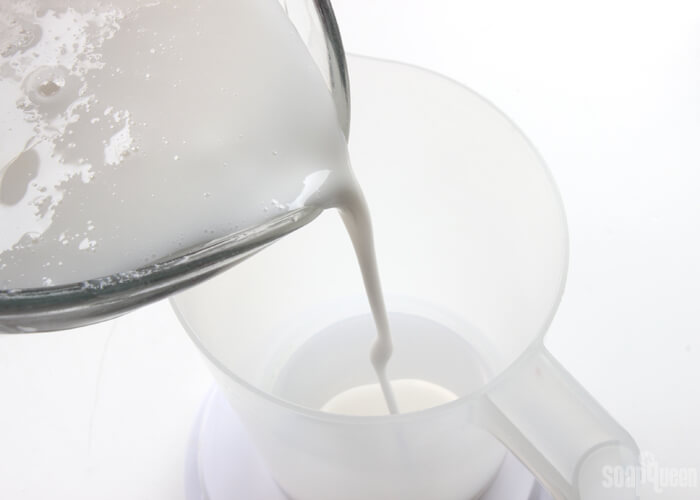
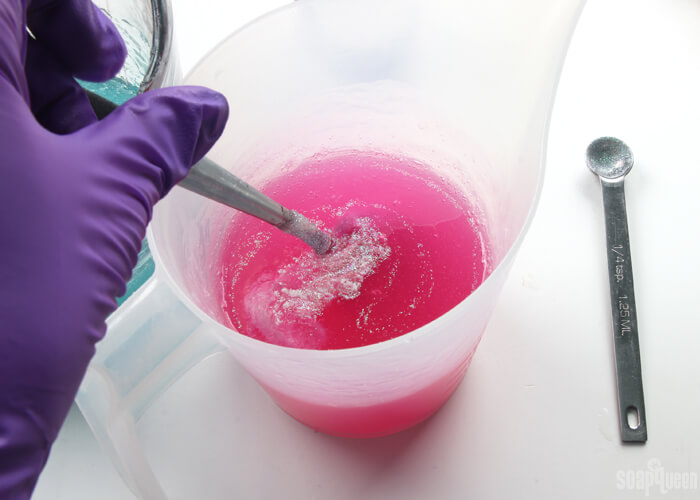
TWO: Split both containers in half so you have two containers of white soap and two containers of clear soap. All containers should weigh about 13 ounces. Add shavings of the Neon Blue Raspberry Color Block to one container of white soap and one container of clear soap. Add shavings of the Electric Bubble Gum Colorant to one container of clear soap and one container of white soap. Use a spoon to mix in the colors. If necessary, place the containers back into the microwave using 10-15 second bursts to fully melt the Color Blocks.
THREE: You now have four colors of soap: pastel pink, hot pink, pastel blue and vibrant blue. Add 1/4 teaspoon of Fine Iridescent Glitter to both containers of clear soap, and use a spoon to thoroughly mix in.
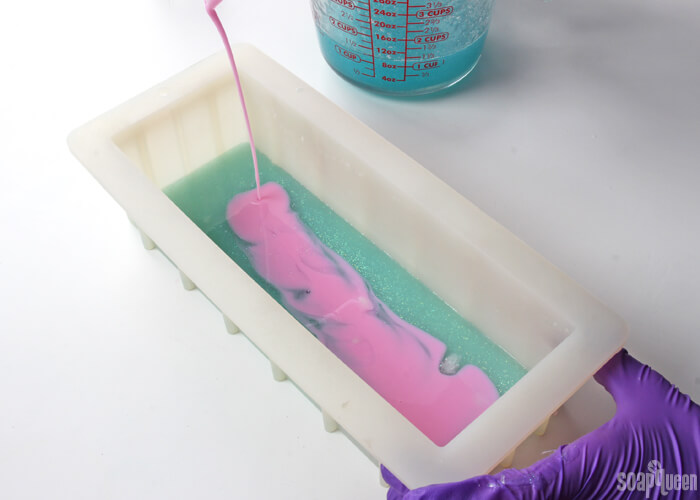
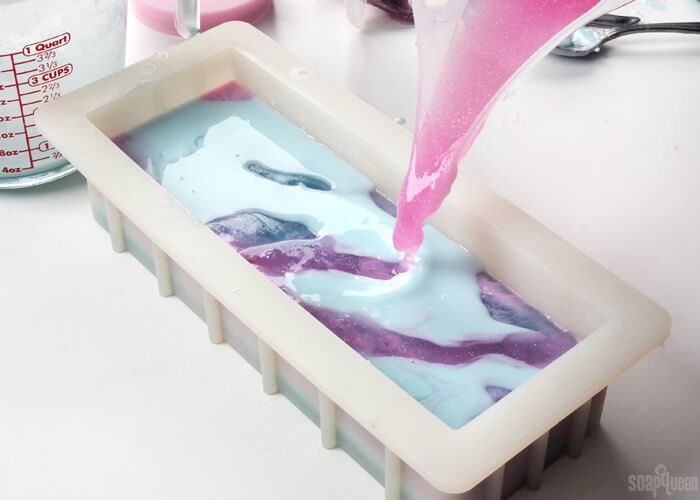
FOUR: It’s time to start pouring and swirling! Check the temperatures of the soap, each container should be about 120-130 ° F. Pour a thin layer of the clear blue soap into the mold, just enough to cover the bottom. Spritz with alcohol to help get rid of bubbles, and pour pastel pink soap on top in random areas and spritz with alcohol. Allow this layer to cool and harden for about 3 minutes. In this time it will develop a thin skin. This will help the soap poured on top stay more separate, and prevent the colors from muddling together.
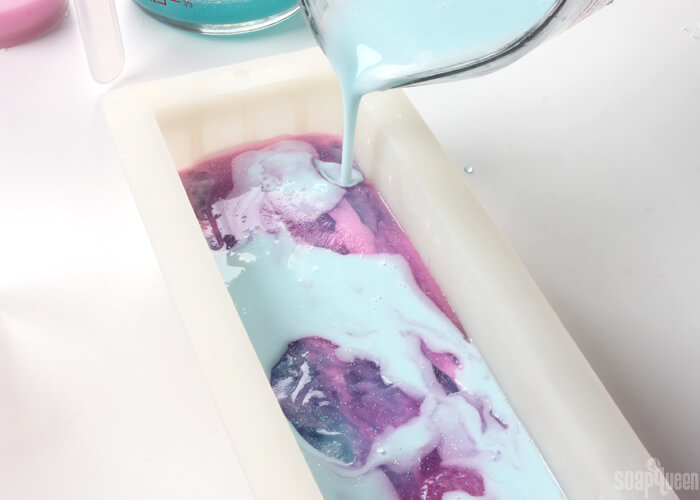
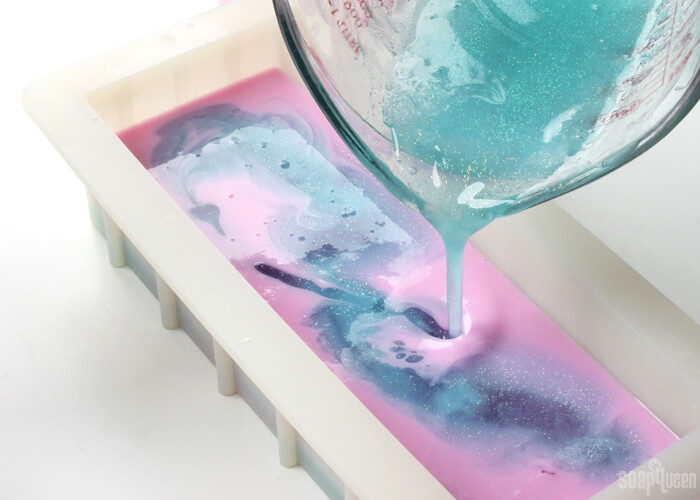
FIVE: If necessary, place the hot pink soap and pastel blue soap back in the microwave until about 125 ° F and fluid. Spritz the soap in the mold with alcohol to help the layers stick together. Pour a thin layer of the pastel blue, spritz with alcohol to get rid of bubbles, then pour hot pink soap in random areas to create a swirl effect. Spritz with alcohol to get rid of bubbles, and allow to cool and harden for 3-4 minutes.

SIX: Repeat this process until all the soap is used up. I recommend always pouring one color made with white soap (the pastel blue and pastel pink) along with one color made with clear soap (vibrant pink and vibrant blue). Pouring these colors together helps make the swirl more eye-catching, and prevents the colors from muddling together.
SEVEN: Once all the soap has been poured into the mold, allow it to fully cool and harden for about 5 hours, or up to overnight. It’s tempting to cut into the soap while it’s still warm, but don’t do it! I have found layers are more likely to separate when I cut into hard, yet still slightly warm melt and pour. Once cut into bars, cover in plastic wrap to help avoid glycerin dew. Enjoy!

Cosmic Cotton Candy Swirl Soap Tutorial
Ingredients
- 10 ″ Silicone Loaf Mold
- 26 oz. Clear Melt and Pour Soap Base
- 26 oz. White Melt and Pour Soap Base
- 0.4 oz. Cotton Candy Fragrance Oil
- 0.4 oz. Vanilla Color Stabilizer
- Neon Blue Raspberry Color Block
- Electric Bubble Gum Color Block
- 1/2 tsp. Fine Iridescent Glitter
- 99 % Isopropyl Alcohol in Spray Bottle
Instructions
- Chop 26 ounces of White Melt and Pour Soap Base and 26 ounces of Clear Melt and Pour Soap Base into small uniform cubes. Place them in the microwave and melt both containers using 30-60 second bursts. Once melted, add 0.2 ounces of Cotton Candy Fragrance Oil and 0.2 ounces Vanilla Color Stabilizer to both containers and use a spoon to mix in thoroughly.
- Split both containers in half, so you have two containers of white soap and two containers of clear soap. All containers should weigh about 13 ounces. Add shavings of the Neon Blue Raspberry Color Block to one container of white soap and one container of clear soap. Add shavings of the Electric Bubble Gum Colorant to one container of clear soap and one container of white soap. Use a spoon to mix in the colors. If necessary, place the containers back into the microwave using 10-15 second bursts to fully melt the Color Blocks.
- You now have four colors of soap: pastel pink, hot pink, pastel blue and vibrant blue. Add 1/4 teaspoon of Fine Iridescent Glitter to both containers of clear soap, and use a spoon to thoroughly mix in.
- Now it’s time to start pouring and swirling! Check the temperatures of the soap, each container should be about 120-130 ° F. Pour a thin layer of the clear blue soap into the mold, just enough to cover the bottom. Spritz with alcohol to help get rid of bubbles, and pour pastel pink soap on top in random areas and spritz with alcohol. Allow this layer to cool and harden for about 3 minutes. In this time it will develop a thin skin. This will help the soap poured on top stay more separate, and prevent the colors from muddling together.
- If necessary, place the hot pink soap and pastel blue soap back in the microwave until about 125 ° F and fluid. Spritz the soap in the mold with alcohol to help the layers stick together. Pour a thin layer of the hot pink soap, spritz with alcohol to get rid of bubbles, then pour pastel blue soap in random areas to create a swirl effect. Spritz with alcohol to get rid of bubbles, and allow to cool and harden for 3-4 minutes.
- Repeat this process until all the soap is used up. I recommend always pouring one color made with white soap (the pastel blue and pastel pink) along with one color made with clear soap (vibrant pink and vibrant blue). Pouring these colors together helps make the swirl more eye-catching, and prevents the colors from muddling together.
- Once all the soap has been poured into the mold, allow it to fully cool and harden for about 5 hours, up to overnight. It’s tempting to cut into the soap while it’s still warm, but don’t do it! I have found layers are more likely to separate when I cut into hard, yet still slightly warm melt and pour. Once cut into bars, cover in plastic wrap to help avoid glycerin dew. Enjoy!