
What You’ll Need:
25.5 oz White Melt and Pour Soap Base
19.5 oz Clear Melt and Pour Soap Base
10 ml Emerald Green LabColor (diluted in 8 oz water)
Get everything you need here in the click of a button!

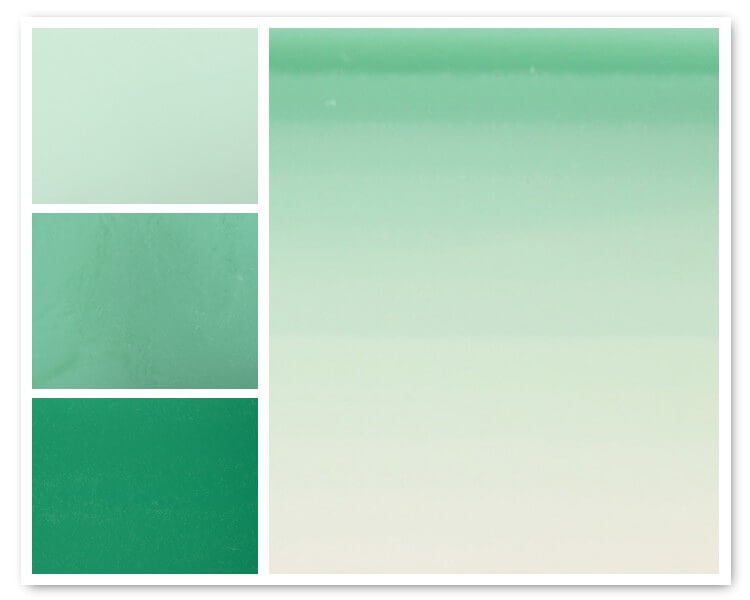
This 15 layer soap was inspired by a Bramble Berry newsletter project using the cold process soapmaking method — here’s the link if you want to check it out. For our melt and pour fans, we wanted to give them the same option of making graduated layers. In order to make the 15 layers manageable, I separated the recipe into 4 parts, pouring 3 ounces per layer and adding drops of Emerald Green LabColor for the fading effect. But, I did do the project all at once, in one sitting so plan to set aside at least 30 minutes to do the project all straight through. If you have never made a layered soap before, please watch the Basic Layers Episode on Soap Queen TV to brush up on the basics before tackling this project. So dilute that LabColor (see directions here) and let’s get started.

Part One
ONE: Melt 15 ounces of white melt and pour base, mix in 1/3 ounce of Sweet Pea Fragrance Oil and 4 drops of diluted Emerald Green Labcolor. Mix well and pour 3 ounces into your loaf mold. I poured 3 ounces into a separate container so I could accurately measure before pouring. Or you can pour the soap with your mold on a scale. Weighing out 3 ounces for each layer is important for a consistent and professional look.
TWO: Add 8 drops of Emerald Green LabColor to the remaining soap and mix well. When layer one has cooled and the soap is around 130 degrees. Spritz with rubbing alcohol and pour layer 2 (3 oz.).
THREE: Add 10 drops of Emerald Green LabColor to the remaining soap and mix well. Spritz with rubbing alcohol and pour layer 3 (3 oz.).
FOUR: Add 10 drops of Emerald Green LabColor to the remaining soap and mix well. Spritz with rubbing alcohol and pour layer 4 (3 oz.).
FIVE: Add 6 drops of Emerad Green LabColor to the remaining soap and mix well. Spritz with rubbing alcohol and pour layer 5 (3 oz.). You may need to reheat the soap after you pour some of your layers. Just make sure you’re paying attention to your temperatures and pour at around 130 degrees so you don’t melt any of the layers.

Part Two
ONE: Melt 7.5 ounces of white base and 7.5 ounce of clear base in one microwave safe container. Blending the two soap bases will allow the base to take on a brighter color. Once the soap is melted, add 1/3 ounce of Sweet Pea Fragrance Oil and 65 drops of Emerald LabColor (just over 3 ml). Mix well, spritz with rubbing alcohol and pour layer 6.
TWO: Add 15 drops of Emerald LC to the remaining soap and mix well. Spritz with rubbing alcohol and pour layer 7 (3 oz.).
THREE: Add 25 drops of Emerald LC to the remaining soap and mix well. Spritz with rubbing alcohol and pour layer 8 (3 oz.).
FOUR: Add 25 drops of Emerald LC to the remaining soap and mix well. Spritz with rubbing alcohol and pour layer 9.
FIVE: Add 30 drops of Emerald LC to the remaining soap and mix well. Spritz with rubbing alcohol and pour layer 10 (3 oz.).
We’re a two thirds of the way there! Yes!

Part Three
ONE: Melt 3 ounces of white base and 9 ounce of clear base in one microwave safe container. This combination will allow the base to take on an even brighter green color. Once the soap is melted, add 1/3 ounce of Sweet Pea Fragrance Oil and 150 drops of Emerald LabColor (about 7.5 ml). Mix well and pour layer 11.
TWO: Add 60 drops of Emerald LC (about 3 ml) to the remaining soap and mix well. Spritz with rubbing alcohol and pour layer 12 (3 oz.)
THREE: Add 50 drops of Emerald LC to the remaining soap and mix well. Spritz with rubbing alcohol and pour layer 13 (3 oz.)
FOUR: Add 35 drops of Emerald LC to the remaining soap and mix well. Spritz with rubbing alcohol and pour layer 14 (3 oz.)

Part Four (the last layer)
For the final layer, melt 3 ounces of clear soap base, mix in 15 drops of Emerald LC and mix well. Spritz with rubbing alcohol and pour layer 15. Let the soap cool for at least 6-8 hours and cut as soon as you can with a sharp knife. The longer you let the soap dry out, the more of a chance your layers could separate when you cut. But hopefully you’ll remember to spritz with rubbing alcohol in between layers. With the combination of spritzing with rubbing alcohol and pouring fresh soap layers you shouldn’t have a problem (but humor me and play it safe).
