In honor of St. Patrick’s Day which is coming right up, I’ve designed a fun St. Patrick’s Day, green themed, soap project. You can find other St. Patrick’s Day inspirations, including more molds and colorant ideas here.
You’ll need:
2 pounds, 8 ounces clear melt and pour
8 onces white melt and pour
Milky Way Shamrock Mold
Loaf Mold (ours aren’t ready but I have 20 made up in a slightly too flexible plastic if anyone wants them for $17 each. Just email me at info -at- brambleberry -dot- com to get it)
Opalescent Green Mica
Iridescent Glitter
Emerald Green (Shamrocks on top)
Non-Bleeding Oxide Green (Shamrocks on bottom)
Fragrance: Lettuce or Green Tea is perfect!
Pyrex Container
Spoons
Rubbing Alcohol in a Spritzer Bottle
Step 1: Make the Shamrocks. Be sure to fragrance them. They end up making up 20% of your total soap in the final product. We used Emerald Green (which bleeds) and Non-Bleeding Green Oxide.
Step 2: If you allow the Shamrocks to sit overnight, be sure to cover them in an airtight container. The more fresh the soap is, the easier it is to adhere in the final product.

Step 3: Heat 8 ounces of clear soap in the microwave. Stir thoroughly until it is no longer steaming and there are no chunks. Fragrance this soap with .1 to .2 ounces of fragrance oil.
Step 4: Pour the clear soap in the bottom of the loaf. Spritz each Shamrock down with rubbing alcohol. Embedd them at an angle to allow air bubbles to flow up the sides. The loaf mold holds three Shamrocks easily.
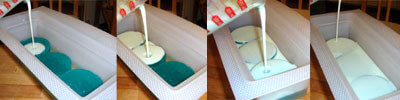
Step 5: Allow a thick skin to form. Pour a layer of white soap to really make the shamrocks pop. 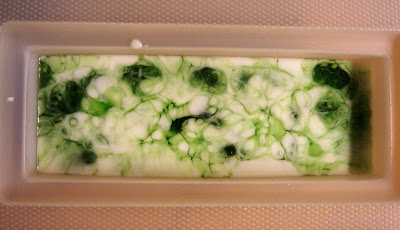
Step 5.5: Then, it’s time to swirl! Using 2 to 4 ounces of colored soap per pour (don’t forget to fragrance), swirl and layer varying green. We used Emerald Green, Irridescent Green, and White melt and pour to get the final look.
Step 6: Allow to harden to a very thick skin. This layer needs to support the next layer of soap and three Shamrocks! Pour a thin layer of Clear Soap (colored with Iridescent Mica).
Step 7: Spray each Shamrock liberally with rubbing alcohol. Gently set each Shamrock, face up, into the thin layer of soap. Pour remaining soap around the Shamrocks, filling the soap so that the Shamrocks are just barely set into the surface of the soap.
Step 8: Do one final spritz of rubbing alcohol and allow soap to harden at least four hours or overnight.
Check back tomrorow for the final photo to see how this fun loaf turned out.