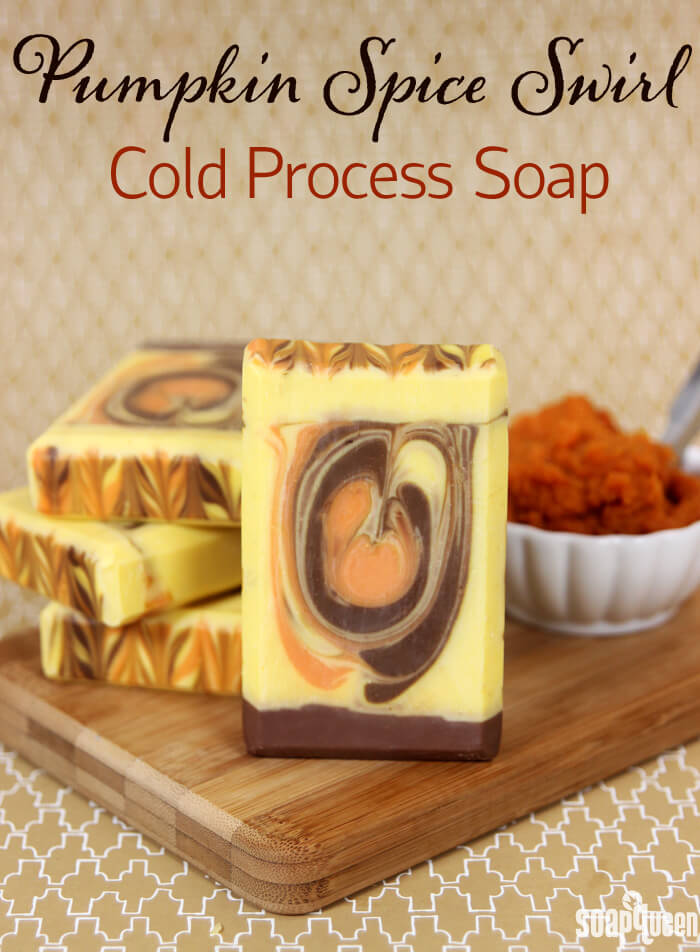
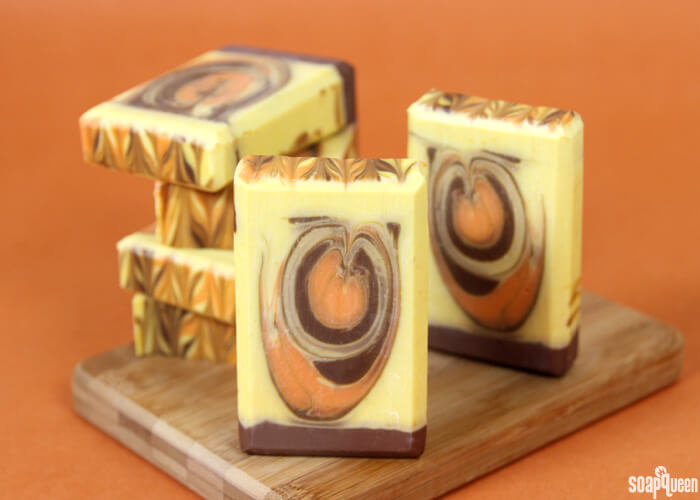
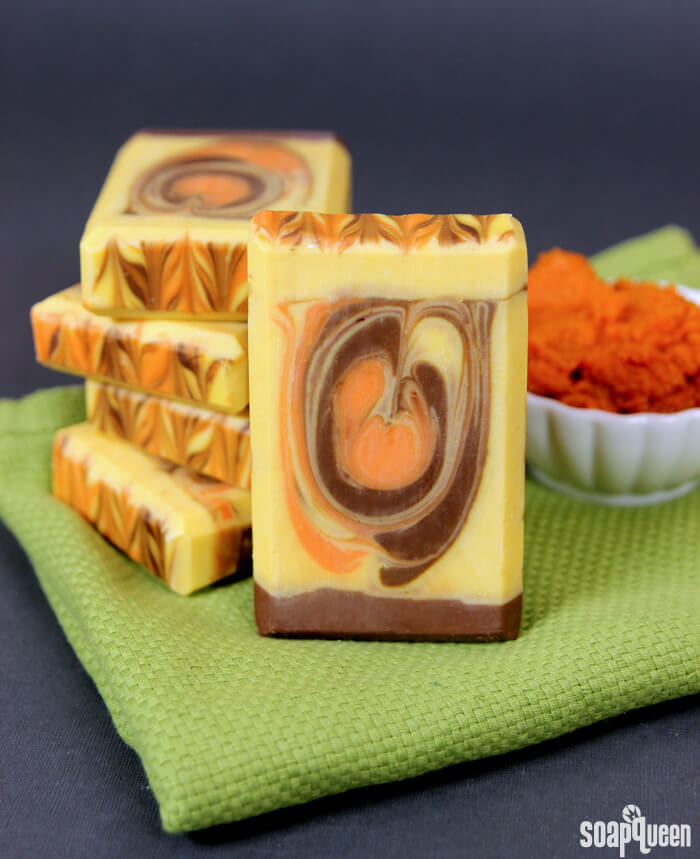
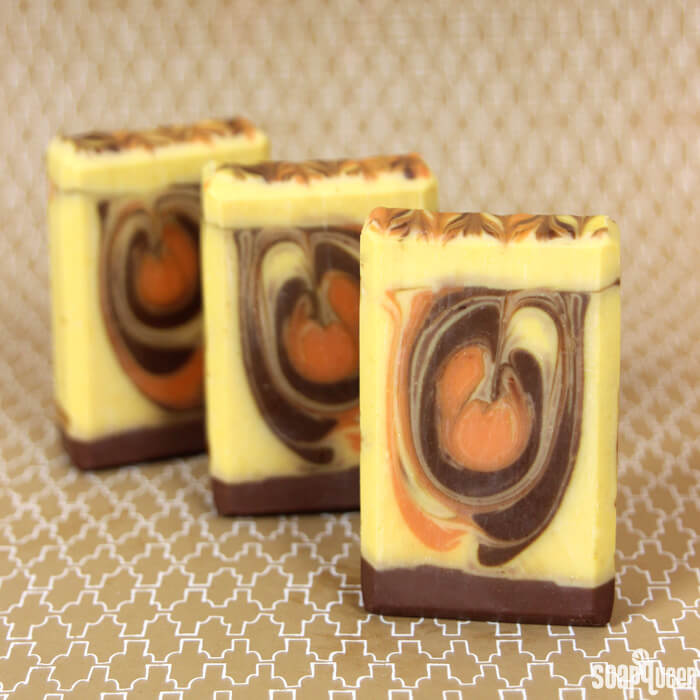
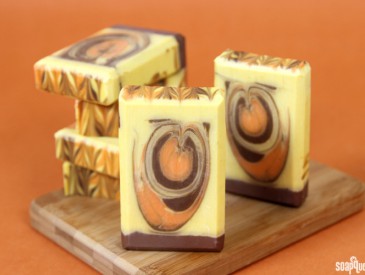
With fall right around the corner it’s time to cook, bake and soap with everything pumpkin. This Pumpkin Spice Swirl Cold Process is made with real pumpkin puree, and scented with Pumpkin Spice Fragrance Oil for a classic fall scent. The swirl is created using the drop swirl technique; check out this Soap Queen TV video to see this swirl in action. We got lucky with this particular batch…the swirls ended up resembling pumpkins in the center!
To keep the soap from discoloring, the fragrance oil is only added to the dark brown portion of the soap. Read more about fragrance discoloration here. When adding water based additives like pumpkin puree, a water discount can be beneficial. This recipe contains a 15% water discount to compensate for the water in the puree. A water discount is optional, but it will help prevent glycerin rivers. It will also cut down on cure time because there is less water to evaporate.
Another thing to consider when working with additives is temperature. The pumpkin puree contains natural sugars which will increase the temperature of the soap. To prevent overheating, you may want to place the soap in the fridge for several hours (up to overnight) after pouring into the mold. I would not recommend insulating or promoting gel phase in this recipe. If you’re looking for more pumpkin-centric recipes, check out the Pumpkin Puree Cold Process Soap and the Pumpkin Spice Latte Cold Process Soap.
What You’ll Need:
Tall Narrow Wood Loaf Mold
10.5 oz. Canola Oil
.8 oz. Castor Oil
9 oz. Coconut Oil
9 oz. Palm Oil
7.8 oz. Olive Oil
.8 oz. Pumpkin Seed Oil
1.2 oz. Shea Butter
5.4 oz. Sodium Hydroxide Lye
11 oz. Distilled Water (15% water discount)
2.5 oz. Pumpkin puree
Titanium Dioxide
Brown Oxide
Tangerine Wow! Colorant
Yellow Oxide
1.1 oz. Pumpkin Spice Fragrance Oil

Click here to add everything you need for this project to your Bramble Berry shopping cart!
If you’ve never made Cold Process soap before, stop here! I highly recommend checking out our FREE four part SoapQueen.tv series on Cold Process Soapmaking, especially the episode on lye safety. And if you’d rather do some reading, Bramble Berry carries a wide range of books on the topic, including my newest book, Soap Crafting. You can also checkout the digital downloads for that instant gratification factor.
SAFETY FIRST: Suit up for safe handling practices! That means goggles, gloves and long sleeves. Make sure kids, pets, and other distractions and tripping hazards are out of the house or don’t have access to your soaping space. Always soap in a well-ventilated area.
COLOR PREP: To ensure that the Titanium Dioxide blends smoothly into the soap batter, we recommend micronizing it before dispersing it in oil. Please note this is an optional tip but it does help with the titanium dioxide clumping in the soap =) To micronize colorant, simply use a coffee grinder to blend the colorant to break up any clumps of color and prevent streaks of white from showing in the final soap. We like to use a coffee grinder that has a removable, stainless steel mixing area for easy cleaning. Then, disperse 1 teaspoons of the colorant into 1 tablespoons of sunflower or sweet almond oil (or any other liquid oil). Then in separate containers, disperse 1 teaspoon of the Brown Oxide, Tangerine Wow! Colorant and Yellow Oxide into 1 tablespoon lightweight liquid oil. Use a mini mixer to disperse any clumps.
MOLD & TOOL PREP: Line the Tall Narrow Wood Loaf Mold with freezer paper with the shiny side up. For tips on how to line the mold, click here.
ONE: Slowly and carefully add the lye to the water and gently stir until the lye has fully dissolved and the liquid is clear. Set aside to cool.
 TWO: Melt and combine the coconut oil, olive oil, canola oil, castor oil, pumpkin seed oil, shea butter and palm oils (remember to fully melt then mix your entire container of palm oil before portioning). Once the lye water and the oils have cooled to 130 degrees or below (and are ideally within 10 degrees of each other), add the lye water to the oils and stick blend until thin trace. If you’d like a harder bar of soap that releases faster from the mold, you can add sodium lactate to the cooled lye water. Use 1 teaspoon of sodium lactate per pound of oils in the recipe. For this recipe, you’d add about 2.5 sodium lactate.
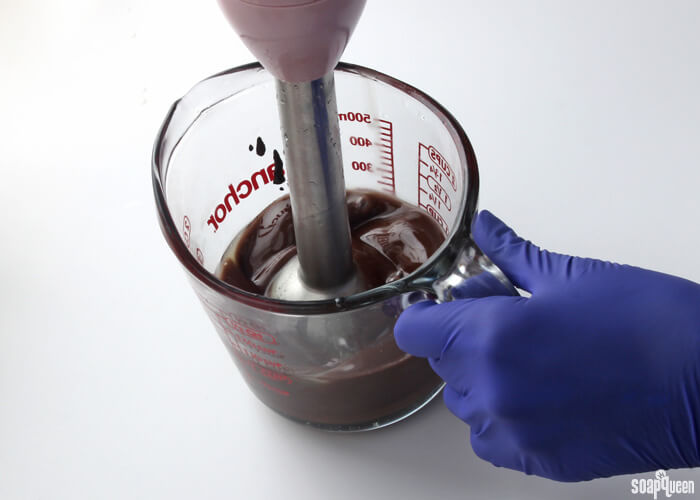
 THREE: Once the batter has reached a light trace, pour off about 6 oz. of soap into a small container. Add 1/4 tsp. dispersed brown oxide and half of the fragrance oil (it’s okay to eyeball it). Then stick blend it to a medium to thick trace.
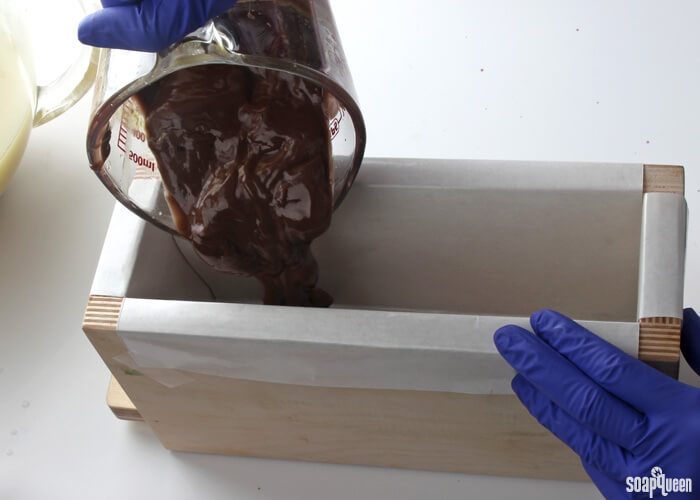
 FOUR: Once it has reached a medium to thick trace, pour the brown soap into the mold. Tap down the mold on the counter to even out the layer as much as possible.
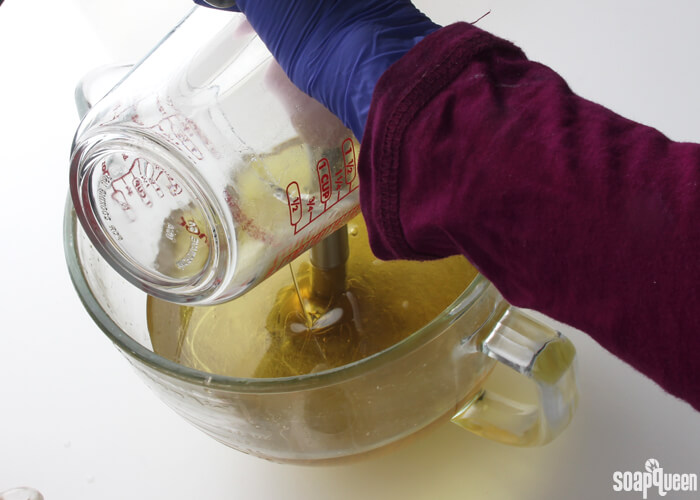
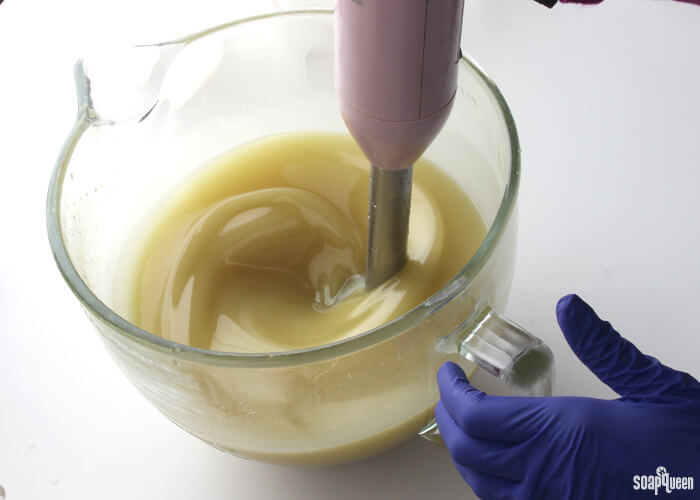
 FIVE: Add all of the pumpkin puree to the remaining soap and use a whisk to stir in.
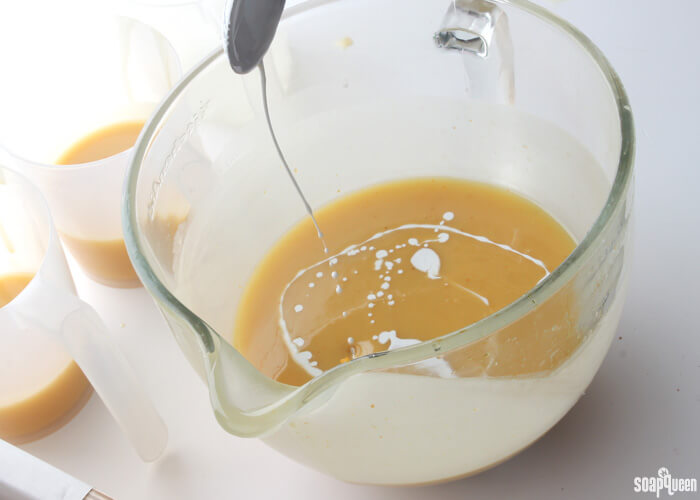
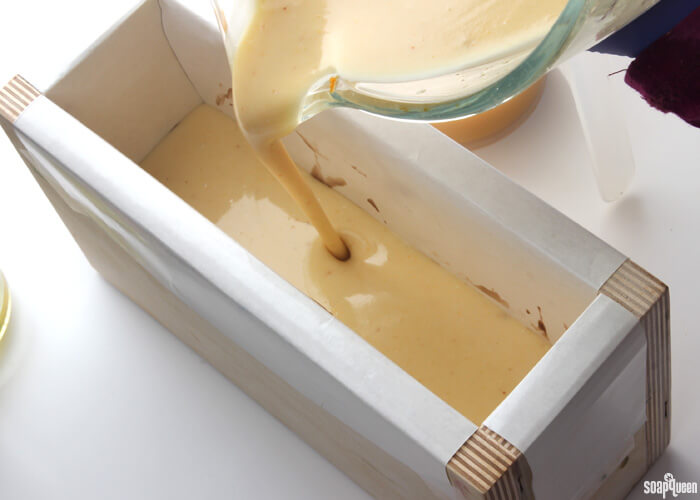
 SIX: Pour off two containers measuring about 300 mL each. To the remaining soap, add 1.5 Tbs. dispersed titanium dioxide and use a whisk to thoroughly stir in. Pour about 1/4 of the white soap into the mold slowly, being careful to not break into the dark brown layer on the bottom.
 SEVEN: To one of the small containers of soap, add 1/2 tsp. dispersed brown oxide and 1/2 tsp. dispersed yellow oxide. Stir to mix in the colorants. Add the remaining fragrance oil to the dark brown soap. To the other container, add 2 tsp. dispersed Tangerine Wow! Colorant and 1 tsp. dispersed Yellow Oxide. Stir to thoroughly mix in the colorants.
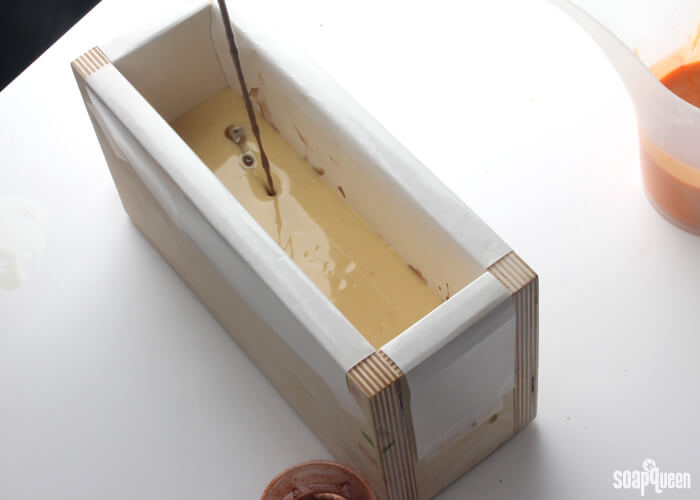
 EIGHT: Begin pouring the brown and orange soap into the mold from about 6-10 inches above the mold, allowing the colors to break into the white soap. Pouring from varying heights will help the colors break through, creating the drop swirl effect.
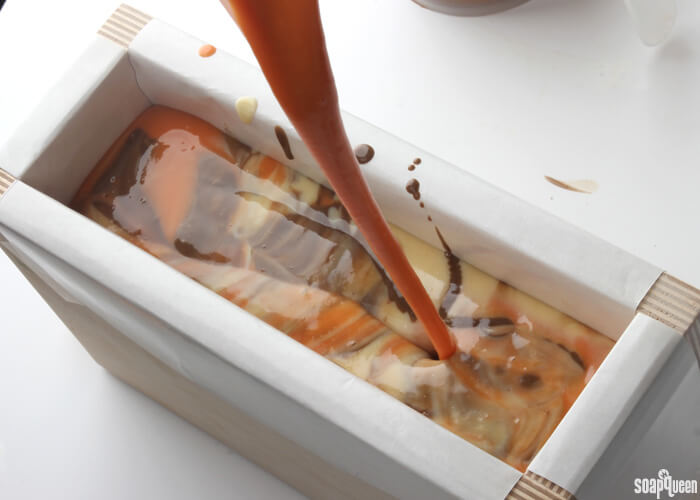
 NINE: Continue to pour the white, brown and orange soap until a small amount of each color remains. Keep enough white soap to cover the top. Tap the mold on the counter to help get rid of bubbles.
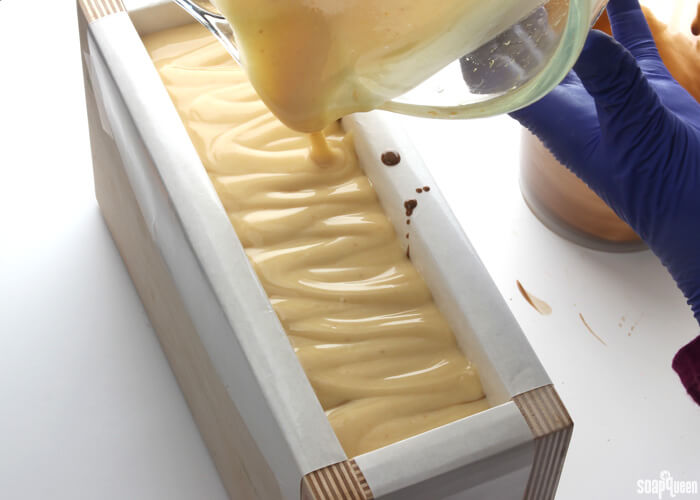
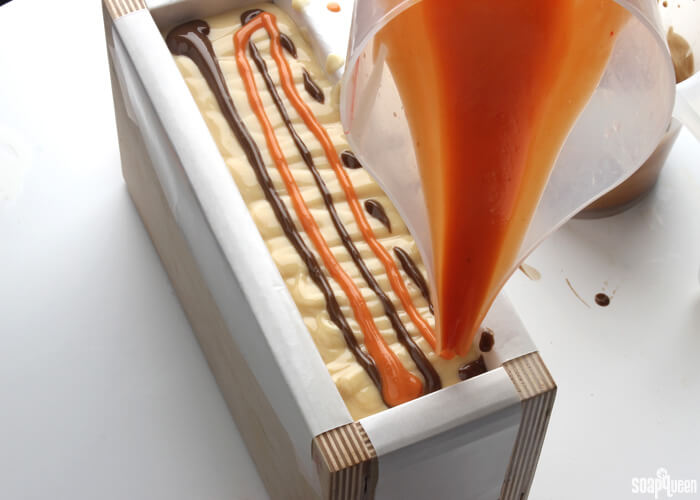
 TEN: Gently pour the remaining white soap on top. Then, pour thin lines of the brown and orange soap down the length of the mold. Don’t worry about making the lines perfect.
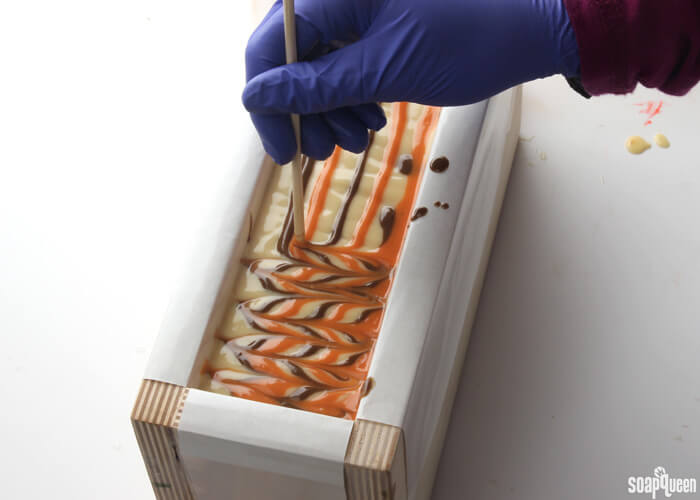
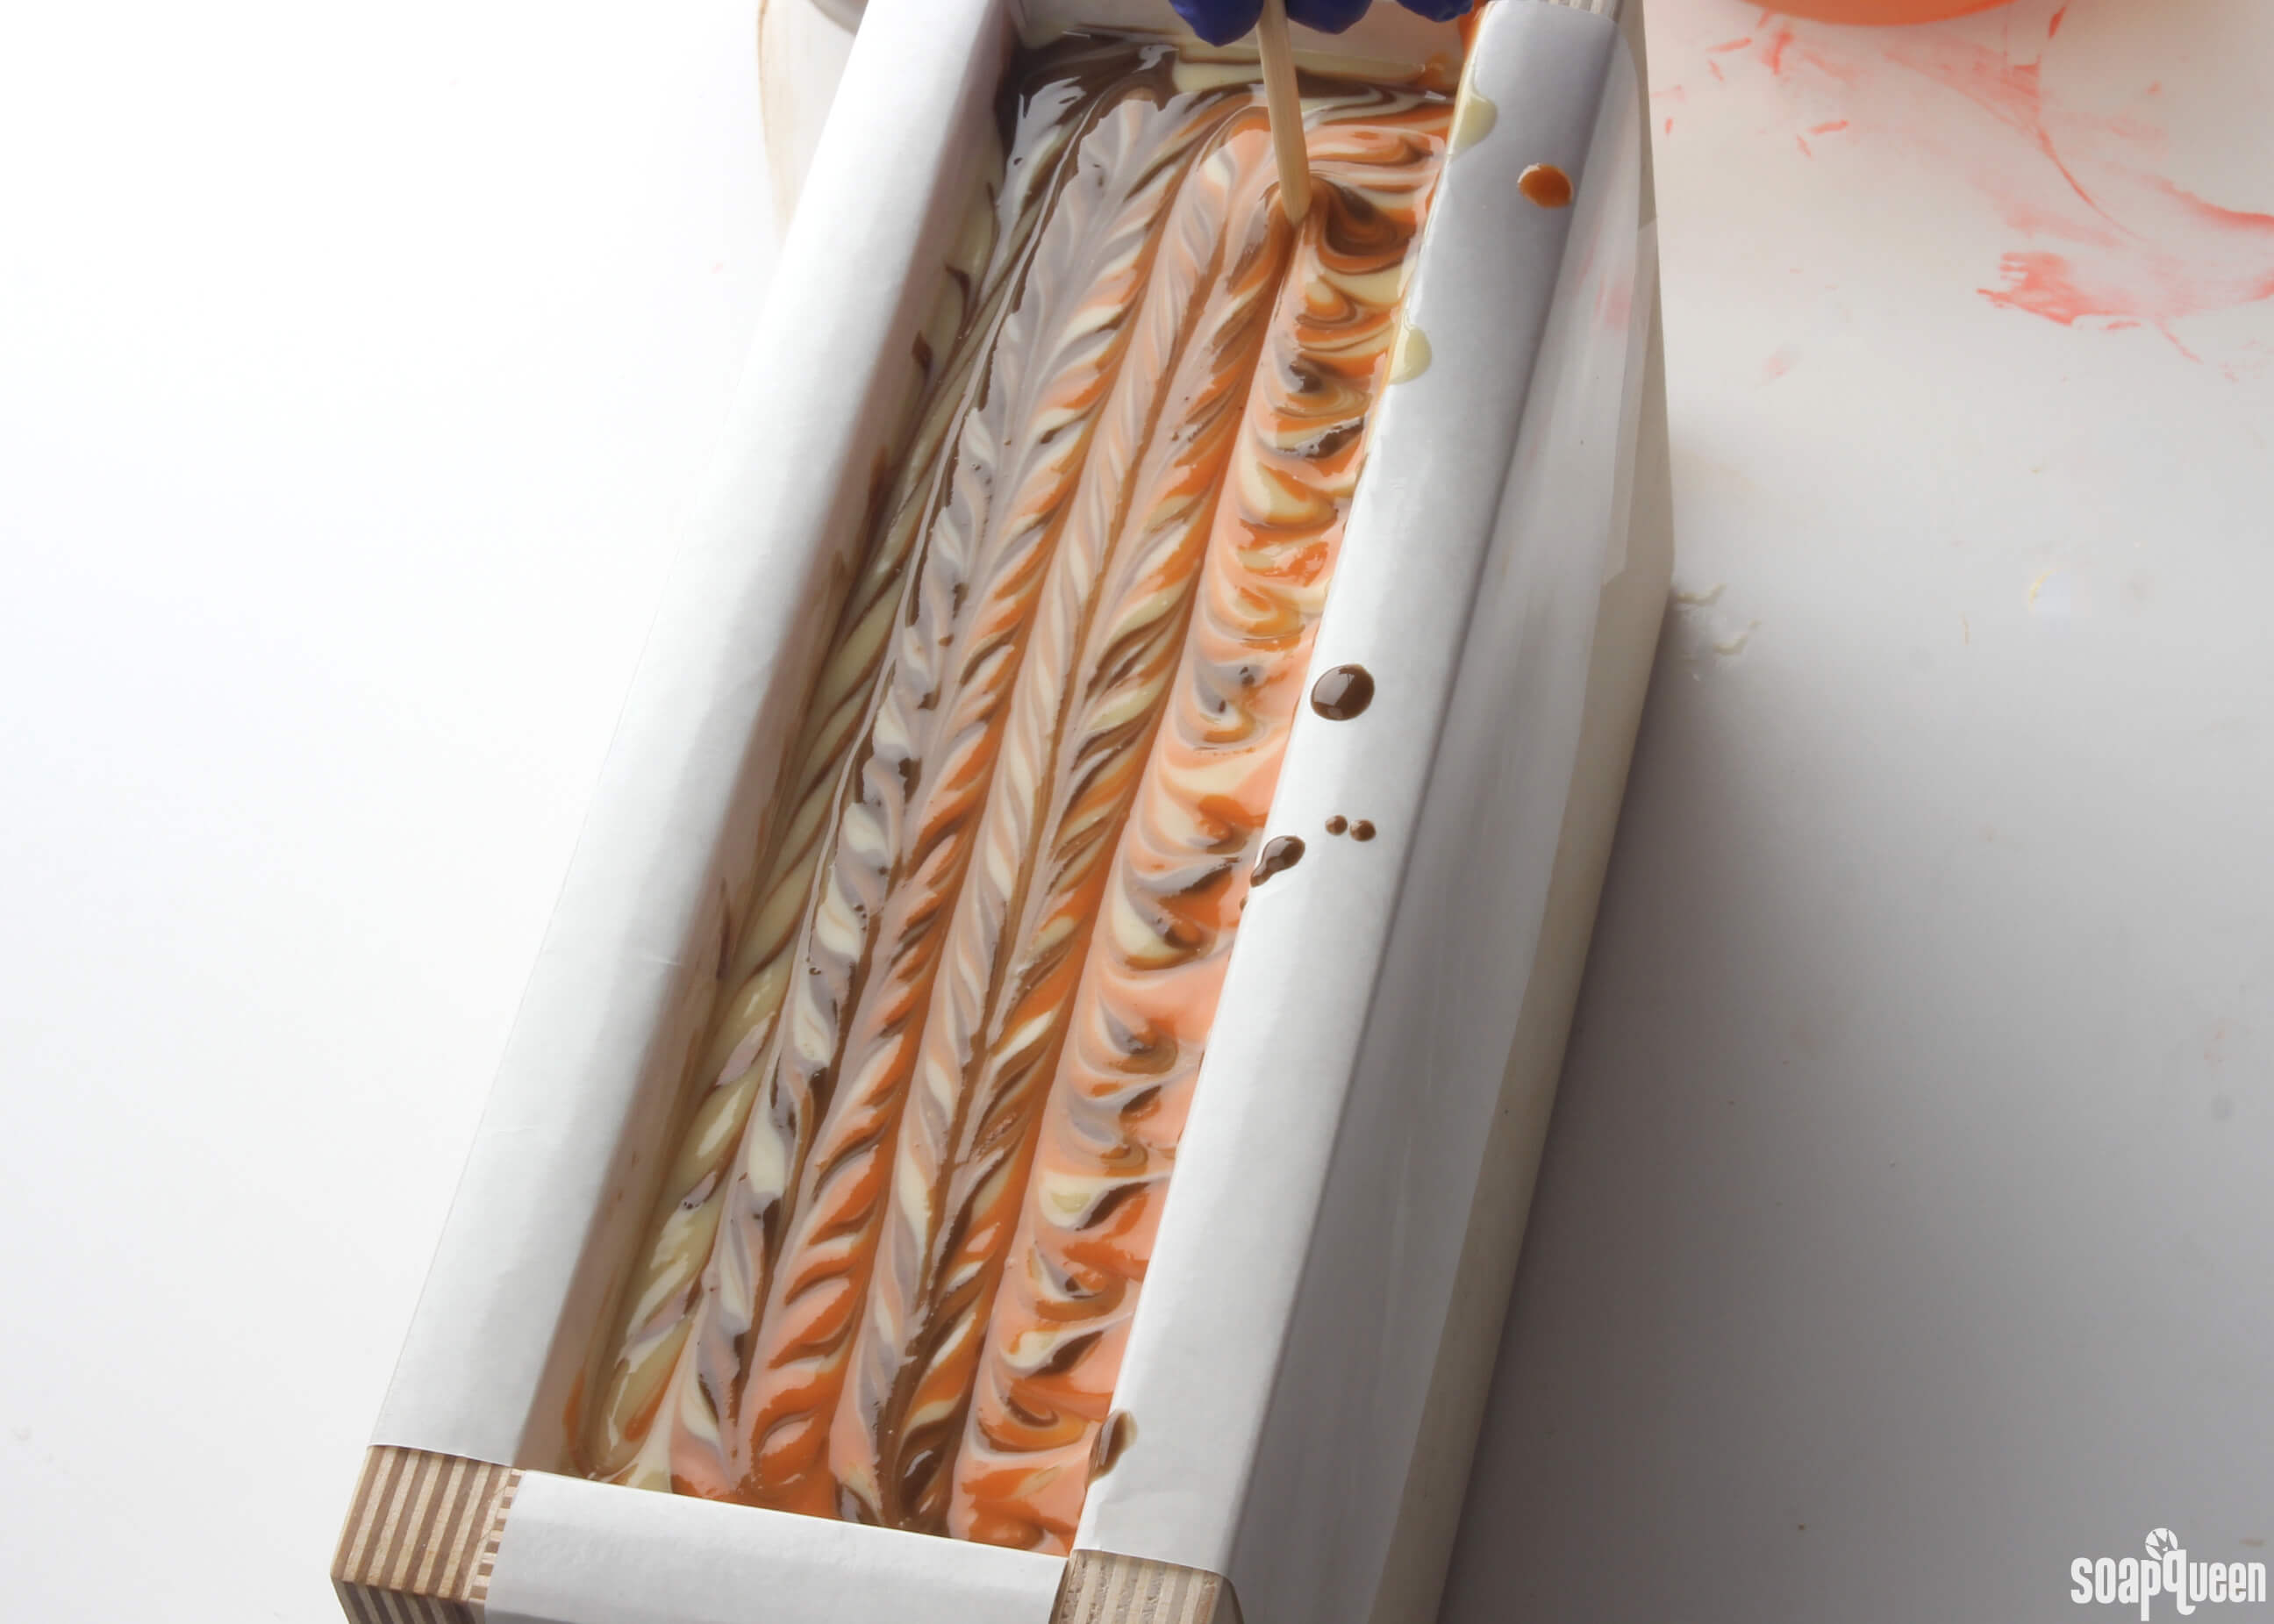
 ELEVEN: Insert the tip of a dowel or chopstick into the very top layer of the soap. Drag the chopstick across the lines of soap width wise in a “S” shaped curve. Then, drag the chopstick down the length of the mold. Spritz with 99% isopropyl alcohol to avoid soda ash.
 TWELVE: To prevent this soap from overheating due to the natural sugar content in the pumpkin puree, place the soap in the fridge for several hours up to overnight. Remove from the fridge and allow to sit in the mold for 3-4 days. Unmold, cut and allow to cure for 4-6 weeks. Enjoy!
Have you ever tried adding food additives to your cold process soap? I would love to hear your tips and tricks.
Pumpkin Spice Swirl Cold Process Tutorial
Ingredients
- Tall Narrow Wood Loaf Mold
- 10.5 oz. Canola Oil
- .8 oz. Castor Oil
- 9 oz. Coconut Oil
- 9 oz. Palm Oil
- 7.8 oz. Olive Oil
- .8 oz. Pumpkin Seed Oil
- 1.2 oz. Shea Butter
- 5.4 oz. Sodium Hydroxide Lye
- 11 oz. Distilled Water 15% water discount
- 2.5 oz. Pumpkin puree
- Titanium Dioxide
- Brown Oxide
- Tangerine Wow! Colorant
- Yellow Oxide
- 1.1 oz. Pumpkin Spice Fragrance Oil
Instructions
SAFETY FIRST: Suit up for safe handling practices! That means goggles, gloves and long sleeves. Make sure kids, pets, and other distractions and tripping hazards are out of the house or don’t have access to your soaping space. Always soap in a well-ventilated area.
COLOR PREP: To ensure that the Titanium Dioxide blends smoothly into the soap batter, we recommend micronizing it before dispersing it in oil. Please note this is an optional tip but it does help with the titanium dioxide clumping in the soap =) To micronize colorant, simply use a coffee grinder to blend the colorant to break up any clumps of color and prevent streaks of white from showing in the final soap. We like to use a coffee grinder that has a removable, stainless steel mixing area for easy cleaning. Then, disperse 1 teaspoons of the colorant into 1 tablespoons of sunflower or sweet almond oil (or any other liquid oil). Then in separate container, disperse 1 teaspoon of the Brown Oxide, Tangerine Wow! Colorant and Yellow Oxide into 1 tablespoon lightweight liquid oil. Use a mini mixer to disperse any clumps.
MOLD & TOOL PREP: Line the Tall Narrow Wood Loaf Mold with freezer paper with the shiny side up. For tips on how to line the mold, click here.
- Slowly and carefully add the lye to the water and gently stir until the lye has fully dissolved and the liquid is clear. Set aside to cool.
- Melt and combine the coconut oil, olive oil, canola oil, castor oil, pumpkin seed oil, shea butter and palm oils (remember to fully melt then mix your entire container of palm oil before portioning). Once the lye water and the oils have cooled to 130 degrees or below (and are ideally within 10 degrees of each other), add the lye water to the oils and stick blend until thin trace. If you’d like a harder bar of soap that releases faster from the mold, you can add sodium lactate to the cooled lye water. Use 1 teaspoon of sodium lactate per pound of oils in the recipe. For this recipe, you’d add about 2.5 sodium lactate.
- Once the batter has reached a light trace, pour off about 6 oz. of soap into a small container. Add 1/4 tsp. dispersed brown oxide and half of the fragrance oil (it’s okay to eyeball it). Then stick blend it to a medium to thick trace.
- Once it has reached a medium to thick trace, pour the brown soap into the mold. Tap down the mold on the counter to even out the layer as much as possible.
- Add all of the pumpkin puree to the remaining soap and use a whisk to stir in.
- Pour off two containers measuring about 300 mL each. To the remaining soap, add 1.5 Tbs. dispersed titanium dioxide and use a whisk to thoroughly stir in. Pour about 1/4 of the white soap into the mold slowly, being careful to not break into the dark brown layer on the bottom.
- To one of the small containers of soap, add 1/2 tsp. dispersed brown oxide and 1/2 tsp. dispersed yellow oxide. Stir to mix in the colorants. Add the remaining fragrance oil to the dark brown soap. To the other container, add 2 tsp. dispersed Tangerine Wow! Colorant and 1 tsp. dispersed yellow oxide. Stir to thoroughly mix in the colorants.
- Begin pouring the brown and orange soap into the mold from about 6-10 inches above the mold, allowing the colors to break into the white soap. Pouring from varying heights will help the colors break through, creating the drop swirl effect.
- Continue to pour the white, brown and orange soap until a small amount of each color remains. Keep enough white soap to cover the top. Tap the mold on the counter to help get rid of bubbles.
- Gently pour the remaining white soap on top. Then, pour thin lines of the brown and orange soap down the length of the mold. Don’t worry about making the lines perfect.
- Insert the tip of a dowel or chopstick into the very top layer of the black soap. Drag the chopstick across the lines of soap width wide in a “S” shaped curve. Then, drag the chopstick down the length of the mold. Spritz with 99% isopropyl alcohol to avoid soda ash.
- To prevent this soap from overheating due to the natural sugar content in the pumpkin puree, place the soap in the fridge for several hours up to overnight. Remove from the fridge and allow to sit in the mold for 3-4 days. Unmold, cut and allow to cure for 4-6 weeks. Enjoy!