June through September is generally considered wedding season. If you (or somebody you know) is getting married this year, you know how quickly those months will be upon us. There are so many details to organize and things to plan!
One of the ways I made my guests feel special at my wedding was with handmade wedding favors. Whether you give these gifts to everybody at your wedding, only your wedding party or a select group, wedding favors are a great way to thank family and friends for celebrating with you on your special day. If you know somebody getting married, creating wedding favors is also fantastic wedding gift for them.
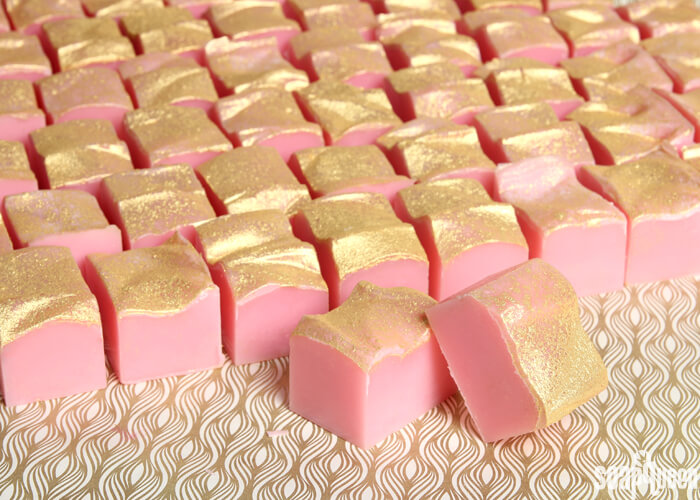
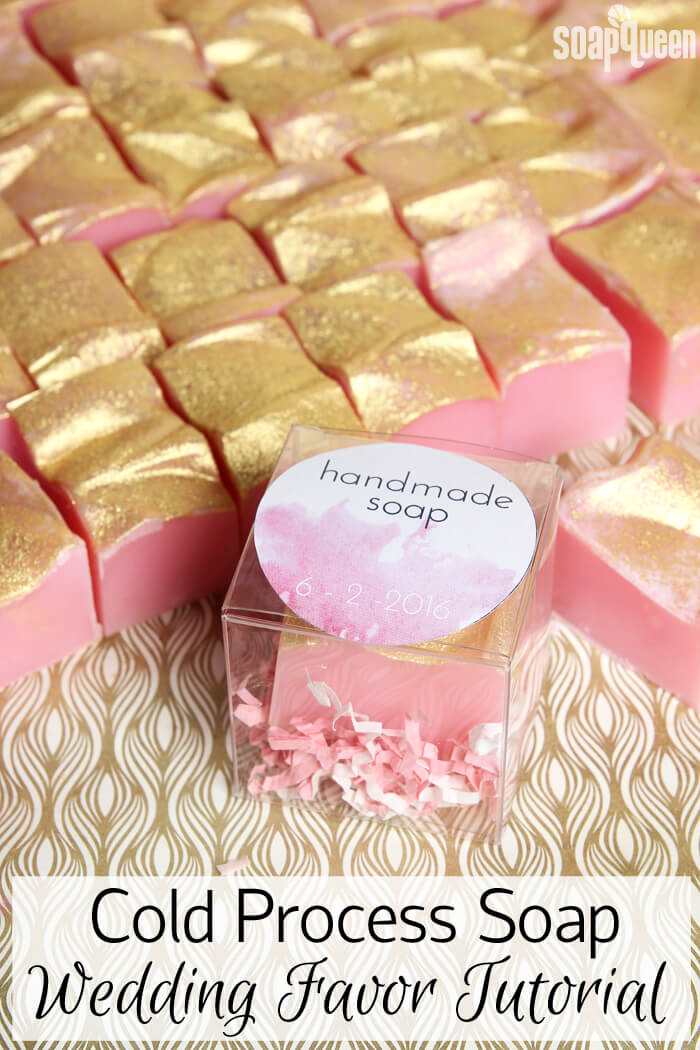
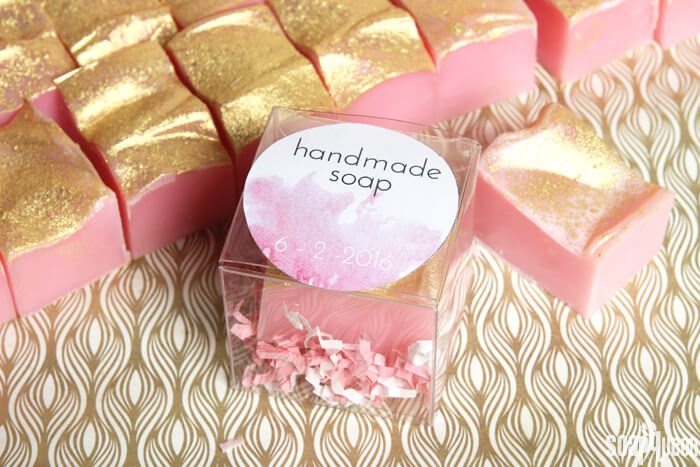
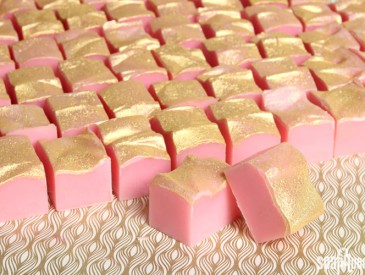
Handmade soap is a luxury item that many people have never used before. It makes a great wedding favor. The colors and scent can be customized to suit any theme. In this tutorial, I used the large 36 Bar Birchwood Mold and the Guest Dividers for 36 Bar Birch Mold to create 72 guest-sized soaps. Depending on the size of your wedding, you may be done with all your wedding favors in as little as two hours! Just make sure to create them ahead of time to allow for a 4-6 week cure time. In addition, I used the Lots of Lather Quick Mix to cut down on the mixing and measuring.
I also created cute tags to package each bar. Simply download the free PDF and print the labels on card stock paper, or Waterproof Label Paper. Then cut out the label and package. The download also includes tags for candles, bath salts, beard oil and a blank option. Tutorials for those projects coming soon (wink, wink). I chose to stick the label on top of the Clear Plastic Cube Box. They would also look cute in an organza bag. This might be the most time consuming aspect of this DIY; I would recommend enlisting the help of your bridesmaids or other family members to package each bar. =)
What You’ll Need:
36 Bar Birchwood Mold
Guest Dividers for 36 Bar Birch Mold
108 oz. Lots of Lather Quick Mix
15.5 oz. Sodium Hydroxide Lye
35.6 oz. Distilled Water
Electric Bubble Gum Colorant
Gold Sparkle Mica
7 oz. Lily of the Valley Cybilla Fragrance Oil
Optional: Wedding Favor Label PDF

Click here to add everything you need for this project to your Bramble Berry shopping cart!
If you’ve never made Cold Process soap before, stop here! I highly recommend checking out our FREE four part SoapQueen.tv series on Cold Process Soapmaking, especially the episode on lye safety. And if you’d rather do some reading, Bramble Berry carries a wide range of books on the topic, including my newest book, Soap Crafting. You can also checkout the digital downloads for that instant gratification factor.
SAFETY FIRST: Suit up for safe handling practices! That means goggles, gloves and long sleeves. Make sure kids, pets, and other distractions and tripping hazards are out of the house or don’t have access to your soaping space. Always soap in a well-ventilated area.
COLOR PREP: Disperse 1 teaspoon of the Electric Bubble Gum Colorant into 1 tablespoon lightweight liquid oil, such as sunflower or sweet almond oil. Use a mini mixer to help get rid of any clumps. Have the Gold Sparkle Mica and a powder duster nearby to dust the top of the soap once it has been poured into the mold.
FRAGRANCE PREP: Measure 7 ounces of the Lily of the Valley Cybilla Fragrance Oil in a glass, fragrance oil safe container. Set aside.
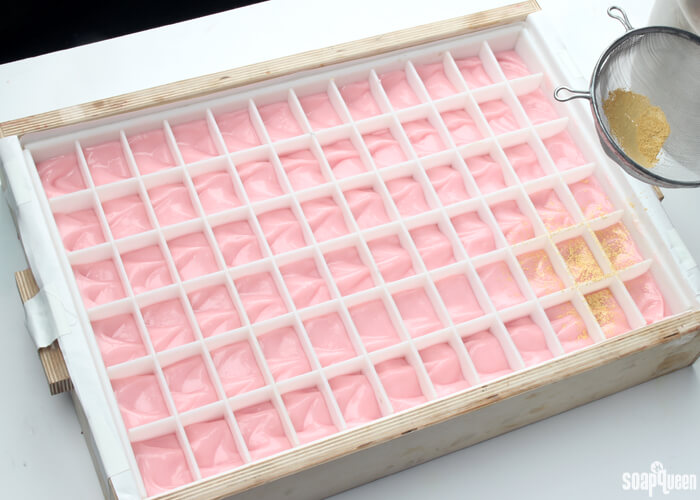
MOLD & DIVIDER PREP: Line the 36 Bar Birchwood Mold with freezer paper with the shiny side up. For tips on how to line the mold, click here. Place the four border pieces of the divider set against the sides of the mold. Then, assemble the Guest Divider Set. For tips on assembling the dividers, click here.
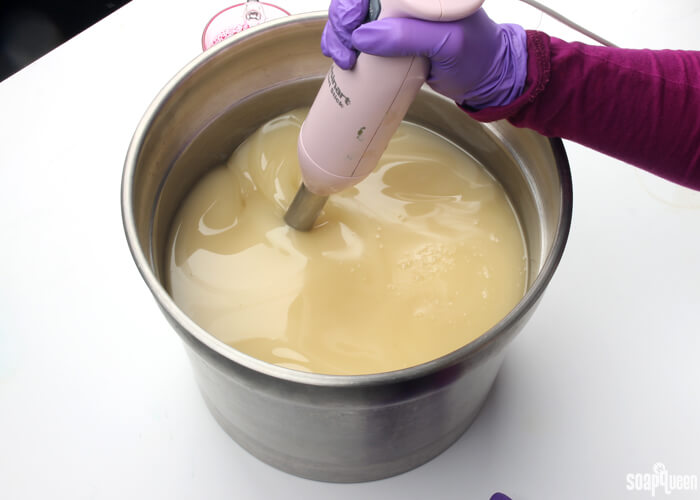
ONE: Slowly and carefully add the lye to the water and gently stir until the lye has fully dissolved and the liquid is clear. Set aside to cool.
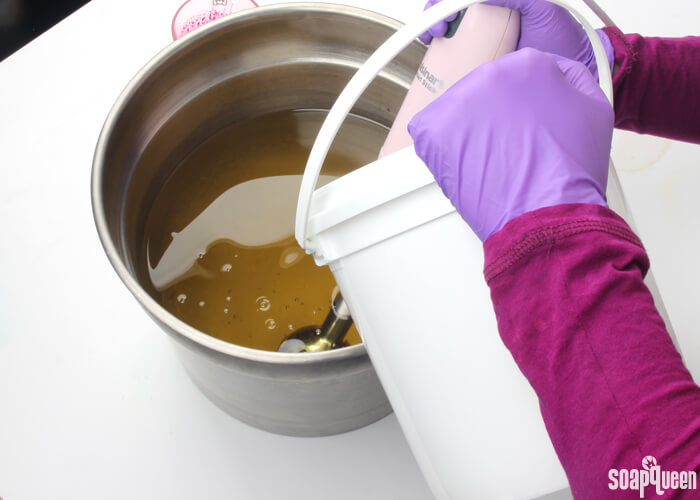
TWO: Fully melt the entire bag of Lots of Lather Quick Quick Mix until there is no cloudiness. Shake to mix and pour the entire bag into a very large soaping container. Make sure the container is big enough to comfortably fit the oils and lye water solution. Once the lye water and the oils have cooled to 130 degrees or below (and are ideally within 10 degrees of each other), add the lye water to the oils and stick blend until thin trace. If you’d like a harder bar of soap that releases faster from the mold, you can add sodium lactate to the cooled lye water. Use 1 teaspoon of sodium lactate per pound of oils in the recipe. For this recipe, you’d add about 6.5 teaspoons sodium lactate.
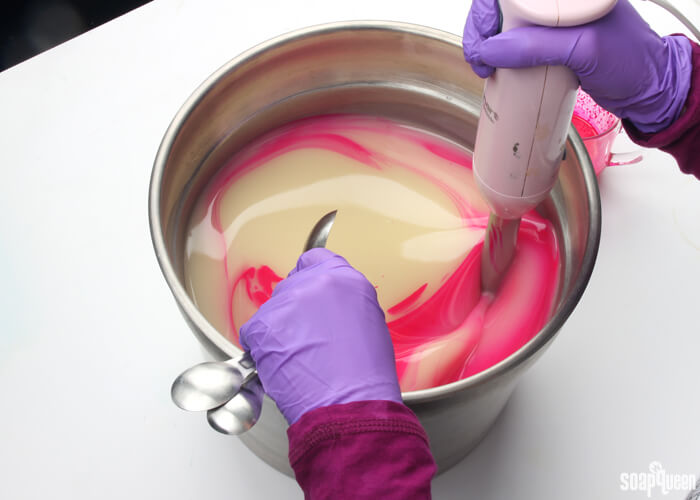
 THREE: Add 1 tablespoon of the dispersed Electric Bubble Gum Colorant into the soap batter, and alternate stirring and pulsing with the stick blender to thoroughly mix in the colorant. Be careful to not over stick blend. If necessary, switch to a whisk to make sure the soap batter does not become too thick.
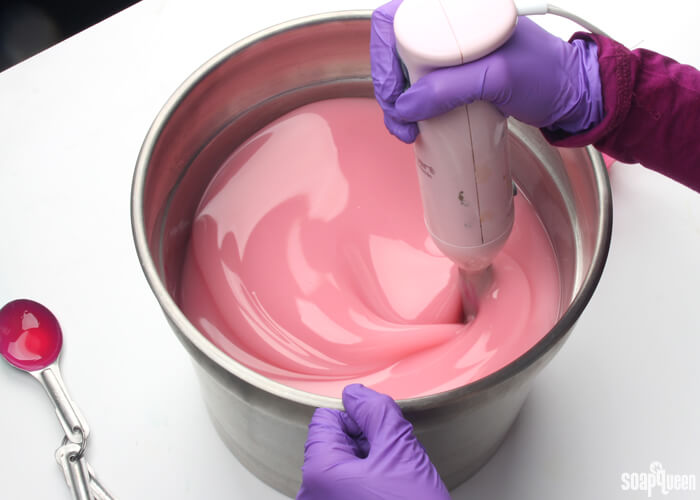 FOUR: Add all of the measured Lily of the Valley Cybilla Fragrance Oil into the mixture and thoroughly whisk in the fragrance oil. When working with such a large batch of soap, I like to mix a little longer than usual with a whisk just to make sure the fragrance oil is fully incorporated throughout the batter.
 FIVE: Once the fragrance is thoroughly mixed in and the soap has the texture of a thin pudding, pour all the soap into the mold.
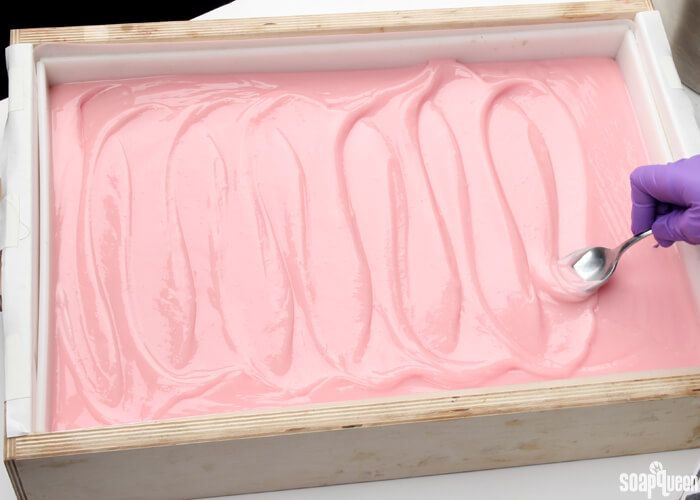
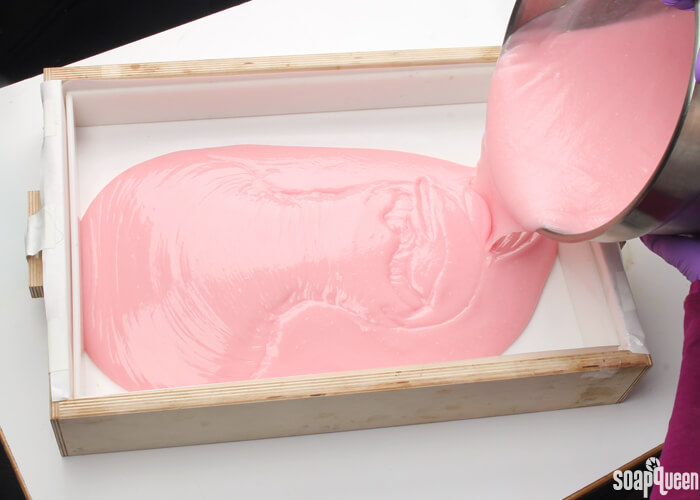 SIX: Use a spoon or spatula to spread the soap evenly throughout the mold.
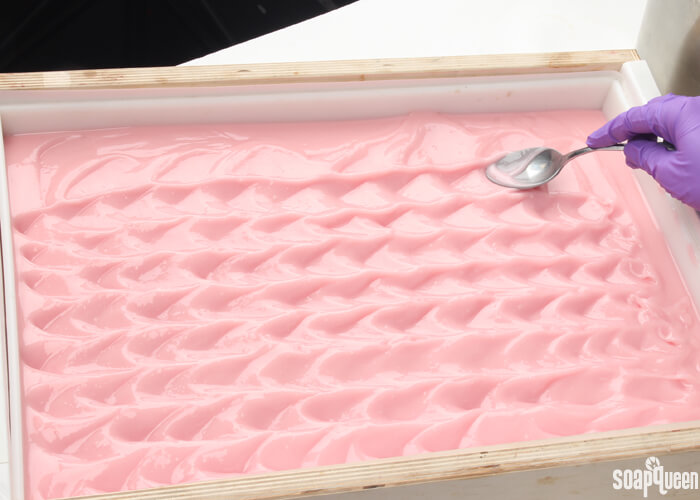
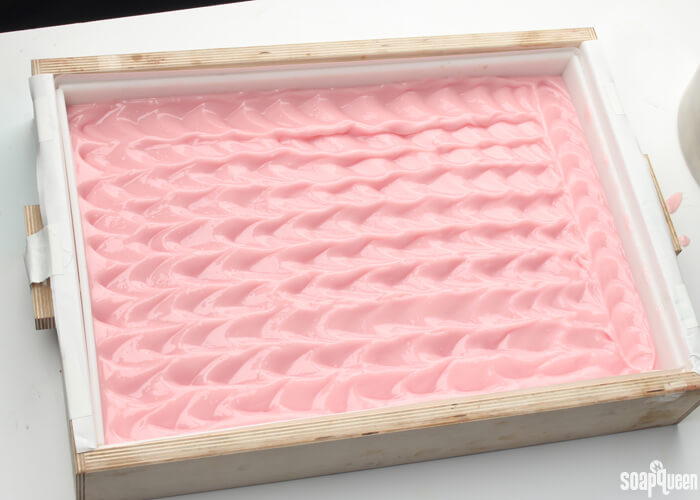
SEVEN: To give the top of the soap slight texture, use a small spoon to make waves down the length of the mold. Continue until the entire batch of soap is textured. There is not right or wrong way to do this; just keep in mind you’re placing the dividers into the soap next, so don’t worry about it looking perfect.
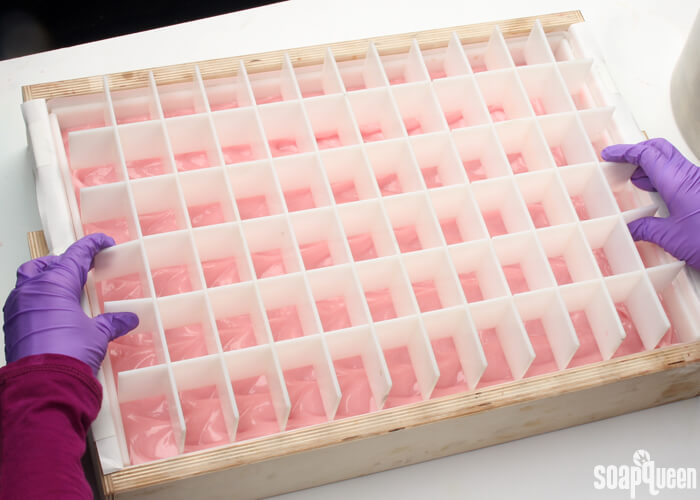
EIGHT: Place the divider set into the mold, and push to the bottom.
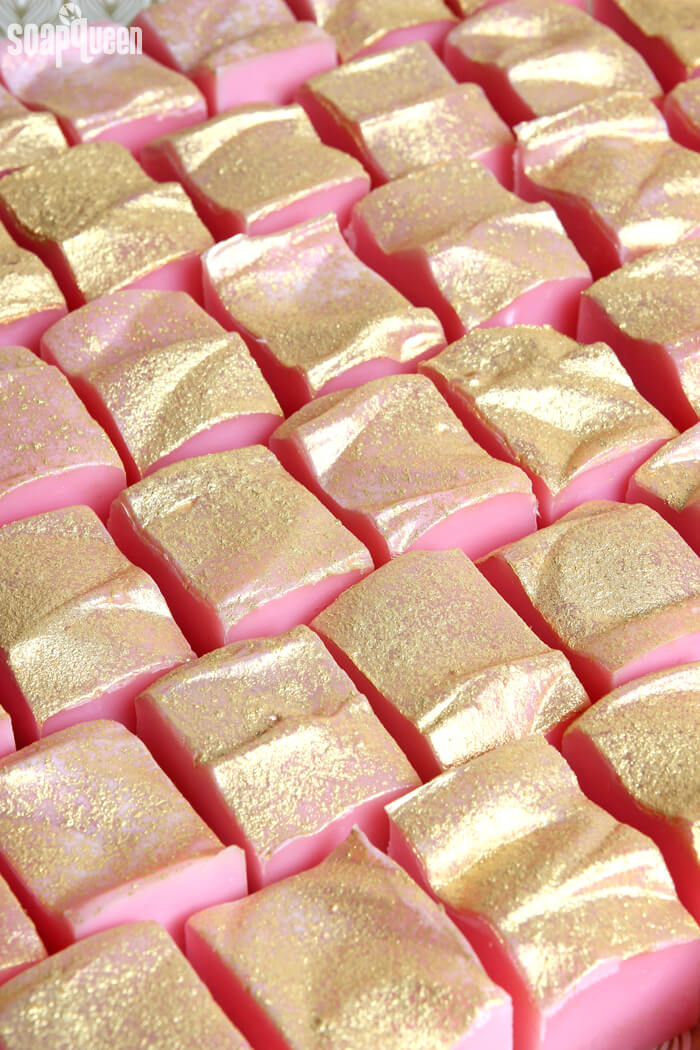
NINE: Place a few spoonfuls of Gold Sparkle Mica into a powder duster or sifter, and gently dust the top with the mica until lightly covered. Then, blow gently on the mica to help disperse it evenly on top of the layer. Watch out, this part can get a bit messy! Hopefully you’re still wearing goggles; close your eyes if they’re not fully protected on all sides. The mica does poof upwards and all over.
Cover the soap to insulate for 24 hours. Then allow the soap to stay in the mold for another 2-3 days to harden. Carefully remove the soap from the mold and peel away the parchment paper from the back. If the bottom of the soap still feels soft, lay the soap on a flat surface with the bottom facing up, allowing the dividers to touch the counter. Let the bottom of the soap harden like this for one day. Once the soap seems firm enough to handle and touch, try pushing a corner bar down to release from the mold. Then, begin to wiggle the dividers up or down to help slide the dividers away from the soap. Never pull the dividers away, as this can tear the sides. Allow the soaps to cure for 4-6 weeks before wrapping or using them. Enjoy!
Have you ever created soap favors for a wedding, or another type of gathering? I would love to hear any tips you have!
Cold Process Soap Wedding Favor Tutorial + Free Printable
Ingredients
- 36 Bar Birchwood Mold
- Guest Dividers for 36 Bar Birch Mold
- 108 oz. Lots of Lather Quick Mix
- 15.5 oz. Sodium Hydroxide Lye
- 35.6 oz. Distilled Water
- Electric Bubble Gum Colorant
- Gold Sparkle Mica
- 7 oz. Lily of the Valley Cybilla Fragrance Oil
- Optional: Wedding Favor Label PDF
Instructions
SAFETY FIRST: Suit up for safe handling practices! That means goggles, gloves and long sleeves. Make sure kids, pets, and other distractions and tripping hazards are out of the house or don’t have access to your soaping space. Always soap in a well-ventilated area.
COLOR PREP: Disperse 1 teaspoon of the Electric Bubble Gum Colorant into 1 tablespoon lightweight liquid oil, such as sunflower or sweet almond oil. Use a mini mixer to help get rid of any clumps. Have the Gold Sparkle Mica and a powder duster nearby to dust the top of the soap once it has been poured into the mold.
FRAGRANCE PREP: Measure 7 ounces of the Lily of the Valley Cybilla Fragrance Oil in a glass, fragrance oil safe container. Set aside.
MOLD & DIVIDER PREP: Line the 36 Bar Birchwood Mold with freezer paper with the shiny side up. For tips on how to line the mold, click here. Place the four border pieces of the divider set against the sides of the mold. Then, assemble the Guest Divider Set. For tips on assembling the dividers, click here.
- Slowly and carefully add the lye to the water and gently stir until the lye has fully dissolved and the liquid is clear. Set aside to cool.
- Fully melt the entire bag of Lots of Lather Quick Quick Mix until there is no cloudiness. Shake to mix and pour the entire bag into a very large soaping container. Make sure the container is big enough to comfortably fit the oils and lye water solution. Once the lye water and the oils have cooled to 130 degrees or below (and are ideally within 10 degrees of each other), add the lye water to the oils and stick blend until thin trace. If you’d like a harder bar of soap that releases faster from the mold, you can add sodium lactate to the cooled lye water. Use 1 teaspoon of sodium lactate per pound of oils in the recipe. For this recipe, you’d add about 6.5 teaspoons sodium lactate.
- THREE: Add 1 tablespoon of the dispersed Electric Bubble Gum Colorant into the soap batter, and alternate stirring and pulsing with the stick blender to thoroughly mix in the colorant. Be careful to not over stick blend. If necessary, switch to a whisk to make sure the soap batter does not become too thick.
- Add all of the measured Lily of the Valley Cybilla Fragrance Oil into the mixture and thoroughly whisk in the fragrance oil. When working with such a large batch of soap, I like to mix a little longer than usual with a whisk just to make sure the fragrance oil is fully incorporated throughout the batter.
- Once the fragrance is thoroughly mixed in and the soap has the texture of a thin pudding, pour all the soap into the mold. Use a spoon or spatula to spread the soap evenly throughout the mold.
- To give the top of the soap slight texture, use a small spoon to make waves down the length of the mold. Continue until the entire batch of soap is textured. There is not right or wrong way to do this; just keep in mind you’re placing the dividers into the soap next, so don’t worry about it looking perfect.
- Place the divider set into the mold, and push to the bottom.
- Place a few spoonfuls of Gold Sparkle Mica into a powder duster or sifter, and gently dust the top with the mica until lightly covered. Then, blow gently on the mica to help disperse it evenly on top of the layer. Watch out, this part can get a bit messy
- Cover the soap to insulate for 24 hours. Then allow the soap to stay in the mold for another 2-3 days to harden. Carefully remove the soap from the mold and peel away the parchment paper from the back. If the bottom of the soap still feels soft, lay the soap on a flat surface with the bottom facing up, allowing the dividers to touch the counter. Let the bottom of the soap harden like this for one day. Once the soap seems firm enough to handle and touch, try pushing a corner bar down to release from the mold. Then, begin to wiggle the dividers up or down to help slide the dividers away from the soap. Never pull the dividers away, as this can tear the sides. Allow the soaps to cure for 4-6 weeks before wrapping or using them. Enjoy!