• January 30, 2013

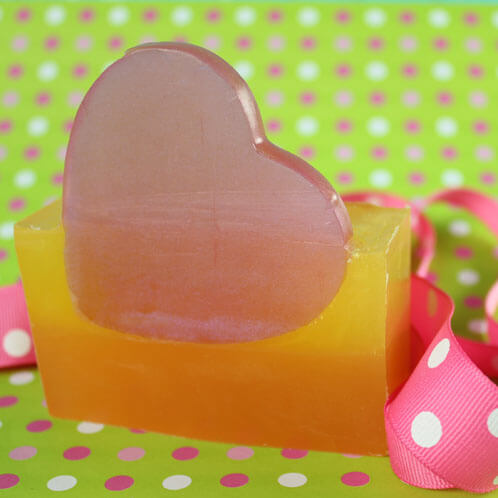
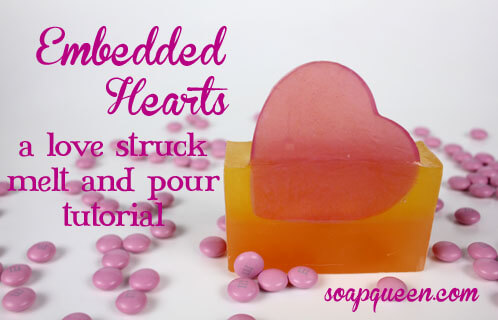
As we head full swing into February, love is in the air. Here’s an adorable melt and pour project that is great for practicing layers and embedding. I used a unique trick to get these heart cut-outs to sit up on their sides. Read on and try not to fall in love with this soap.

Embedded Hearts

Recipe:

55 oz. Clear Melt and Pour Soap Base

 Shimmer Yellow Color Block

 Perfect Orange Color Block

 Super Pearly White Color Block

 Red Blue Mica

 Mango Peach Salsa Fragrance Oil

 Heart Shaped Soap Cutter

 Glossy Silicone Square Tray Mold

Silicone Loaf Mold

  Mini-Scoop

 Click here to add everything you need for this project to your Bramble Berry shopping cart!

ONE: Cut the Clear Melt and Pour into approximately 1 inch cubes. Split the cubes into three heat-safe containers, one with 9 ounces of soap base and the other two with 23 ounces of soap base each.

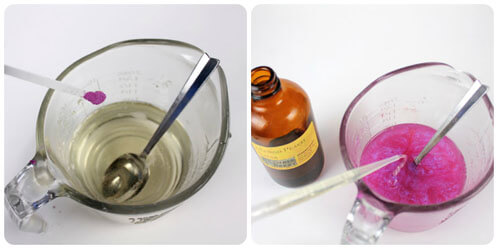
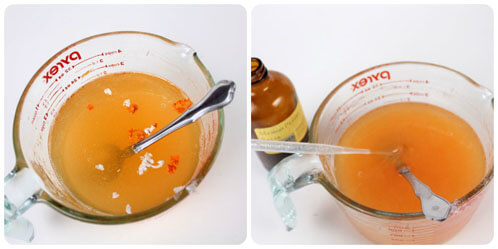
TWO: Melt the 9 ounce portion of soap base in the microwave on 30 second bursts, stirring between bursts. Once the soap base is fully melted, add 2-3 heaping mini scoops of Red Blue mica and mix until there are no more clumps. Spray a bit of Isopropyl (Rubbing) Alcohol in there to help disperse the mica clumps. After the mica is mixed, add 6 mL Mango Peach Salsa Fragrance oil and mix in well.

Adding Mica and FO to heart soap

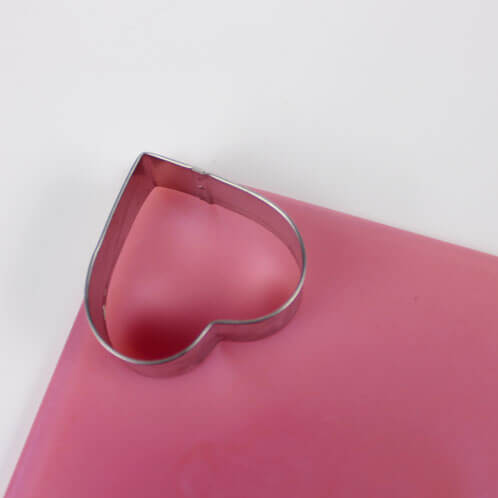
THREE: Pour the soap into the Brownie Tray Mold and spritz with Isopropyl (Rubbing) Alcohol to pop any surface bubbles. Allow to fully harden. Once the soap has fully hardened, unmold it and use the Heart Shaped Cutter to cut out the embeds for the top of the soap. Set the embeds aside for now, but keep the Brownie Tray Mold handy for the next few steps.

Cutting Heart Embeds

FOUR:  Melt one of the 23 ounce portions of soap base in the microwave on 30 second bursts, stirring between bursts. Once the soap base is fully melted, add enough Shimmer Yellow Color Block shavings for your ideal color (what you see is what you get!) and stir until the color block bits have fully melted. Add 0.5 ounces of Mango Peach Salsa Fragrance Oil and stir until mixed.

Pouring Yellow Soap

TIP: First time using color blocks? Check out this quick vid for a great demo!

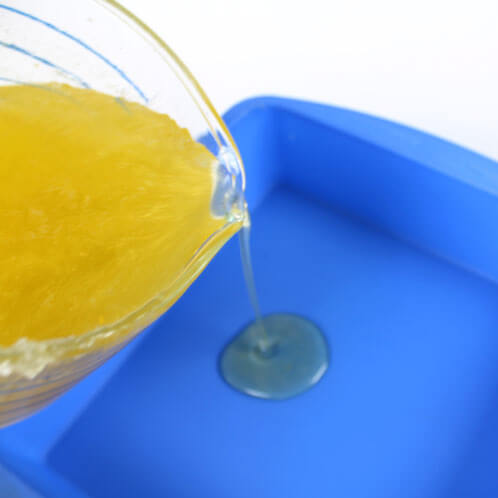
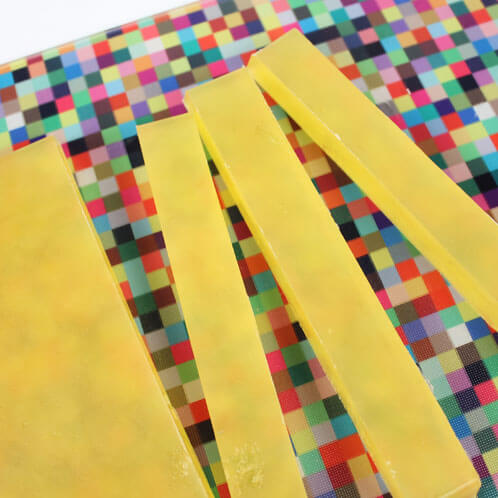
FIVE: Pour the yellow soap into the Brownie Tray Mold and spritz with Isopropyl (Rubbing) Alcohol to pop any surface bubbles. Allow to fully harden. Once hardened, unmold and cut into one inch strips. Cut the one inch strips into blocks that are about two inches long. Set the blocks aside.

Cutting Yellow Soap into Strips

SIX: Melt the second of the 23 ounce portions of soap base in the microwave on 30 second bursts, stirring between bursts. Once the soap base is fully melted, add Perfect Orange and Super Pearly White Color Block shavings to get a great shimmery orange  (remember that what you see is what you get!) and stir until the color block bits have fully melted. Add 0.5 ounces of Mango Peach Salsa Fragrance Oil and stir until mixed.

Color and Fragrance in Orange Soap

SEVEN: Pour the orange soap into the Silicone Loaf Mold and spritz with Isopropyl (Rubbing) Alcohol to pop any surface bubbles. Set aside and allow to fully harden.

Pouring Orange Soap

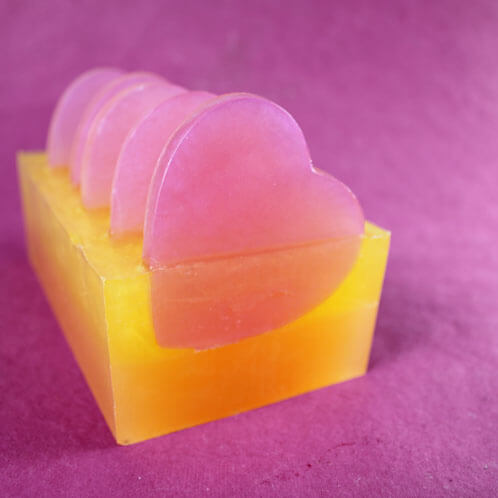
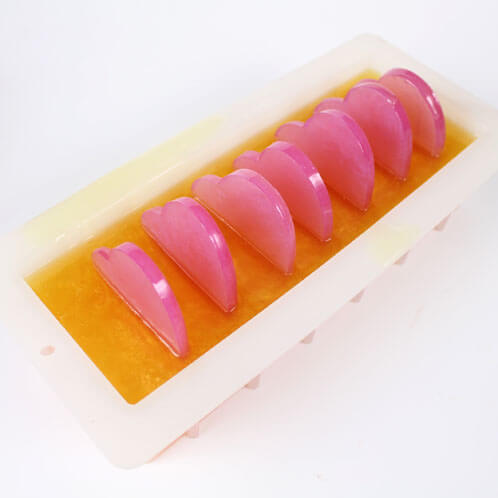
EIGHT: Once the orange soap has fully hardened, arrange the heart cut-outs standing upright, using the yellow blocks between each heart as props. Re-melt unused yellow blocks on 30 second bursts in the microwave until completely melted.

Blocks and Hearts

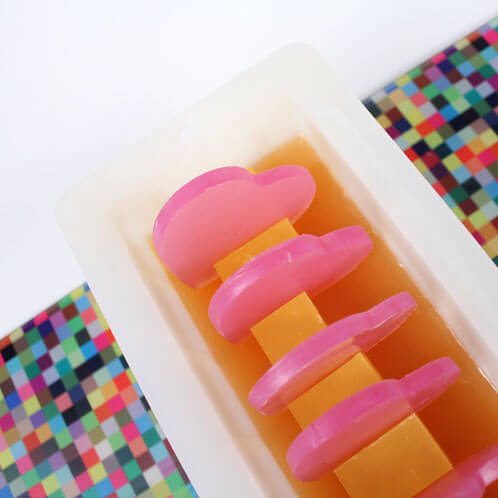
NINE: Spray the hearts and yellow blocks liberally with Isopropyl (Rubbing) Alcohol. Check the temperature of the melted yellow soap; if it’s 135 degrees or under, pour over the embeds until the mold is full. Spray again with Isopropyl (Rubbing) Alcohol and allow to harden.

Poured Yellow Soap

TEN: Carefully unmold the soap. How to cut it is up to you! I cut mine right up against the hearts so that they were in the spotlight on one side of the soap. These soaps are ready to use right away, or wrap them with an air-tight method (like plastic wrap) if they’re to be saved for later. Enjoy!

Hearts in a Row

Embedded Heart

You may also like these

Become an email subscriber

Enter your email address below and you will receive all our new posts directly in your email inbox.

  1. The tutorials are great the videos work better for me since I lear by watching and doing

    1. Hi Karyn!

      I’m happy to hear you are enjoying the tutorials and videos! We wish that we could do a video for every tutorial, but they take quite a lot of time 🙂 I hope you give this project a try, it’s a lot of fun!

      -Amanda with Bramble Berry

  2. I received the 9″ silicone heart mold and made my first two heart soap logs from it(one pink, one red.) My next step is to put them into a “bar” form. Sounds like I need to be sure to spray with iso-alcohol and make sure my (white) soap base is under 130 degrees, as to not melt my hearts. I was a little concerned about that… Your site is so helpul with things like this!!! Many thanks!

    1. Hi Vicky!

      It sounds like you’re going to have a really cute bar of soap! You may be interested in our Rainbow Hearts Melt and Pour Project, it uses the Silicone Heart Embed 🙂 You’re right, keeping an eye on the temperature and spraying with alcohol is important. If you get photos of your project, we would love to see them on our Facebook page!

      Rainbow Hearts Melt and Pour:
      https://soapqueen.com/bath-and-body-tutorials/melt-and-pour-soap/rainbow-hearts-melt-pour/

      -Amanda with Bramble Berry

      1. Hi! I made 1 pink & 1 red heart and surrounded them with white (goats milk M&P) and they worked great.
        I would recommend keeping a knife blade (Xacto) handy so any “whiskers” on the hearts can be removed cleanly when taken out of the mold.
        But about two weeks later I discovered the pink & red bled into the white. I used colorants from my local soap crafter (not a chain craft store.) What can I do to prevent this from happening?

  3. I love this soap a question is important to use isopropyl alcohol in all melt and pour soaps? because I use ethyl alcohol and when I layered soap when I split mold bag

    1. Good morning, Kathy!

      We have found that the Isopropyl Alcohol (Rubbing Alcohol) to be the best for us when trying to adhere the layers together as well as get rid of the air bubbles in the soap. You can also use the Isopropyl Alcohol on your cold process soaps to help prevent soda ash as well! I hope this helps. Let us know if you have any other questions. =)

      -Becky with Bramble Berry

      Isopropyl Alcohol (99%): https://www.brambleberry.com/Isopropyl-Alcohol-99-16-oz-P5682.aspx

  4. I love this idea! I have a bride who would love this for her wedding in May! her colors are deep plum with a soft lavander and lemon yellow for the heart which would be perfect! Thanks for the tutorial. I am making a sample for her to check out before she orders for her May wedding! My first BIG order!! Lots of practice planned for the next few months!

  5. This is soooo cute! 🙂 Love the color scheme. It’s bright, cheery, & fun! I have “mango peach salsa” fragrance (not from BB) & it smells sooooo good! I wonder if they smell similar? I’lll have to order some & compare.

    ~Nickie~

Comments are closed.

{"email":"Email address invalid","url":"Website address invalid","required":"Required field missing"}

The Latest from Soap Queen TV

Inspired by Gems & Crystals

All About Essential Oils

The Power of Charcoal

Create Your Own Clay Face Mask

DIY Bath Bombs

Cold Process Soap Tips & Tricks

Learn the Basics of Cold Process Soapmaking

Learn the Basics of Melt & Pour Soapmaking

Want to Start Your Own Soap Business?

Soap Business Success Stories

Soap Queen TV Favorites

Ingredient Spotlight

Disclosure

Unless stated otherwise, all images are original material and are copyrighted. If you'd like to use an image, please be a friend and credit the photo and link back to Soap Queen. Feel free to share, tweet and pin to your hearts content.