 The Swiss Alps are bustling with wildlife, including marmots, red deer and foxes. Another familiar sight is goats grazing on the hills. Not only are goats adorable, but their milk can be for a variety of projects, including soap. It gives the soap a creamy, silky feeling. The Goat Milk Melt and Pour Base from Bramble Berry is made with 10% goat milk and feels amazing on the skin.
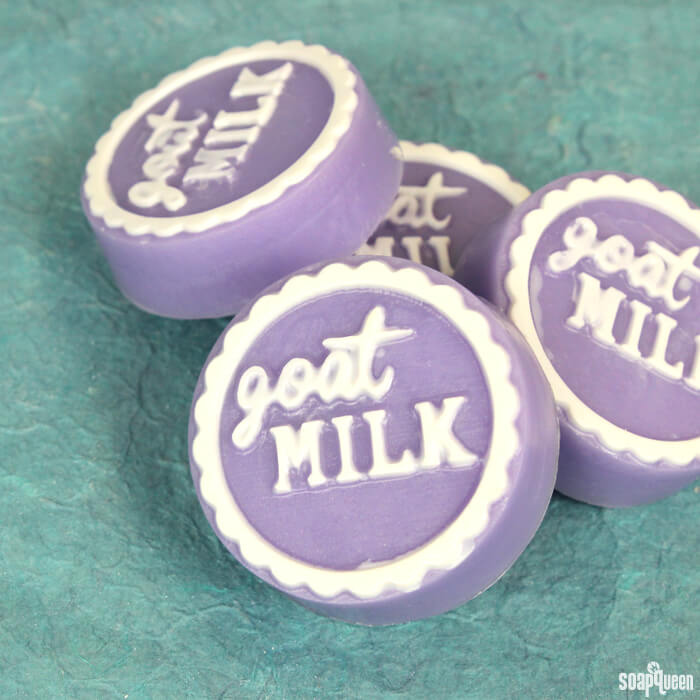
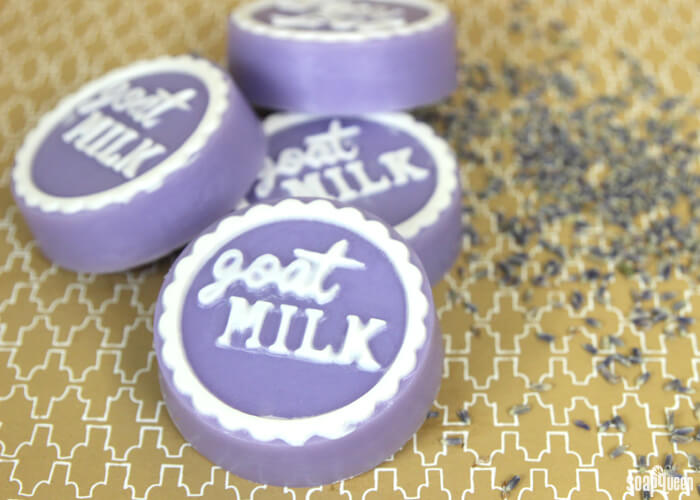 The goat milk base used in this Lavender Goat Milk Melt and Pour Soap adds luxury and a touch of shimmer. The goat milk lettering is a beautiful contrast to the base, which is colored with the Ultramarine Violet Color Block. To go along with the shimmery purple, an earthy blend of Lavender 40/42 Essential Oil and Spring Meadow Fragrance Oil are used. You’ll have a blast making this easy and beautiful soap!
What You’ll Need:
Goat Milk Mold
2 oz. Goat Milk Melt and Pour
11 oz. Clear Melt and Pour
Super Pearly White Color Block
Ultramarine Violet Color Block
0.2 oz. Spring Meadow Fragrance Oil
0.1 oz. Lavender 40/42 Essential Oil
Optional: Droppers and 99% Isopropyl Alcohol

Click here to add everything you need for this project to your Bramble Berry shopping cart!
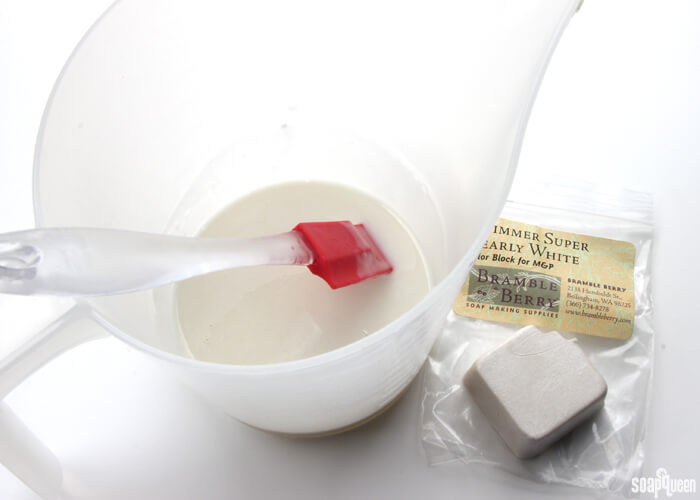
ONE: Chop 2 oz. of Goat Milk Melt and Pour Base into small, even pieces. Place the soap in a heat-safe container and melt in the microwave using 5 second bursts, stirring in between each burst. Using short bursts prevents the soap from scorching. Read more about burnt melt and pour and how to prevent it here.
TWO: Add shavings of the Super Pearly White Color Block until the soap has a slight shimmer.
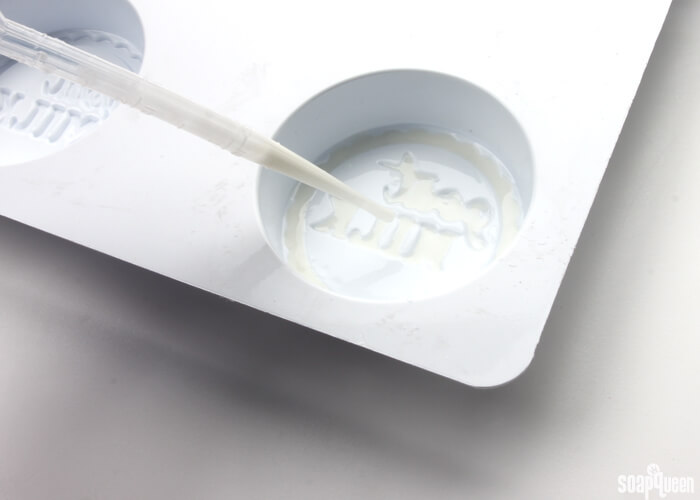
THREE: Spray the mold with a thin layer of 99% isopropyl alcohol. Using a dropper, squeeze the white soap into the lettering and the border. Spraying the mold with alcohol beforehand helps the soap spread easily into the letters and borders. Spritz the top with alcohol to disperse any bubbles. Allow to fully cool and harden. Save the container with any leftover Goat Milk Melt and Pour. If you drop outside the ‘lines’, you can use the back of a spoon or the scraper clean up tool to scrape off any excess soap.
FOUR: Chop 11 oz. of Clear Melt and Pour Base into small, even pieces. Place the soap into the same container as the leftover Goat Milk Melt and Pour. Adding the clear soap to the small amount of goat milk base gives the bars a semi-opaque look. Melt in the microwave using 20 second bursts, stirring in between each burst. Using short bursts prevents the soap from scorching.
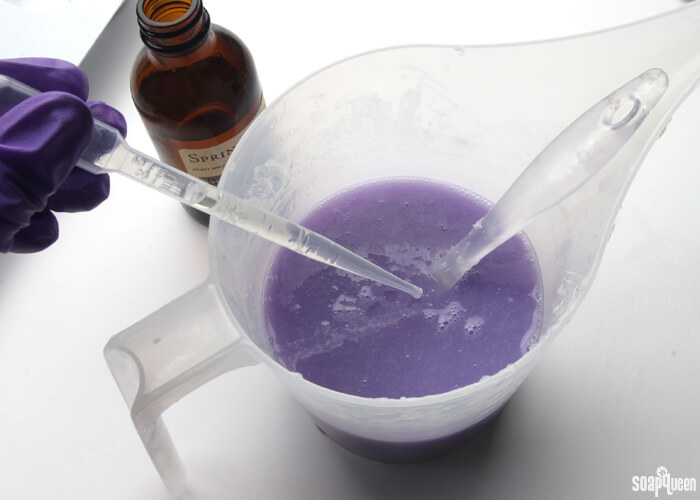
FIVE: Add the Spring Meadow Fragrance Oil and Lavender 40/42 Essential Oil and stir until fully incorporated. Add shavings of Ultramarine Violet Color Block until a medium purple color is achieved.
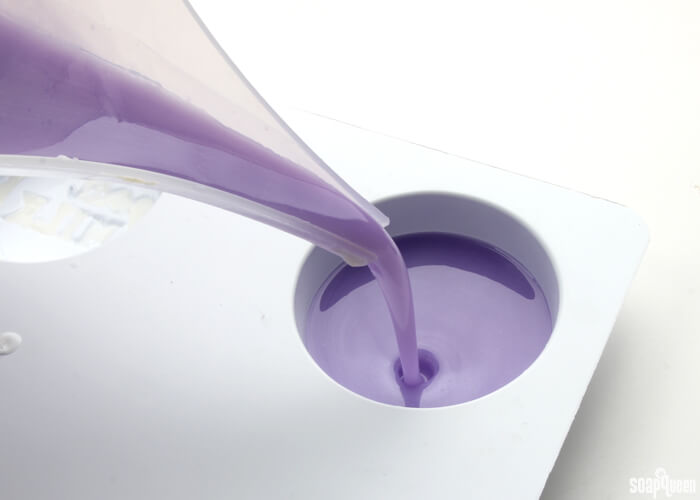
SIX: Check the temperature of the purple soap. If the soap is warmer than 130°F, it will melt the white lettering. When the soap is at the correct temperature, spritz the white layer with alcohol to help the layers stick together. Gently pour the purple soap on top and spritz with alcohol to disperse any bubbles. You want to do the layers within quick succession of each other; if you wait even a day for the two layers, they run the risk of not sticking together.
SEVEN: Allow the soap to fully cool and harden, which takes about 1-2 hours. Pull at the sides of the cavities to break the air lock on the soap. Flip the mold over. Using your thumbs or the heel of your hand, push the soap out and enjoy! If you’re having trouble getting the soap out of the mold, pop the fully hardened soap into the freezer for 10-15 minutes. Then, use your thumbs to push out of the mold.
Have you ever used milk in soap before? What do you think?

Lavender Goat Milk Melt and Pour
Ingredients
- Goat Milk Mold
- 2 oz. Goat Milk Melt and Pour
- 11 oz. Clear Melt and Pour
- Super Pearly White Color Block
- Ultramarine Violet Color Block
- 0.2 oz. Spring Meadow Fragrance Oil
- 0.1 oz. Lavender 40/42 Essential Oil
- Optional: Droppers and 99% Isopropyl Alcohol
Instructions
- Chop 2 oz. of Goat Milk Melt and Pour Base into small, even pieces. Place the soap in a heat-safe container and melt in the microwave using 5 second bursts, stirring in between each burst. Using short bursts prevents the soap from scorching.
- Add shavings of the Super Pearly White Color Block until the soap has a slight shimmer.
- Spray the mold with a thin layer of 99% isopropyl alcohol. Using a dropper, squeeze the white soap into the lettering and the border. Spraying the mold with alcohol beforehand helps the soap spread easily into the letters and borders. Spritz the top with alcohol to disperse any bubbles. Allow to fully cool and harden.
- Chop 11 oz. of Clear Melt and Pour Base into small, even pieces. Place the soap into the same container as the leftover Goat Milk Melt and Pour. Adding the clear soap to the small amount of goat milk base gives the bars a semi-opaque look. Melt in the microwave using 20 second bursts, stirring in between each burst. Using short bursts prevents the soap from scorching.
- Add the Spring Meadow Fragrance Oil and Lavender 40/42 Essential Oil and stir until fully incorporated. Add shavings of Ultramarine Violet Color Block until a medium purple color is achieved.
- Check the temperature of the purple soap. If the soap is warmer than 130°F, it will melt the white lettering. When the soap is at the correct temperature, spritz the white layer with alcohol to help the layers stick together. Gently pour the purple soap on top and spritz with alcohol to disperse any bubbles.
- Allow the soap to fully cool and harden, which takes about 1-2 hours. Pull at the sides of the cavities to break the air lock on the soap. Flip the mold over. Using your thumbs or the heel of your hand, push the soap out and enjoy! If you’re having trouble getting the soap out of the mold, pop the fully hardened soap into the freezer for 10-15 minutes. Then, use your thumbs to push out of the mold.