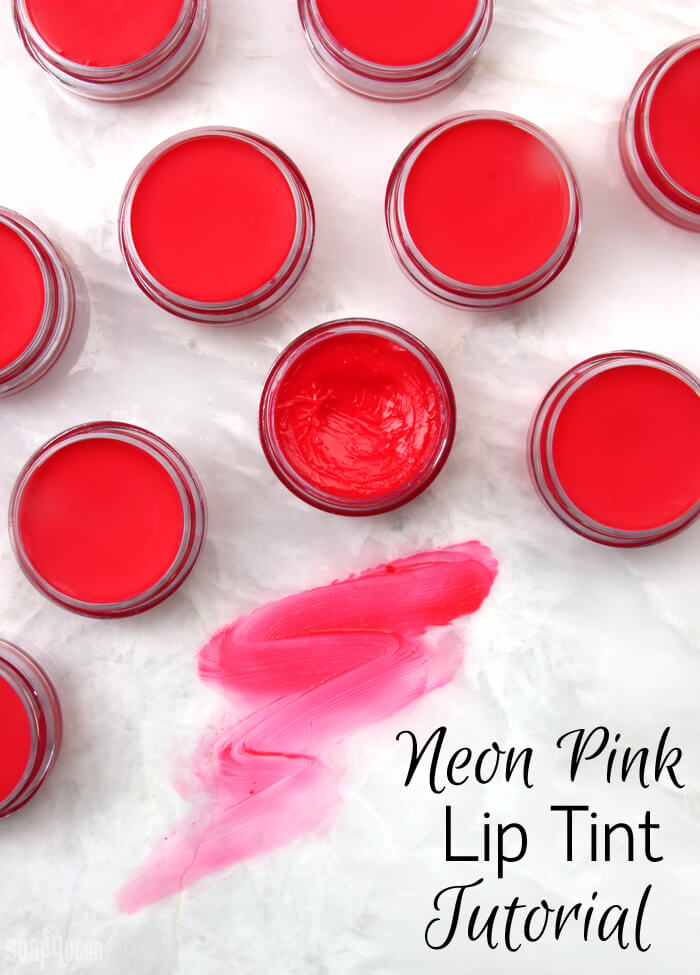
Summer is the perfect time to try bright makeup colors. If the idea of bright cosmetics makes you feel a little intimated, sheer lip colors are one way to try the look without committing fully. This Neon Pink Lip Tint has a sheer yet buildable color. Use your fingers or a brush to apply a thin layer for a tint of color, or apply more with a lip makeup brush for a more bold look.
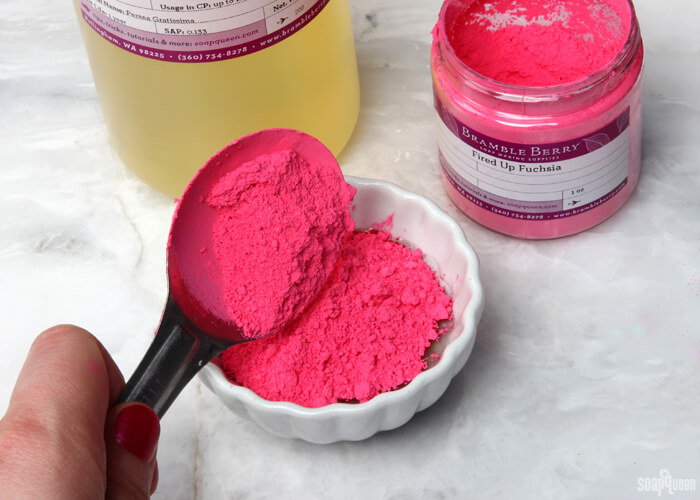
I designed this recipe to be simple and easy to make. Avocado oil and cocoa butter are added to moisturize lips, while beeswax gives the tint a solid texture. The tint gets its hot pink hue from Fired Up Fuchsia Colorant. It’s mixed with some of the avocado oil using a Mini White Plastic Mixer. This helps get rid of any clumps and mix in smoothly.

What You’ll Need:
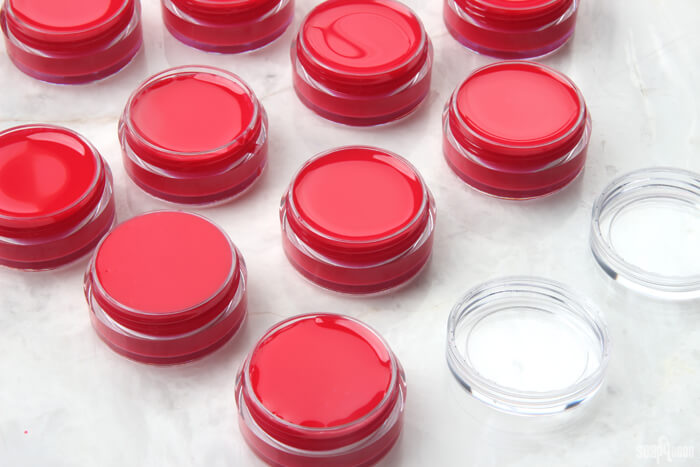
10 Non-Stackable Clear Lip Butter Pots
6 Tbs. Avocado Oil
2 Tbs. Cocoa Butter Pastilles
2 tsp. White Beeswax
2 Tbs. Fired Up Fuchsia Colorant
Optional: Mini White Plastic Mixer

Click here to add everything you need for this project to your Bramble Berry shopping cart!
[sq_products]
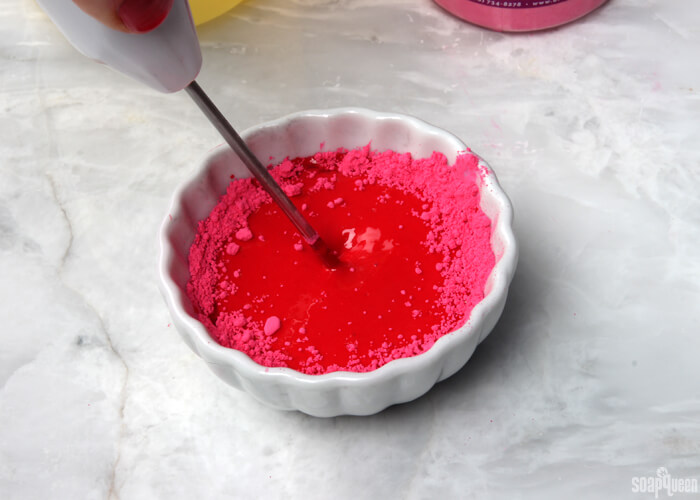
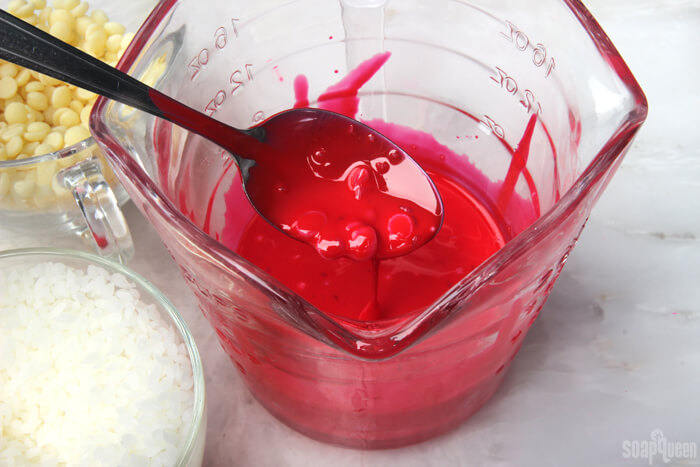
 ONE: In a small container, add 2 tablespoons of avocado oil. Then, add the Fired Up Fuchsia Colorant and mix the two together until completely smooth. Use the Mini White Plastic Mixer to help remove clumps.
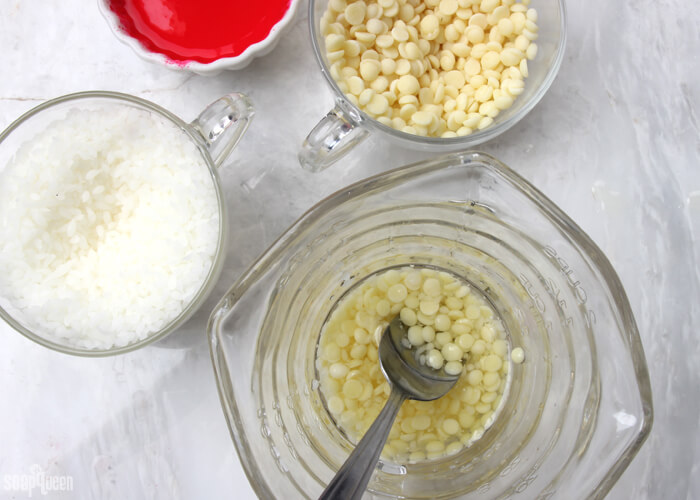
 TWO: In a separate heat-safe container, add the remaining 4 tablespoons of avocado oil. Add the white beeswax and cocoa butter pastilles. Then, add the pink colorant mixture and stir together.
 THREE: Place the container into the microwave, and heat on 30 second bursts. Continue to microwave until the cocoa butter and beeswax are completely melted. Be careful when removing the container, as it may be very hot. Stir to fully incorporate the ingredients together.
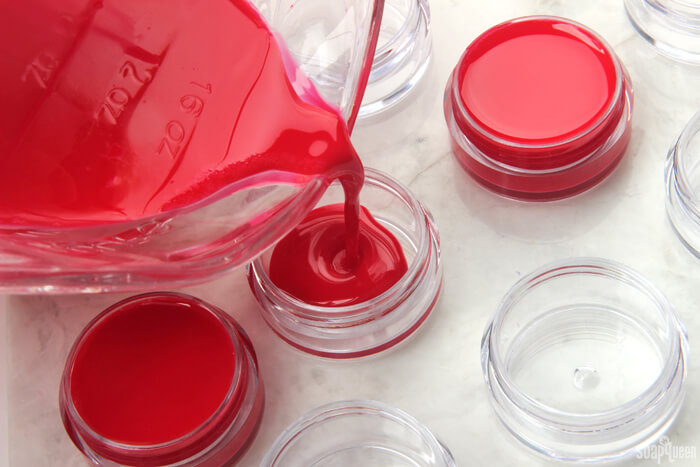
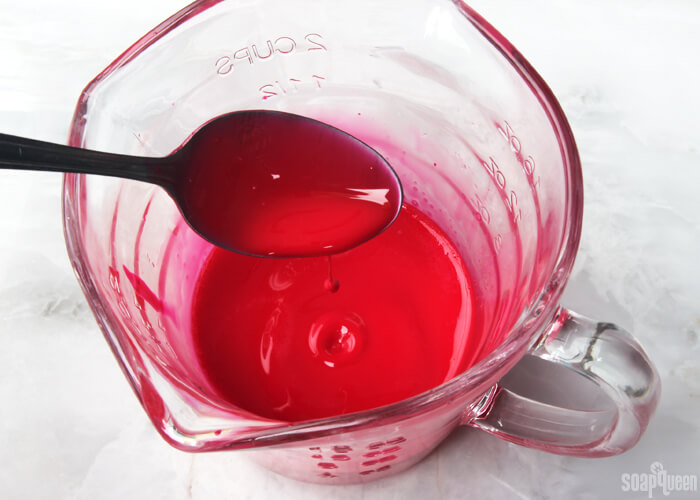 FOUR: Continue to stir the mixture until it cools slightly (several minutes). Carefully pour the mixture into the lip butter pots and allow to fully cool. Use your fingers or a lip brush to apply. Enjoy!


Neon Pink Lip Tint Tutorial
Ingredients
- 10 Non-Stackable Clear Lip Butter Pots
- 6 Tbs. Avocado Oil
- 2 Tbs. Cocoa Butter Pastilles
- 2 tsp. White Beeswax
- 2 Tbs. Fired Up Fuchsia Colorant
- Optional: Mini White Plastic Mixer
Instructions
- In a small container, add 2 tablespoons of avocado oil. Then, add the Fired Up Fuchsia Colorant and mix the two together until completely smooth. Use the Mini White Plastic Mixer to help remove clumps.
- In a separate heat-safe container, add the remaining 4 tablespoons of avocado oil. Add the white beeswax and cocoa butter pastilles. Then, add the pink colorant mixture and stir together.
- Place the container into the microwave, and heat on 30 second bursts. Continue to microwave until the cocoa butter and beeswax are completely melted. Be careful when removing the container, as it may be very hot. Stir to fully incorporate the ingredients together.
- Continue to stir the mixture until it cools slightly (several minutes). Carefully pour the mixture into the lip butter pots and allow to fully cool. Use your fingers or a lip brush to apply. Enjoy!
Can I use yellow beeswax instead of white? Thank you
Yes, you can use yellow beeswax in this recipe. It will affect the color of the tint, so you may want to make a small test batch first to see what you think. Then you can adjust the color from there if you need to.
Yellow beeswax: https://www.brambleberry.com/yellow-beeswax-p4206.aspx
Hai there. Thank you for your recipe. If I may know,
1. does the lip tint feel so heavy / oily on the lips ?
2. Does the colour easily stick to glass/cup when we drink ?
3. Can I use the lipgloss container that has brush in it to pour in the mixture instead of using lipbalm pot/tube?
I appreciate your answer. Thank you 😉
This lip tint will fill pretty glossy and moisturizing. The cocoa butter is a bit heavier, but the avocado oil is lightweight. It’s a nice mix of moisturizing without being too heavy. Because it is more glossy, it will transfer to cups throughout the day. Also, it should be soft enough to apply with a brush.
-Kelsey with Bramble Berry
Thank you 🙂
Since I dont have cocoa butter here, can I use mango butter with beeswax? & Can I mix avocado oil, sweet almond oil, castor oil, argan oil & rosehips oil all together ? If can, what is the measurement ?
A typical lip balm formula is 1:1:1 butter, wax, and oil. That’s a good place to start. You can experiment with the different oils and mango butter until you get a consistency you like. Learn more about formulating lip products here: https://soapqueen.com/bath-and-body-tutorials/lip-products/how-to-create-lip-product-recipes/
-Kelsey with Bramble Berry
Hi..can i use sunflower oil instead of avocado oil? And can i use refined shea butter instead of cocoa butter? Thank u..loved every single thing about this blog!
You can use sunflower and shea butter in this recipe. Shea butter is softer than cocoa butter and sunflower oil is a bit lighter than avocado, so the consistency of the balm will change. You may want to make a small test batch to see what you think.
-Kelsey with Bramble berry
Shea butter: https://www.brambleberry.com/Shea-Butter-P3220.aspx
Sunflower oil: https://www.brambleberry.com/Sunflower-Oil-P3208.aspx
Hello, its can’t find any cocoa butter pastilles in my country. Can i use the natural cocoa butter instead? How to adjust the amount? Thank you… From a big fan frm Malaysia
You can use natural cocoa butter! You can use the same amount as the pastilles in this recipe (2 Tbsp.) 🙂
-Kelsey with Bramble Berry
I notice that in all of your lip recipes that carnauba wax is never used. Is there a particular reason why this wax isn’t used in your recipes? Most cosmetic manufacturers use carnauba wax in their lip products, especially in lipstick recipes. I like it because it give such a firm texture and won’t melt in lip tubes or lip pots in high heat. I tried many times to incorporate bees wax into my lip blend and each time it leaves a film like coating on my lips. I so want to use bees wax, but cannot get it to work for me.
We don’t carry canauba wax so we haven’t done a lot of experimenting with it! We will definitely keep it in mind for future tutorials. You may also like candelilla wax! It has a softer texture than beeswax. 🙂
Candelilla wax: https://www.brambleberry.com/Candelilla-Wax-P4207.aspx
Learn more about wax options for lip products here: https://soapqueen.com/bath-and-body-tutorials/lip-products/how-to-create-lip-product-recipes/
-Kelsey with Bramble Berry
Can I use a natural colorant instead?
We don’t recommend natural colorants for lip balm. Many of them aren’t approved lip safe colors. You’ll want to use only lip safe colors in your balms and lipsticks: https://www.brambleberry.com/Lip-Safe-Colors-C679.aspx
-Kelsey with Bramble Berry
Hi. I would like to adjust this recipe to make it Vegan. What can you suggest I use instead of the beeswax in this recipe? Thanks
Hi Linda!
You can use candelilla wax, which is a vegetable wax! It does have a softer texture than the beeswax. So, when the balm is melted, dip a cold spoon in so you can feel the texture. If you want the balm a bit harder, you can add more cocoa butter. 🙂
Candelilla wax: https://www.brambleberry.com/Candelilla-Wax-P4207.aspx
And learn more about The Spoon Trick here: https://soapqueen.com/bath-and-body-tutorials/tips-and-tricks/spoon-trick/
-Kelsey with Bramble Berry
hi, what can i add to make it more like a lipstick so it applies the color evenly and not splotchy (will cera bellina help with this?) and something that maybe dries it a little or gives a more matte finish?
Hi Vanessa!
To make the color a bit more opaque, you can add more Fired Up Fuchsia Colorant! You can also add a tiny sprinkle of titanium dioxide. That will help make the recipe less sheer and prevent any splotchiness. 🙂
Titanium dioxide: https://www.brambleberry.com/Titanium-Dioxide-Pigment-P4040.aspx
Because this recipe contains oil and butter, it will have a more glossy/satin finish. Adding cera bellina wax may actually make it a bit more glossy, as that wax has a unique gel-like texture. We haven’t found a way to make the lip products more matte. You can dust setting powder on top though. That helps absorb some of the glossiness and gives it a more matte look!
-Kelsey with Bramble Berry
Cera bellina wax: https://www.brambleberry.com/Cera-Bellina-Wax-P5642.aspx
Hi! Is there a limit on how much titanium dioxide you can put in a lip product? And what’s the acceptable percentage of colorants in a product? Can I put 20% colorant in my lip balm? If I’m making a total 100 grams of lip balm can I put 20% colorant as long as the colorant is lip safe? Thank you!
You can use as much colorant as you like in a lip product, but too much can affect the texture. It can make it feel powdery and not as moisturizing. For 100 grams, I would recommend starting with 1/8 tsp. and going from there.
It helps to keep a few spoons in the freezer so you can check the color of the balm while it’s still melted. Learn more about The Spoon Trick here: https://soapqueen.com/bath-and-body-tutorials/tips-and-tricks/spoon-trick/
I, too, would like to put this in tubes. Could I add some kokum butter rather than adding more beeswax ? Any ideas on how much?
Also, measurements by weights are so much easier to use.
Thank you,
Wallis
This recipe is harder, so it may work in tubes with these measurements! I would recommend testing one lip tint in the tube to see how it works. If it’s a bit soft, I would recommend adding 1/4-1/2 tsp. kokum butter and testing it with a cold spoon. If it’s too soft, you can add more kokum butter from there.
Learn more about The Spoon Trick here: https://soapqueen.com/bath-and-body-tutorials/tips-and-tricks/spoon-trick/
Also, thank you for your feedback about the measurements! We thought the volume measurements would be great for beginners who may not have a scale on hand. We’ll definitely keep your feedback in mind for future lip tutorials. 🙂
-Kelsey with Bramble Berry
I would like to put this in tubes how much more bees wax should I add?
This recipe is fairly hard, so it may work it tubes as is! I would recommend making one lip tint in the tube to see how it works. If it’s a bit too soft, I would recommend adding 1/4-1/2 tsp. more beeswax and testing it with a cold spoon. If it needs to be a bit more firm, you can add more beeswax from there. 🙂
Learn more about The Spoon Trick here: https://soapqueen.com/bath-and-body-tutorials/tips-and-tricks/spoon-trick/
-Kelsey with Bramble Berry
Lip balm tubes: https://www.brambleberry.com/Lip-Balm-Tubes-P3024.aspx
Clear lip balm tubes: https://www.brambleberry.com/Clear-Lip-Balm-Tubes-P4750.aspx
Can anyone show how it wears on the lips? I like to make these for my 3 daughters and neice.. 🙂
We don’t have swatch pictures, sorry about that! I can tell you it’s a nice light pink color on the lips. It has a fairly sheer coverage, but can be built up for a brighter pink. 🙂
-Kelsey with Bramble Berry
I don’t have cocoa butter and was wondering if I could substitute Shea butter instead? Maybe up the beeswax portion a little to offset the softer Shea? Also, I have yellow beeswax but no white. Will that change the color of the fuchsia? Thank you! I can’t wait to try this!
You can definitely use shea butter if you like! It is a bit softer than the shea butter, so I would recommend dipping a cold spoon in the balm as you’re making it. It will harden instantly and you can check the consistency. If you want it a bit more firm, you can add some more beeswax. 🙂
Read more about The Spoon Trick here: https://soapqueen.com/bath-and-body-tutorials/tips-and-tricks/spoon-trick/
Also, yellow beeswax may affect the color of the lip tint slightly. It may add a bit of warmth that will look quite nice. You can use the frozen spoon to check the color as well. If you want a bit more pink, you can add it then!
-Kelsey with Bramble Berry
I don’t have the coco butter pastilles so would I use 2 tablespoons of the solid deodorized block?
Hi Michelle!
That would work well! I would recommend breaking off a chunk, cutting it into small pieces and measuring it out with a tablespoon. That will give you the correct measurement. 🙂
-Kelsey with Bramble Berry
Thank you Kelsey
You’re welcome!
This is not intended as a criticism in any way (I love your projects!). However I am curious as to why bath and body projects like this are given in volume measurements instead of weight? I’d really like to make this and was trying to convert it to parts to scale it down, however the weight/volume “part” measurement would be very different for the colorant powder. I’m stumped, weight measurements are so much easier to work with to accurately recreate projects.
Thanks for your help!
Hi Molly!
Good question! For most of our projects, we measure just about everything in weight. It’s more accurate, especially for cold process soapmaking. One exception are colorants; we normally measure our colorants by volume, as some colorant amounts are so small they hardly show up a scale.
Because we get requests for recipes in volume, we decided to make one :). Some find volume measurements a little easier. This is especially true for beginner crafters who may not have a scale at home. The great thing about this recipe is that it’s very forgiving. If you use slightly less or more of one ingredient it will change the texture or color very slightly, but will still work great!
Thanks for your feedback Molly, I’m happy to hear that our recipes in weight are appreciated! 🙂
-Amanda with Bramble Berry
Hooray! Thank you so much! I love the look and can’t wait to try it. 🙂
You’re welcome Nicole! Have fun giving this a try. 🙂
-Kelsey with Bramble Berry