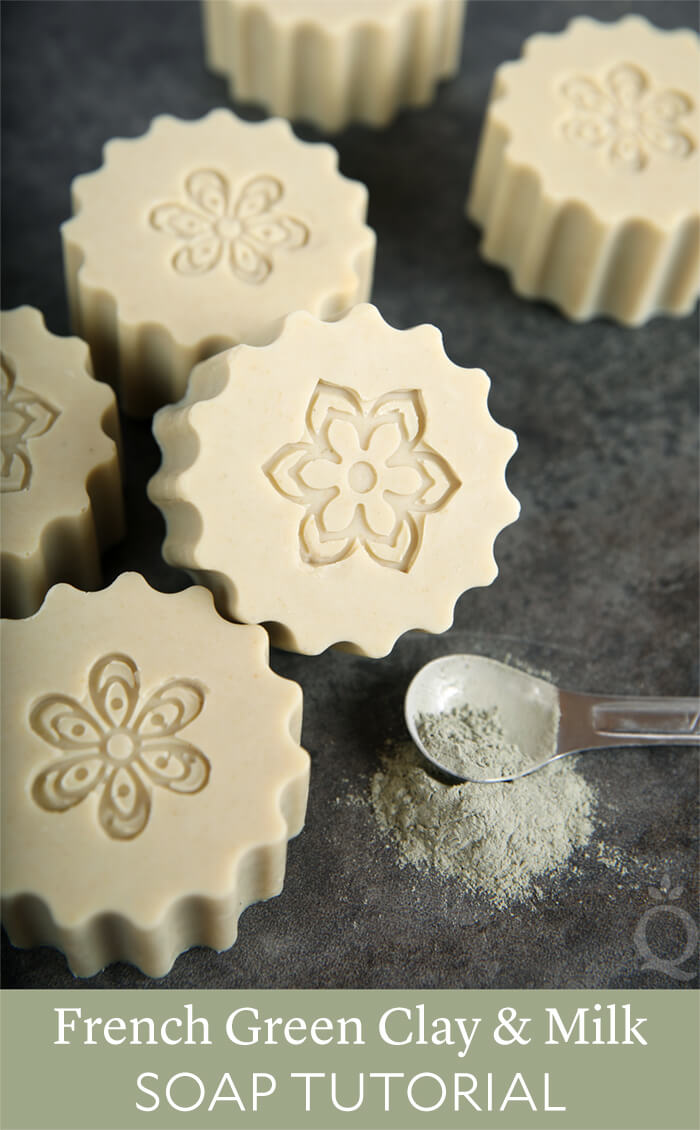
French green clay is a popular additive in beauty products. It has a fine texture and light green color that comes from decomposed plant matter and iron oxides. It’s known for its fantastic oil absorbing properties. In this French Green Clay & Milk Soap, the clay adds a subtle color and skin-loving properties.
Rather than water, this recipe uses raw unpasteurized cow milk. You can also use pasteurized in this recipe – we just happened to have raw unpasteurized cow milk on hand. If you’ve never made milk soap, there are a few extra precautions to keep in mind. The lye can scorch the milk if it gets too hot, which can produce a dark color and unpleasant smell. Learn more about how to add lye to milk here.
This soap can be used on the face. It’s best suited for combination to oily skin. Learn more about which clay is right for your skin here. The recipe is made with a refreshing blend of lemongrass essential oil and tea tree essential oil. If you’re planning on using this as a facial soap and you have sensitive skin, you may consider removing the essential oil or using a lighter usage rate.
What You Need
Silicone Scalloped Round Mold
Impression Mat – Flowers and Spirals
4.3 oz. Borage Oil (25%)
4.3 oz. Coconut Oil (25%)
5.1 oz. Olive Oil (30%)
3.4 oz. Palm Oil (20%)
2.4 oz. Sodium Hydroxide Lye
5 oz. Milk (10% discount)
0.6 oz. Lemongrass Essential Oil
0.4 oz. Tea Tree Essential Oil
French Green Clay
Titanium Dioxide
Click below to add everything you need for this project to your Bramble Berry shopping cart!

MILK PREP: When lye is added to milk, the temperatures heat up to 200 ° F. This scorches the milk, causing it to smell bad and develop a dark yellow color. Keeping the temperatures as cool as possible helps prevent that scorching. Our preferred technique is to freeze the milk into cubes before adding the lye. To keep the milk extra, extra cold, you can place the container of frozen milk into a larger container with ice.
First, measure out 5 ounces of milk and pour into ice cube trays. Allow the milk to fully freeze. Next, empty the milk ice cubes into a container appropriate for mixing lye. When adding the cubes to the container, place the container on a scale to make sure you have the correct amount of milk. Although it was measured previously, some milk might be lost in the freezing/transferring process. If you’re short, pour cold milk into the container to supplement what you have. Adding distilled water to supplement works too.
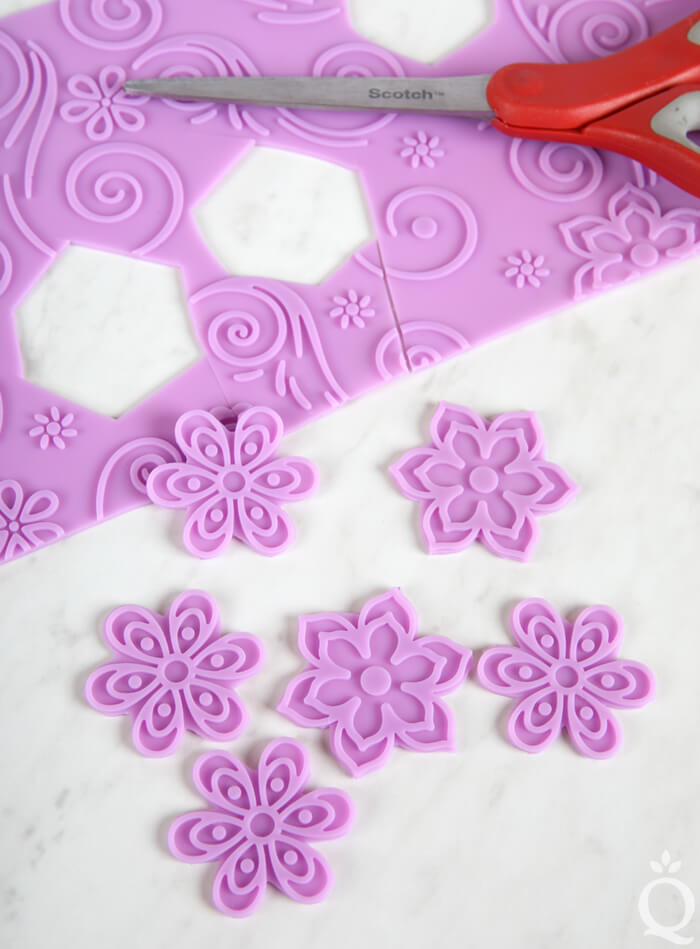
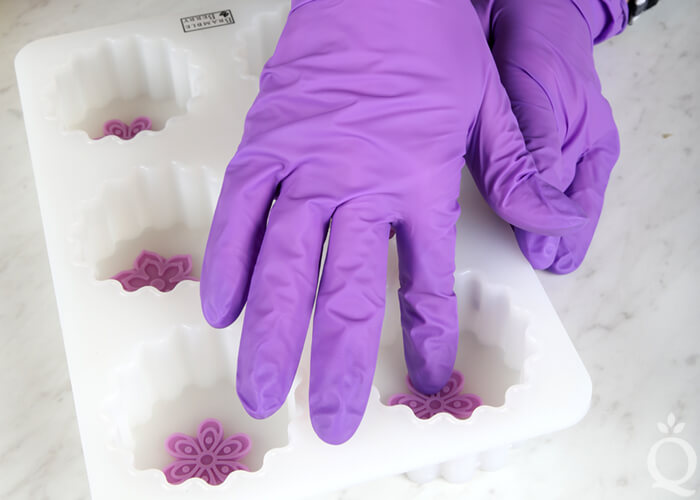
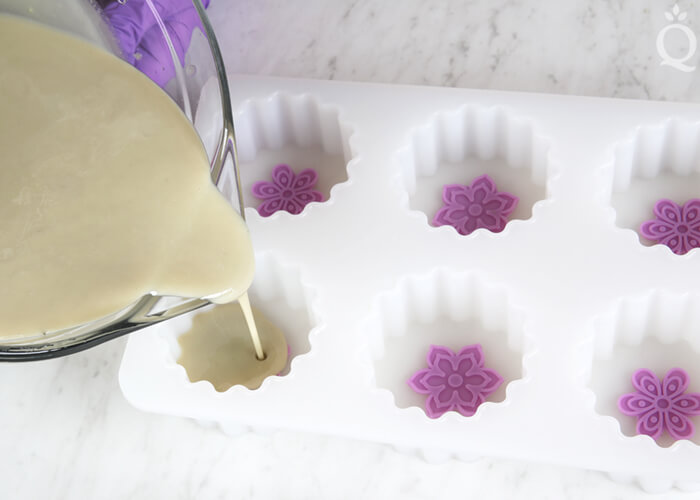
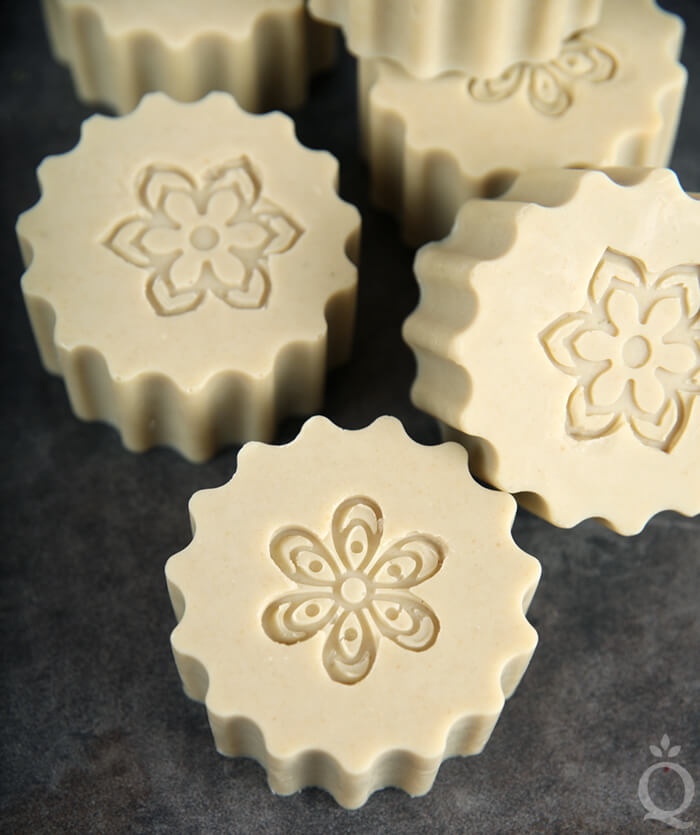
MOLD PREP: To create the flower shape on top of each bar, we used the Flowers and Spirals Impression Mat. Use a sharp pair of scissors to carefully cut out individual flowers from the mat. Then, place them pattern side up into each cavity of the Silicone Scalloped Round Mold. Set aside.
SAFETY FIRST: Suit up for safe handling practices. That means goggles, gloves, and long sleeves. Make sure kids, pets, other distractions, and tripping hazards are out of the house or don’t have access to your soaping space. Always soap in a well-ventilated area.
LYE PREP: With safety gear on, slowly add about 1/4 of the lye flakes directly to the frozen milk. Use a non-reactive spoon to stir the lye flakes and milk together. Slowly, the flakes will begin to melt the cubes. After a few minutes of stirring, add another 1/4 of the flakes and continue stirring for several minutes.
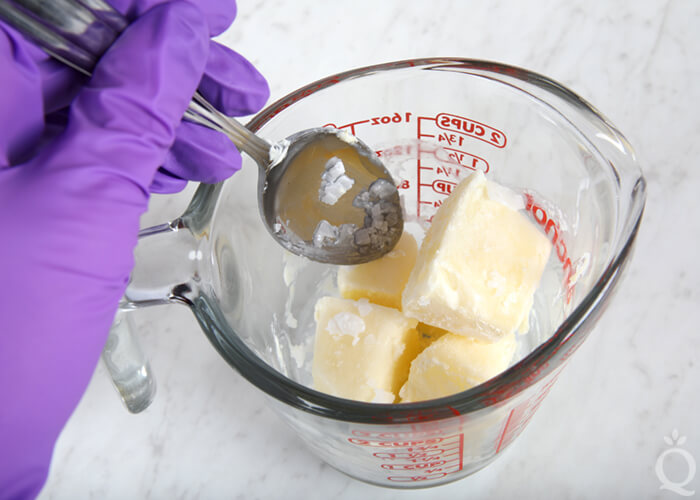
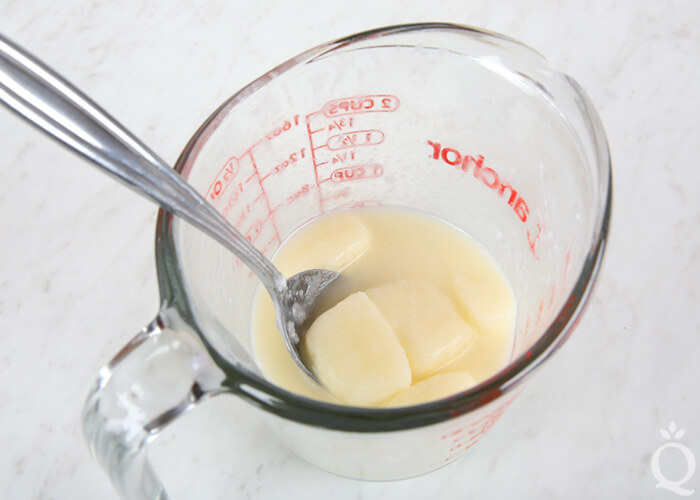
Continue this process until all the lye flakes have been added to the milk. The milk will continue to melt as more lye is added and stirred. Once the milk has fully melted, continue to stir to make sure all the lye flakes have completely dissolved.
Because the temperatures are low, the lye flakes do not dissolve as quickly. Listen and look for lye flakes on the bottom of your container; lye flakes can take a lot longer to dissolve in cooler temperature liquids. Patience is key. Any undissolved lye in your soap could cause skin irritation or even lye burns, so take extra time to make sure all the lye is dissolved.
If you’d like a harder bar of soap that releases faster from the mold, you can add sodium lactate to the milk solution. Use 1 teaspoon of sodium lactate per pound of oils in the recipe. For this recipe, you’d add 1 teaspoon sodium lactate.
COLOR PREP: Disperse 1/2 teaspoon of titanium dioxide into 1/2 tablespoon of lightweight liquid oil, like sweet almond oil or sunflower oil. Then mix 2 teaspoons of French green clay into 2 tablespoons distilled water. Use a mini mixer to get rid of any clumps.
NOTE: To ensure that the titanium dioxide blends smoothly into the soap batter, we recommend micronizing it before dispersing it in oil. Please note this is an optional tip but it does help with the titanium dioxide clumping in the soap. To micronize colorant, simply use a coffee grinder to blend the colorant to break up any clumps of color and prevent streaks of white from showing in the final soap. We like to use a coffee grinder that has a removable, stainless steel mixing area for easy cleaning.
FRAGRANCE PREP: Measure 0.6 ounces of lemongrass essential oil and 0.4 ounces of tea tree essential oil into a glass, essential oil safe container. Set aside.
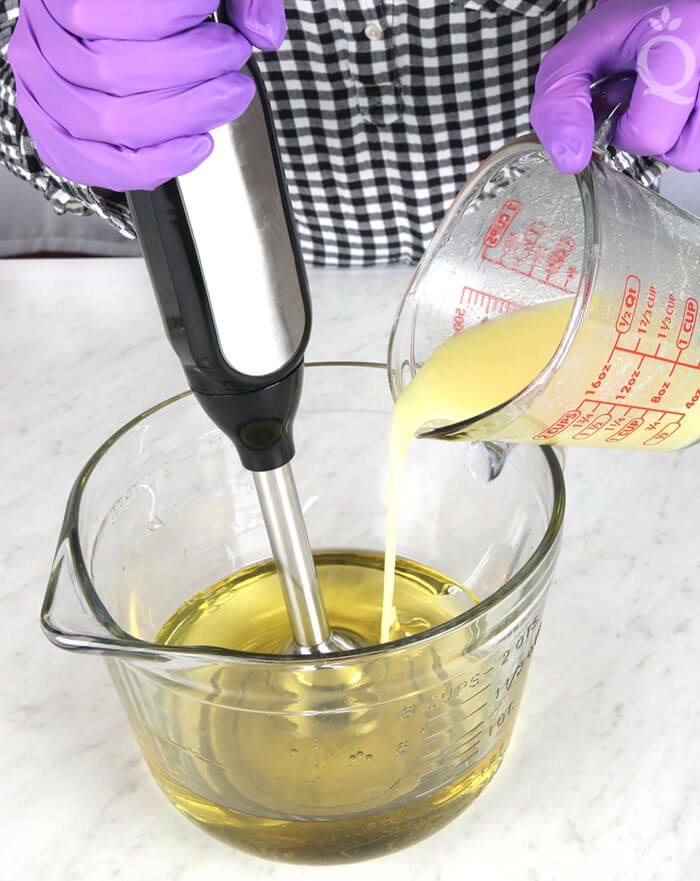
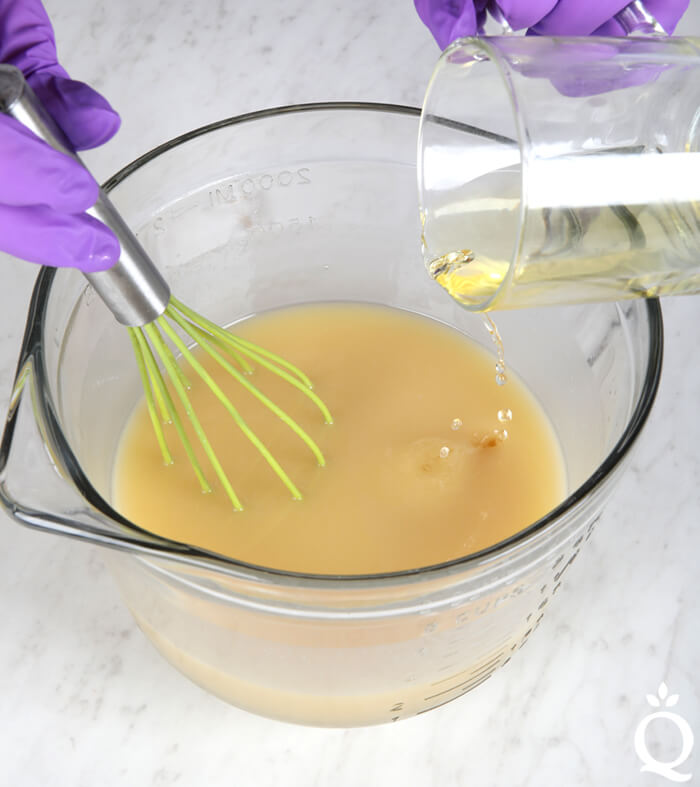
ONE: Fully melt and combine 4.3 ounces coconut oil, 3.4 ounces palm oil, 5.1 ounces olive oil, and 4.3 ounces borage oil (remember to fully melt then mix your entire container of palm oil before portioning). Once the oils have cooled to 130 degrees or below (the milk lye solution will be on the cooler side, that’s okay), add the milk and lye solution slowly to the oils. As you add the milk, begin pulsing your stick blender. Because the milk and lye solution is on the cooler side and the recipe contains hard oils that solidify at cooler temperature, adding the lye and milk solution gradually can help prevent false trace.
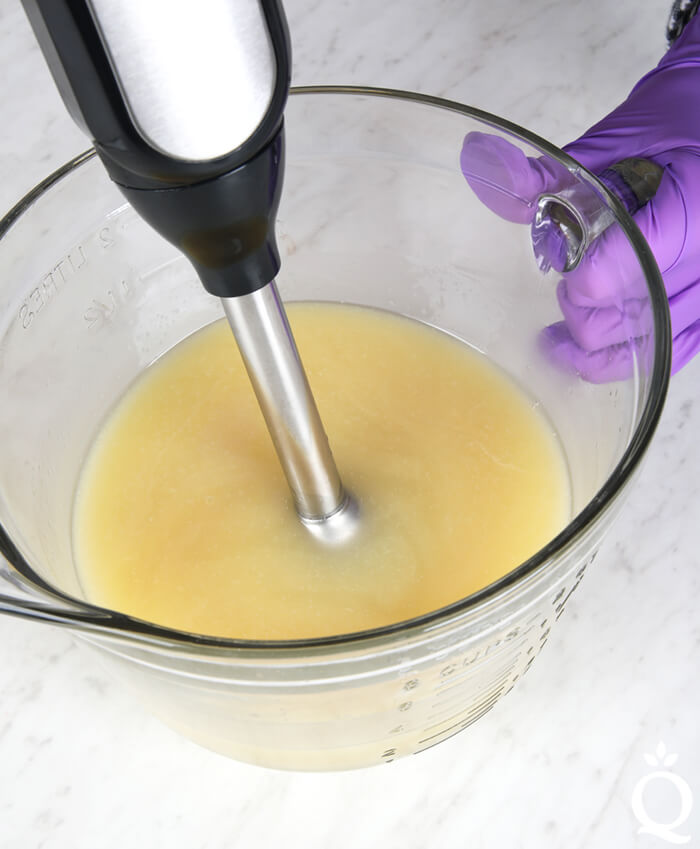
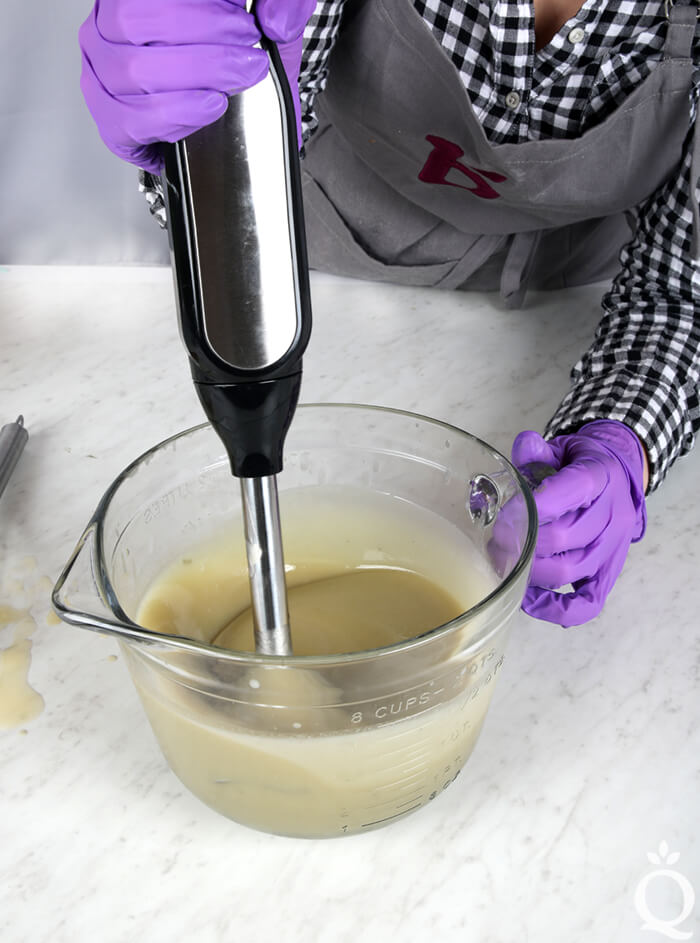
TWO: Once all the lye solution has been added, continue to blend until thin trace. As you stick blend you may notice some very slight graininess – that’s okay. That’s common for milk soap and disappears as the soap becomes more emulsified.
THREE: Once the soap is at a thin trace, whisk in the essential oil blend.
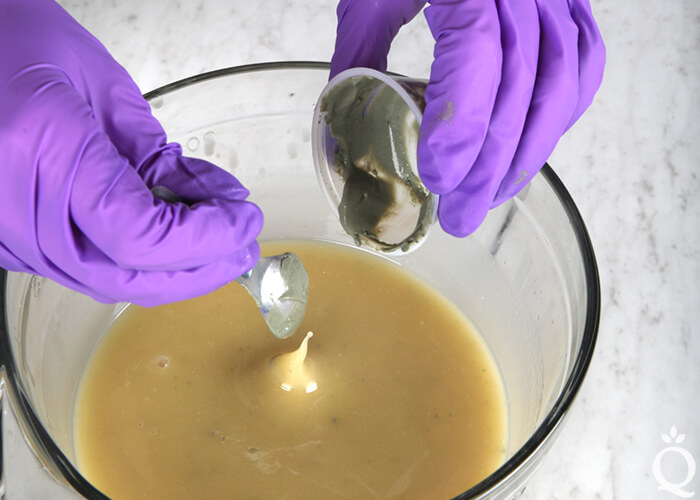
FOUR: Add all of the dispersed French green clay. It will be a thick texture – that’s okay. Pulse the soap with the stick blender to get rid of the clumps. Add 1 teaspoon of the dispersed titanium dioxide. If your soap is still a thin trace, stick blend in the titanium dioxide. If it’s becoming thick, use a whisk to fully mix in.
FIVE: The soap needs to be a thin enough texture to pour into the mold cavities and to fill the small details of the silicone flowers. But very thin soap can take a long time to remove from a silicone mold. Stick blend the batter until it’s a thin to medium trace. Just be careful to not over blend.
SIX: Once you’ve reached a good texture, slowly pour the soap into each cavity. This batch makes enough soap to fill each cavity to the very top. Once each cavity is full, tap it gently on the counter to help even the soap and get rid of air bubbles. Spritz the top with alcohol to prevent soda ash.

SEVEN: If you live in a very hot climate, place the soap in the fridge for several hours to keep temperatures cool and prevent the milk from scorching. If your area is not very hot (70° F or lower), you can keep the soap out at room temperature. Doing so will allow the soap to unmold slightly faster.
EIGHT: Allow the soap to stay in the mold for 1-2 days. Check the soap by gently pulling away the silicone mold from the sides. If it releases without any tearing, attempt to break the airlock on the bottom by gently pushing the soap out. Once the soap is out of the mold, it’s time to pull away the silicone flowers. We found the soap released from the flower detail the best when the soap had hardened outside the mold slightly. If your soap still feels a little soft, give it one more day. The details in the flowers will hold their shape better.
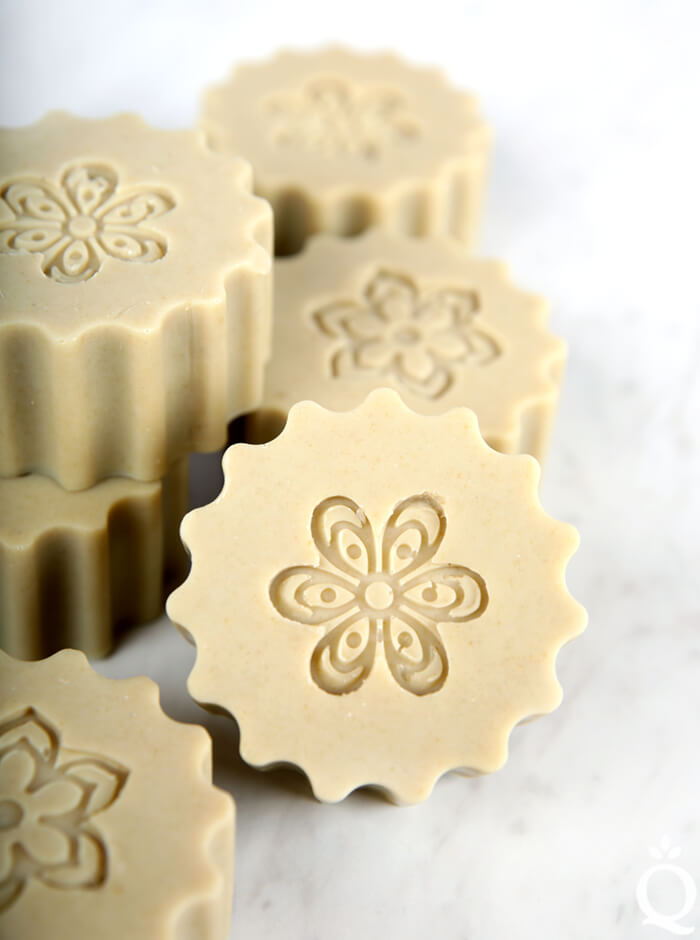
We found the best way to remove the flowers was to use a Clean Up Tool to gently “pull” each petal away from the soap to break the airlock, then use the tool to pull away one petal, then the entire flower. Continue this process for each bar. Allow the soap to fully cure for 4-6 weeks. Enjoy.

French Green Clay & Milk Soap Tutorial
Ingredients
- Silicone Scalloped Round Mold
- Impression Mat – Flowers and Spirals
- 4.3 oz. Borage Oil 25%
- 4.3 oz. Coconut Oil 25%
- 5.1 oz. Olive Oil 30%
- 3.4 oz. Palm Oil 20%
- 2.4 oz. Sodium Hydroxide Lye
- 5 oz. Milk 10% discount
- 0.6 oz. Lemongrass Essential Oil
- 0.4 oz. Tea Tree Essential Oil
- French Green Clay
- Titanium Dioxide
Instructions
MILK PREP: When lye is added to milk, the temperatures heat up to 200 ° F. This scorches the milk, causing it to smell bad and develop a dark yellow color. Keeping the temperatures as cool as possible helps prevent that scorching. Our preferred technique is to freeze the milk into cubes before adding the lye. To keep the milk extra, extra cold, you can place the container of frozen milk into a larger container with ice. First, measure out 5 ounces of milk and pour into ice cube trays. Allow the milk to fully freeze. Next, empty the milk ice cubes into a container appropriate for mixing lye. When adding the cubes to the container, place the container on a scale to make sure you have the correct amount of milk. Although it was measured previously, some milk might be lost in the freezing/transferring process. If you’re short, pour cold milk into the container to supplement what you have. Adding distilled water to supplement works too.
MOLD PREP: To create the flower shape on top of each bar, we used the Flowers and Spirals Impression Mat. Use a sharp pair of scissors to carefully cut out individual flowers from the mat. Then, place them pattern side up into each cavity of the Silicone Scalloped Round Mold. Set aside.
SAFETY FIRST: Suit up for safe handling practices. That means goggles, gloves, and long sleeves. Make sure kids, pets, other distractions, and tripping hazards are out of the house or don’t have access to your soaping space. Always soap in a well-ventilated area.
LYE PREP: With safety gear on, slowly add about 1/4 of the lye flakes directly to the frozen milk. Use a non-reactive spoon to stir the lye flakes and milk together. Slowly, the flakes will begin to melt the cubes. After a few minutes of stirring, add another 1/4 of the flakes and continue stirring for several minutes. Continue this process until all the lye flakes have been added to the milk. The milk will continue to melt as more lye is added and stirred. Once the milk has fully melted, continue to stir to make sure all the lye flakes have completely dissolved. Because the temperatures are low, the lye flakes do not dissolve as quickly. Listen and look for lye flakes on the bottom of your container; lye flakes can take a lot longer to dissolve in cooler temperature liquids. Patience is key. Any undissolved lye in your soap could cause skin irritation or even lye burns, so take extra time to make sure all the lye is dissolved. If you’d like a harder bar of soap that releases faster from the mold, you can add sodium lactate to the milk solution. Use 1 teaspoon of sodium lactate per pound of oils in the recipe. For this recipe, you’d add 1 teaspoon sodium lactate.
COLOR PREP: Disperse 1/2 teaspoon of titanium dioxide into 1/2 tablespoon of lightweight liquid oil, like sweet almond oil or sunflower oil. Then mix 2 teaspoons of French green clay into 2 tablespoons distilled water. Use a mini mixer to get rid of any clumps. NOTE: To ensure that the titanium dioxide blends smoothly into the soap batter, we recommend micronizing it before dispersing it in oil. Please note this is an optional tip but it does help with the titanium dioxide clumping in the soap. To micronize colorant, simply use a coffee grinder to blend the colorant to break up any clumps of color and prevent streaks of white from showing in the final soap. We like to use a coffee grinder that has a removable, stainless steel mixing area for easy cleaning.
FRAGRANCE PREP: Measure 0.6 ounces of lemongrass essential oil and 0.4 ounces of tea tree essential oil into a glass, essential oil safe container. Set aside.
- Fully melt and combine 4.3 ounces coconut oil, 3.4 ounces palm oil, 5.1 ounces olive oil, and 4.3 ounces borage oil (remember to fully melt then mix your entire container of palm oil before portioning). Once the oils have cooled to 130 degrees or below (the milk lye solution will be on the cooler side, that’s okay), add the milk and lye solution slowly to the oils. As you add the milk, begin pulsing your stick blender. Because the milk and lye solution is on the cooler side and the recipe contains hard oils that solidify at cooler temperature, adding the lye and milk solution gradually can help prevent false trace.
- Once all the lye solution has been added, continue to blend until thin trace. As you stick blend you may notice some very slight graininess – that’s okay. That’s common for milk soap and disappears as the soap becomes more emulsified.
- Once the soap is at a thin trace, whisk in the essential oil blend.
- Add all of the dispersed French green clay. It will be a thick texture – that’s okay. Pulse the soap with the stick blender to get rid of the clumps. Add 1 teaspoon of the dispersed titanium dioxide. If your soap is still a thin trace, stick blend in the titanium dioxide. If it’s becoming thick, use a whisk to fully mix in.
- The soap needs to be a thin enough texture to pour into the mold cavities and to fill the small details of the silicone flowers. But very thin soap can take a long time to remove from a silicone mold. Stick blend the batter until it’s a thin to medium trace. Just be careful to not over blend.
- Once you’ve reached a good texture, slowly pour the soap into each cavity. This batch makes enough soap to fill each cavity to the very top. Once each cavity is full, tap it gently on the counter to help even the soap and get rid of air bubbles. Spritz the top with alcohol to prevent soda ash.
- If you live in a very hot climate, place the soap in the fridge for several hours to keep temperatures cool and prevent the milk from scorching. If your area is not very hot (70° F or lower), you can keep the soap out at room temperature. Doing so will allow the soap to unmold slightly faster.
- Allow the soap to stay in the mold for 1-2 days. Check the soap by gently pulling away the silicone mold from the sides. If it releases without any tearing, attempt to break the airlock on the bottom by gently pushing the soap out. Once the soap is out of the mold, it’s time to pull away the silicone flowers. We found the soap released from the flower detail the best when the soap had hardened outside the mold slightly. If your soap still feels a little soft, give it one more day. The details in the flowers will hold their shape better. We found the best way to remove the flowers was to use a Clean Up Tool to gently “pull” each petal away from the soap to break the airlock, then use the tool to pull away one petal, then the entire flower. Continue this process for each bar. Allow the soap to fully cure for 4-6 weeks. Enjoy.