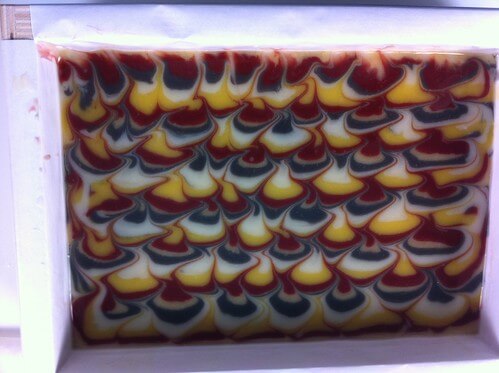
Presenting another Soap Queen Short video that we quickly put together to show how to do the Peacock Swirl technique. I’ll admit that my design was a little large and loose so the ‘peacock’ didn’t turn out perfectly but if you tighten up the design, it’ll be peacock-spot-on. The Peacock Swirl is a marbling style that has been around for centuries and the technique has become very popular in the soapmaking community. This is an advanced technique so be sure to brush up on the basics of cold process soapmaking on Soap Queen TV and pay extra attention to the lye safety video. I hope you enjoy my demonstration of the basics of this beautiful swirl variation.

For colorants I used natural infusions of Alkanet and Annatto as well as Seaclay and Titanium Dioxide. To learn more about how to make and use infusions, check out my book and video on infusing herbs and seeds.
How to do the Peacock Swirl in Cold Process Soap from Soap Queen on Vimeo.
These ingredients were used in this video:
- 14 oz Canola Oil
- 21 oz Coconut Oil
- 17.5 oz Olive Oil
- 17.5 oz Palm Oil
- 9.9 oz Lye
- 23 oz Distilled Water
- Alkanet Root Powder
- Annatto Seeds
- Sea Clay
- Titanium Dioxide
- White Tea & Ginger
- Sweet Almond Oil
- 18 Bar Birchwood Mold
![]() Get everything you need to make the Peacock Swirl Soap project with the click of a button!
Get everything you need to make the Peacock Swirl Soap project with the click of a button!
Donna asked a great question in the Comment section below: “How did you cut the soap? Did you add the dividers when you was finished?”. Below is one of my (better-than-the-video!) practice attempts at the Peacock swirl technique. I’m super happy with how it looks in the mold.
Then, I added the dividers. The dividers pulled the swirls out and around, making them wider and more distorted. It’s still a pretty look but it’s not exactly the same look.

For the Peacock Swirl technique, I recommend cutting the soap with a sharp, non-serrated knife after cure time.