Oktoberfest is an annual beer festival that originated in Germany. They celebrate with beer, food, music and other festivities. The only thing missing from Oktoberfest is soap! That’s how we’re celebrating Oktoberfest this year. Enjoy our variation of the black and tan drink (traditionally, it’s Guinness and a Pale Ale beer layered in the glass) soap made with real beer, scented with the delicious Oatmeal Stout fragrance oil blended with a little Almond Biscotti. You’re going to love this Fall blend.

Ingredients
14.8 oz. Coconut Oil
15.3 oz. Olive Oil
14.8 oz. Palm Oil
6.5 oz. Lye
275 ml dark beer and 139 ml distilled water (mixed together).
3 oz Oatmeal Stout Fragrance Oil
1 oz Almond Biscotti Fragrance Oil
Buy everything you need in the click of a button (beer not included).![]()
PREP: The first step to a successful beer soap (in my opinion) is boiling the beer. In the past I’ve let the beer sit out for 24 hours so it goes flat. I’ve now discovered that you can boil a freshly opened beer ( it will go flat as it’s heated). Boil for 5-10 minutes to cook out all of the alcohol. The beer really ‘poofs’ up during this boiling phase so don’t leave it unattended. For this project I boiled a 12 oz bottle of beer. Due to evaporation, I ended up with 9.29 ounces (which is 275 ml). Let the beer cool back down to room temperature before you get started. Note: The combination of beer and lye has a distinctly strange smell (I don’t mind it but I can see how some might not like the scent). This will go away as the soap cures.
FRAGRANCE BLEND: Mix 3 oz of Oatmeal Stout Fragrance Oil and 1 oz of Almond Biscotti Fragrance Oil for a delicious, Fall blend.
SAFETY UP! Goggles on. Gloves on. Kids out of the way. No pets around. For more cold process safety tips watch the video on Soap Queen TV about lye safety!
ONE: By volume, measure out 275 ml (about 9.2 ounces. ish) of your choice of dark beer. Combine the beer with 139 ml (4.7 oz. ish) distilled water. Mix together.
TWO: Measure out your lye (by weight) and slowly add the lye to the beer and water combination in 3 batches (pour a little lye and stir – repeat 2 more times). The reason we add the lye slowly is because it tends to roil and boil over if you add the lye to the beer too quickly (even if the beer is flat). Repeat until the lye is completely added and stir until the lye is dissolved. Let the lye mixture cool.
 THREE: While the lye, beer and water combination is cooling, weigh and combine your Coconut Oil, Palm Oil, Olive Oil. Make sure all of the oils are in liquid form so you may need to melt the Coconut and Palm oil in the microwave or on the stove. Although with this heat wave going around the country, you may not need to heat them at all.

FOUR: Slowly and carefully add the lye mixture to the oil mixture. I like to run it down the side of my stick blender to avoid air bubbles. Stick blend until light, light, light, trace. Notice how dark the beer lye water made my soap? Wowzers! That’s some dark beer!

FIVE: Split the soap batter into two separate batches. I normally eyeball it but you should have about 4 cups in each container (we like glass Pyrex brand). To the first container of soap add 1 heaping tablespoon of Super Pearly White mica. Give it a quick pulse with the stick blender then hand stir the rest of the way. Once the colorant is mixed in, whisk in just 1 oz of your fragrance oil combination.
SIX: Whisk in the rest of your fragrance oil combination (3 oz left) to the second batch of uncolored soap batter. Then quickly stick blend for about 10 seconds.

SEVEN: Pour each soap batter into their respective sides of the vertical mold.
 See how the top is all one color in the picture above? I had the tiniest bit of dark soap left over so I just added it to the top. I hate wasting soap!
EIGHT: Lift the divider out of its resting spot on the bottom of the soap. Then, twist the divider about 25 degrees and gently pull the divider out. This is going to give us a subtle zig-zag design. Then let the soap harden for 3-4 days before attempting to unmold. I know it seems like a long time but since there’s no oxygen getting to the soap it will take a couple extra days to harden up.

NINE: Yay! It’s time to unmold. This can be a little difficult because of the design of the mold but it’s well worth the extra effort. I like to put the mold on the side of a counter top and slowly press the sides down. Pressing and sliding the sides off is really important. If you pull them off you’ll take some of the soap with you…not ideal.
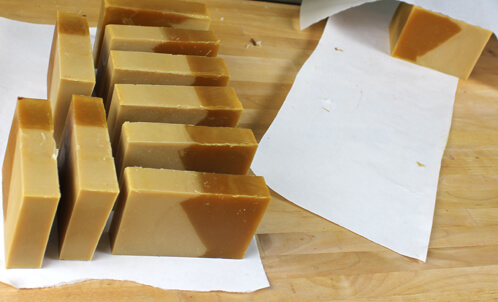
The soap turned out a lovely color that darkened into a perfect Black ‘n’ Tan design over time. The soap got hot so the final bars (if you see them in person) have small titanium dioxide glycerin ‘rivers’ in the soap that adds to the textured look of the bar.