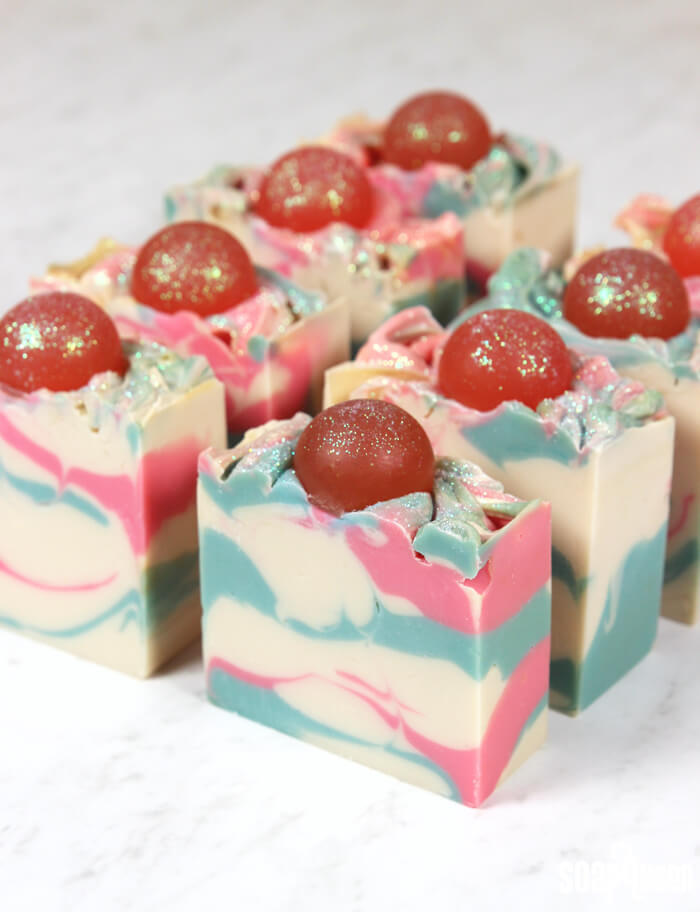
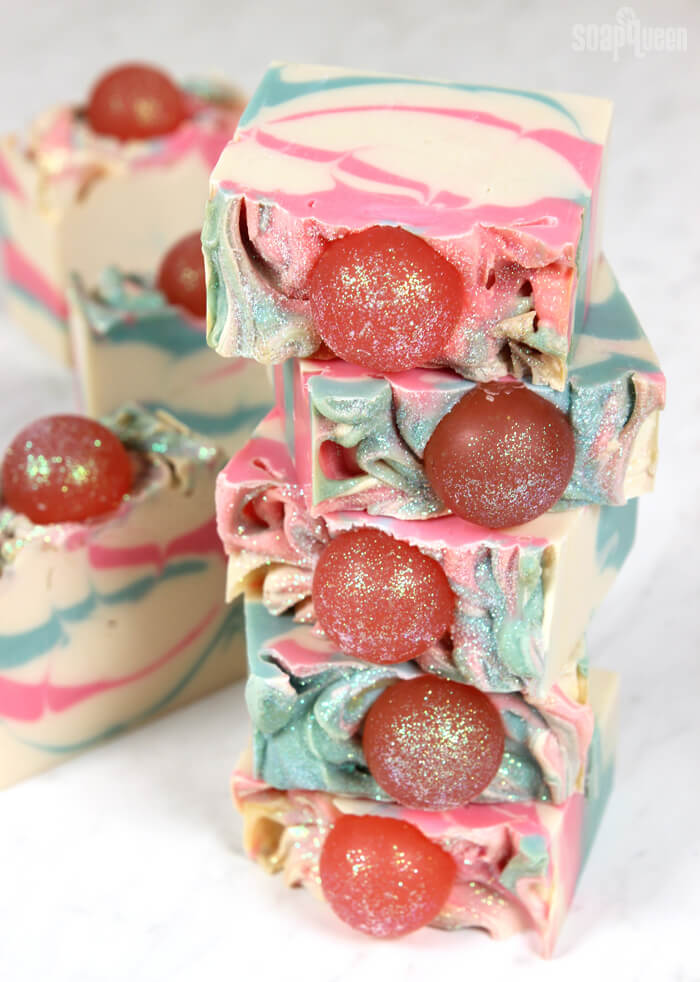
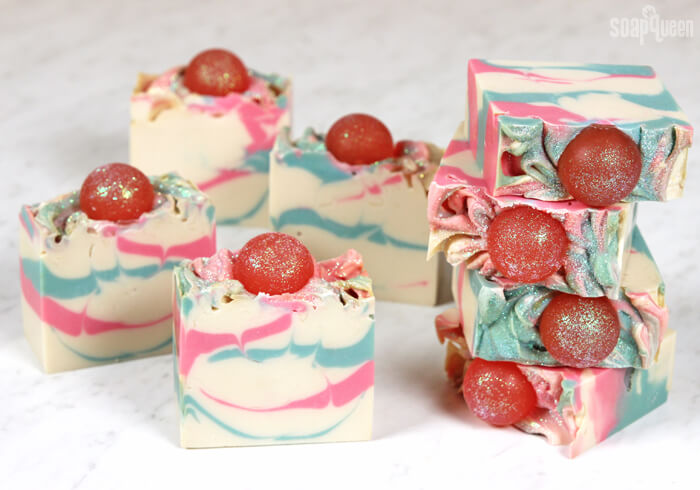
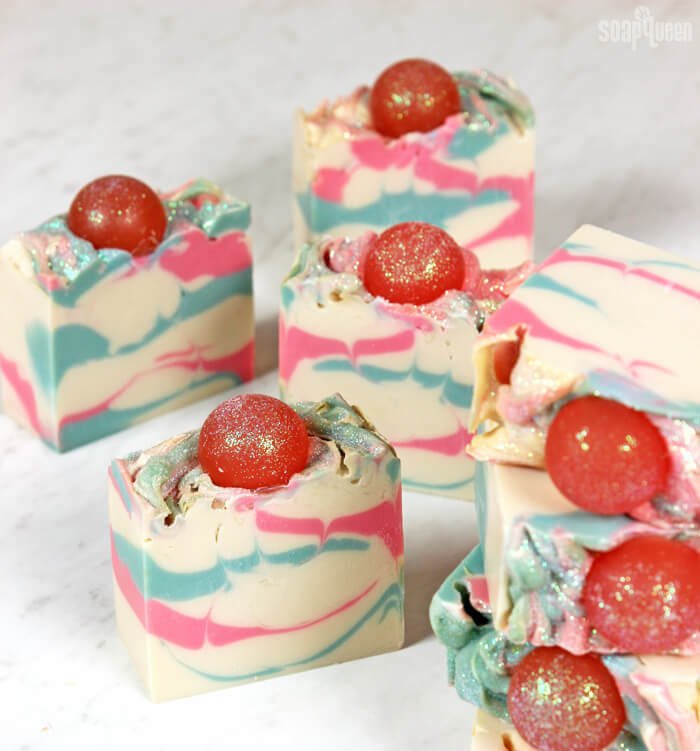
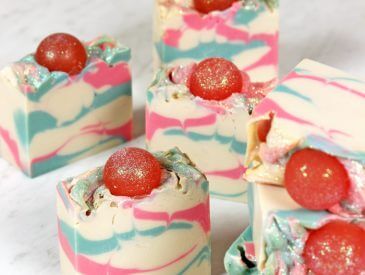
Is there a treat that screams “fun!” more than cotton candy? I can’t think of any! Fluffy, colorful and sweet, it brings back memories of summers at the fair or circus. This soap is made with Cotton Candy Fragrance Oil, which smells just like the real thing – sweet, sticky and fluffy. I made this soap at the tail end of summer, and the bars smell as good as when they were freshly cut. Of course I had to use light blue and pink to replicate classic cotton candy colors, along with plenty of sparkle and a melt and pour embed.
One of the best things about the Cotton Candy Fragrance Oil (other than the smell, of course) is the minimal discoloration. It gives the soap a yellow tint, but that can be overcome with some titanium dioxide. It does accelerate, so be ready to move fast when working with it. With fast-moving fragrance oils, sometimes it can be nice to have a “soap-helper” nearby. This is a great project to get help from friends and family who might be visiting for the holidays, or if you’re teaching a friend to soap!
For this project I did a combination of a spoon plop and hanger swirl using the Hanger Swirl Tool. As you can see, the Hanger Swirl tool didn’t swirl the soap as much as it usually does, because the soap was on the thicker side. But, it still gave the swirls some nice movement. Because this soap uses a good amount of titanium dioxide, I used a small water discount to reduce glycerin rivers. A few still popped up, but nothing too noticeable. =)
What You’ll Need:
Embeds:
Medium 9 Ball Silicone Mold
10 oz. LCP Clear Melt and Pour Base
Fired Up Fuchsia Color Block
Fine Iridescent Glitter
Base:
5 Pound Mold with Sliding Bottom
Silicone Liner for 5 lb Wood Mold
Hanger Swirl Tool
54 oz. Lots of Lather Quick Mix
7.8 oz. Sodium Hydroxide Lye
16.5 oz. Distilled Water
4 oz. Cotton Candy Fragrance Oil
Zippy Blue Pigment
Fired Up Fuchsia
Titanium Dioxide
Fine Iridescent Glitter

Click here to add everything you need for this project to your Bramble Berry shopping cart!
Make the Embeds:
ONE: Chop and melt 10 ounces of LCP Clear Melt and Pour Soap in the microwave using 15 second bursts. Add shavings of the Fired Up Fuchsia Color Block to achieve a bright pink color. Add a sprinkle of Fine Iridescent Glitter and stir to combine. Pour the soap into the cavities of the Medium 9 Ball Silicone Mold, and wait for them to cool and harden.
TWO: Once the melt and pour has fully cooled and hardened, remove from the mold. Remelt the remaining soap using 5-10 second bursts and fill up the cavities again. Allow to fully harden, and remove from the mold. Set aside until you’re ready to use.
Make the Base:
If you’ve never made Cold Process soap before, stop here! I highly recommend checking out our FREE four part SoapQueen.tv series on Cold Process Soapmaking, especially the episode on lye safety. And if you’d rather do some reading, Bramble Berry carries a wide range of books on the topic, including my newest book, Pure Soapmaking. You can also checkout the digital downloads for that instant gratification factor.
SAFETY FIRST: Suit up for safe handling practices! That means goggles, gloves and long sleeves. Make sure kids, pets, and other distractions and tripping hazards are out of the house or don’t have access to your soaping space. Always soap in a well-ventilated area.
COLOR PREP: To ensure that the Titanium Dioxide blends smoothly into the soap batter, we recommend micronizing it before dispersing it in oil. Please note this is an optional tip but it does help with the titanium dioxide clumping in the soap. To micronize colorant, simply use a coffee grinder to blend the colorant to break up any clumps of color and prevent streaks of white from showing in the final soap. We like to use a coffee grinder that has a removable, stainless steel mixing area for easy cleaning. Then, disperse 1 teaspoons of the colorant into 1 tablespoons of sunflower or sweet almond oil (or any other liquid oil). Then in separate containers, disperse 1/2 teaspoon Zippy Blue Pigment and 1/2 teaspoon Fired Up Fuchsia Colorant into 1/2 tablespoon lightweight liquid oil. Use a mini mixer to help get rid of any clumps.
FRAGRANCE PREP: Measure 4 ounces of Cotton Candy Fragrance Oil into a glass, fragrance oil safe container. Set aside.
MOLD & TOOL PREP: Insert the silicone liner into the wood mold. Bend the hanger tool so it fits inside the mold by length with silicone liner.
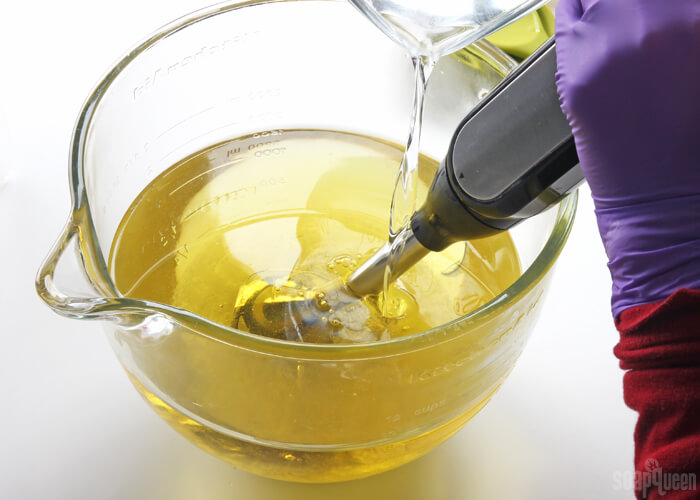
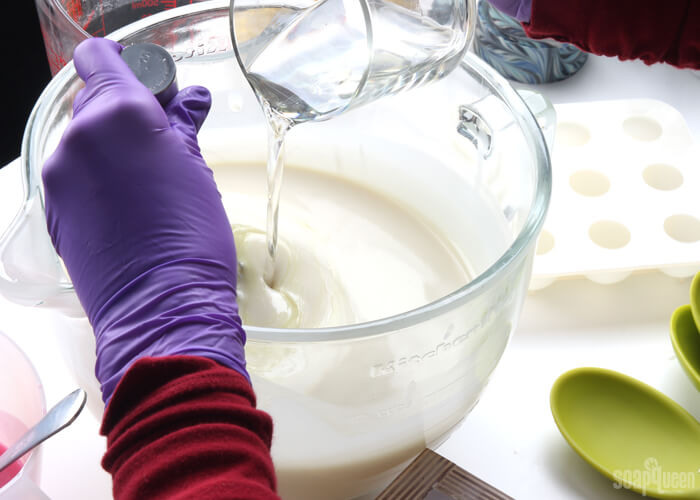
ONE: Slowly and carefully add the lye to the water and gently stir until the lye has fully dissolved and the liquid is clear. Set aside to cool.
TWO: Fully melt the entire bag of Lots of Lather Quick Mix until completely clear and there is no cloudiness. Shake the bag to mix up all the oils. Measure 54 oz. into your soaping bowl. Once the lye water and the oils have cooled to 130 degrees or below (and are ideally within 10 degrees of each other), add the lye water to the oils and stick blend until thin trace. If you’d like a harder bar of soap that releases faster from the mold, you can add sodium lactate to the cooled lye water. Use 1 teaspoon of sodium lactate per pound of oils in the recipe. For this recipe, you’d add about 3.5 tsp. sodium lactate.
THREE: Once you have a thin trace, add all the dispersed titanium dioxide. Use a whisk to mix in the colorant, and give it a short burst or two with the stick blender to help break up any chunks of colorant.

FOUR: Split off about 400 mL of soap into two separate containers. To one container, add 1 tsp. dispersed Fired Up Fuchsia. To the other, add 1 tsp. dispersed Zippy Blue Pigment. Mix the colorants in with a whisk or spoon.
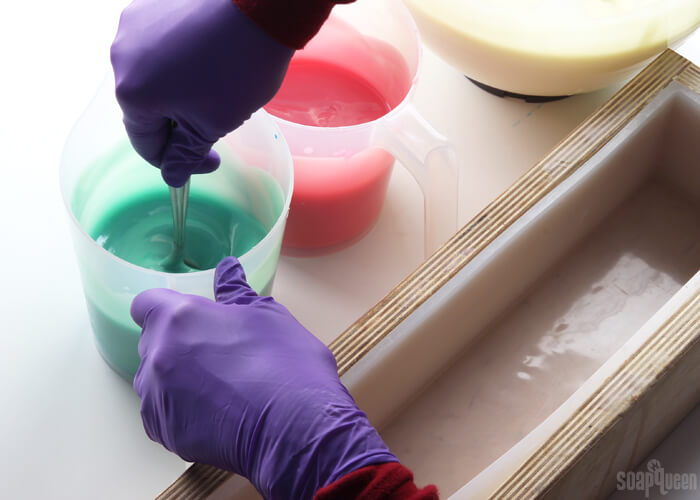
FIVE: Add the fragrance oil to each container proportionally, it’s okay to eyeball it. Use a whisk to mix in the fragrance oil. The fragrance does accelerate the soap, so be ready to move quickly.
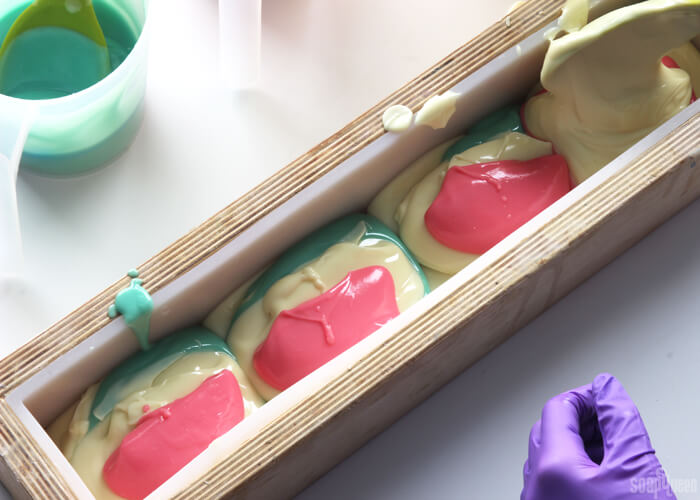
SIX: Time for the spoon plop technique! Grab a large spoon for each color. Spoon the soap into the mold, one color at a time, layering them in three different spots. Don’t worry about being too precise with your “plops.”
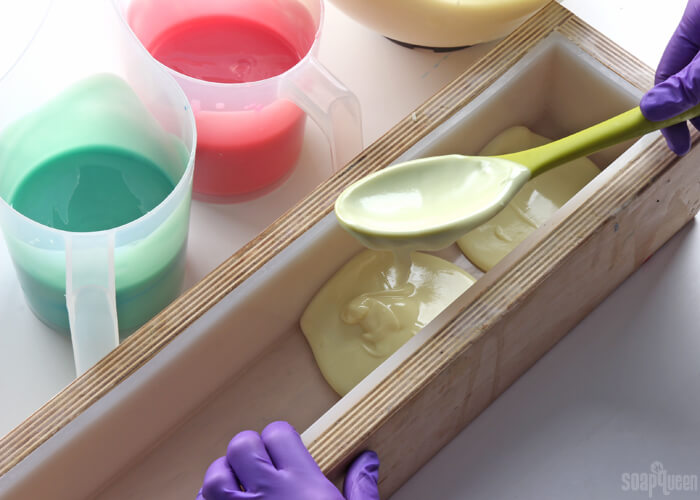
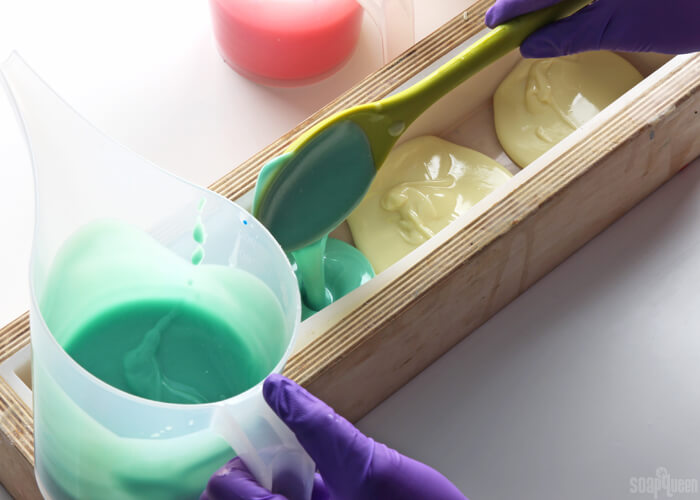
Continue plopping the colors into the mold, using slightly larger plops for the white soap since there is more of it. Work quickly, as the soap will start to thicken up. Once all the soap is plopped into the mold, give it firm taps on the counter to help get rid of bubbles.
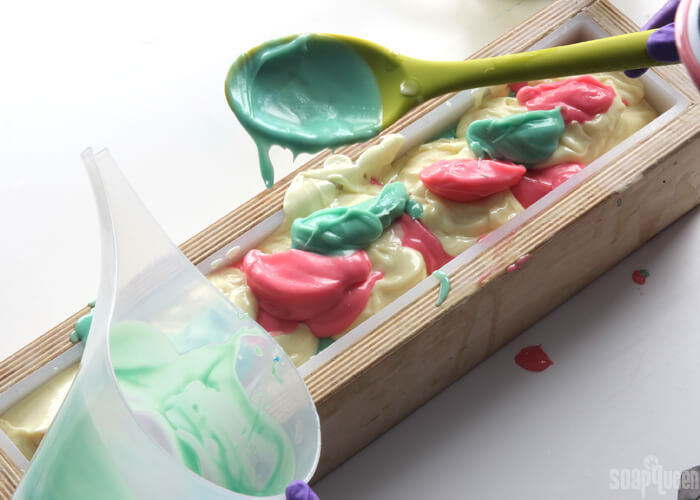
SEVEN: Now it’s time to make the hanger swirl! Insert the hanger into the soap against the long side of the mold furthest away from you. Drag the hanger against the bottom of the mold toward you. Once you drag the hanger about 1/6th of the way, pull the hanger up until it almost breaks through the top of the soap, but not quite. Move the hanger towards you about 1/6th of the way. Push the hanger back down into the soap, and drag the hanger against the bottom of the mold and move it towards you again, moving about 1/6th of the way. Bring the hanger up until it almost breaks the top, then move it over and push it back down. This wasn’t my most precise hanger swirl, so don’t worry about making it perfect! You can see the swirl in action here.
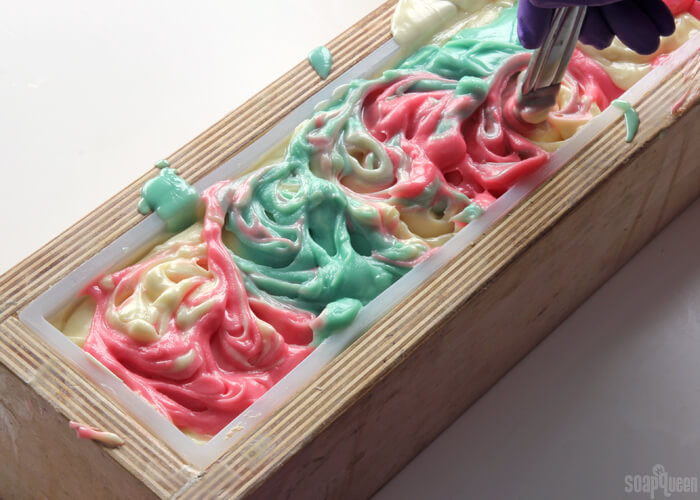
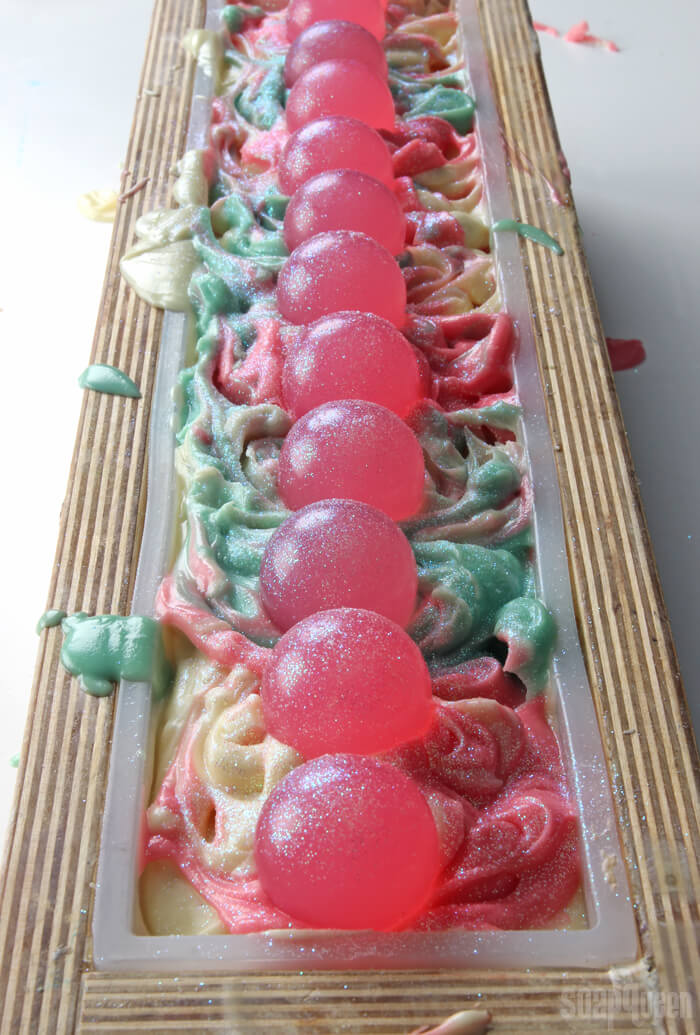
EIGHT: Tap the mold firmly on the counter to help get rid of air bubbles. Use a dowel, chopstick (or the back of a spoon!) to swirl the top of the soap. I used basic “loop-de-loop” motions. Don’t worry too much about the swirl, a lot of it will get covered up with the embeds.
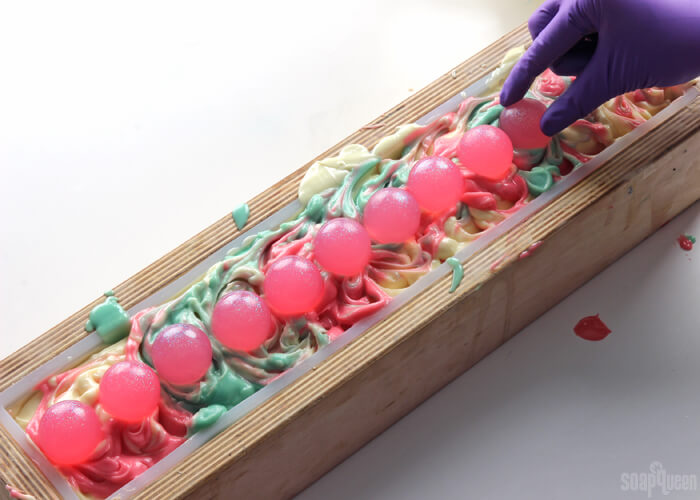
NINE: Place the melt and pour embeds in the center of the soap, pressing down lightly to help them stick. Place them so there is a small amount of room between each to allow for a clean cut.
TEN: Once there is no more room for embeds, sprinkle the top of the soap with Fine Iridescent Glitter. Spritz with 99% isopropyl alcohol to prevent soda ash. Do not cover. If the soap gets too hot, it could slightly melt the embeds. Allow the soap to stay in the mold for 2-3 days. Unmold and cut into bars, and allow to cure for 4-6 weeks. Enjoy!
Cotton Candy Swirl Cold Process Soap Tutorial
Ingredients
Embeds
- Medium 9 Ball Silicone Mold
- 10 oz. LCP Clear Melt and Pour Base
- Fired Up Fuchsia Color Block
- Fine Iridescent Glitter
Base:
- 5 Pound Mold with Sliding Bottom
- Silicone Liner for 5 lb Wood Mold
- Hanger Swirl Tool
- 54 oz. Lots of Lather Quick Mix
- 7.8 oz. Sodium Hydroxide Lye
- 16.5 oz. Distilled Water
- 4 oz. Cotton Candy Fragrance Oil
- Zippy Blue Pigment
- Fired Up Fuchsia
- Titanium Dioxide
Instructions
Make the Embeds
- Chop and melt 10 ounces of LCP Clear Melt and Pour Soap in the microwave using 15 second bursts. Add shavings of the Fired Up Fuchsia Color Block to achieve a bright pink color. Add a sprinkle of Fine Iridescent Glitter and stir to combine. Pour the soap into the cavities of the Medium 9 Ball Silicone Mold, and wait for them to cool and harden.
- Once the melt and pour has fully cooled and hardened, remove from the mold. Remelt the remaining soap using 5-10 second bursts and fill up the cavities again. Allow to fully harden, and remove from the mold. Set aside until you’re ready to use.
Make the Base:
SAFETY FIRST: Suit up for safe handling practices! That means goggles, gloves and long sleeves. Make sure kids, pets, and other distractions and tripping hazards are out of the house or don’t have access to your soaping space. Always soap in a well-ventilated area.
COLOR PREP: To ensure that the Titanium Dioxide blends smoothly into the soap batter, we recommend micronizing it before dispersing it in oil. Please note this is an optional tip but it does help with the titanium dioxide clumping in the soap. To micronize colorant, simply use a coffee grinder to blend the colorant to break up any clumps of color and prevent streaks of white from showing in the final soap. We like to use a coffee grinder that has a removable, stainless steel mixing area for easy cleaning. Then, disperse 1 teaspoons of the colorant into 1 tablespoons of sunflower or sweet almond oil (or any other liquid oil). Then in separate containers, disperse 1/2 teaspoon Zippy Blue Pigment and 1/2 tsp. Fired Up Fuchsia Colorant into 1/2 tablespoon lightweight liquid oil. Use a mini mixer to help get rid of any clumps.
FRAGRANCE PREP: Measure 4 ounces of Cotton Candy Fragrance Oil into a glass, fragrance oil safe container. Set aside.
MOLD & TOOL PREP: Insert the silicone liner into the wood mold. Bend the hanger tool so it fits inside the mold by length with silicone liner.
- Slowly and carefully add the lye to the water and gently stir until the lye has fully dissolved and the liquid is clear. Set aside to cool.
- Fully melt the entire bag of Lots of Lather Quick Mix until completely clear and there is no cloudiness. Shake the bag to mix up all the oils. Measure 54 oz. into your soaping bowl. Once the lye water and the oils have cooled to 130 degrees or below (and are ideally within 10 degrees of each other), add the lye water to the oils and stick blend until thin trace. If you’d like a harder bar of soap that releases faster from the mold, you can add sodium lactate to the cooled lye water. Use 1 teaspoon of sodium lactate per pound of oils in the recipe. For this recipe, you’d add about 3.5 tsp. sodium lactate.
- Once you have a thin trace, add all the dispersed titanium dioxide. Use a whisk to mix in the colorant, and give it a short burst or two with the stick blender to help break up any chunks of colorant.
- Split off about 400 mL of soap into two separate containers. To one container, add 1 tsp. dispersed Fired Up Fuchsia. To the other, add 1 tsp. dispersed Zippy Blue Pigment. Mix the colorants in with a whisk.
- Add the fragrance oil to each container proportionally, it’s okay to eyeball it. Use a whisk to mix in the fragrance oil. The fragrance does accelerate the soap, so be ready to move quickly.
- Time for the spoon plop technique! Grab a large spoon for each color. Spoon the soap into the mold, one color at a time, layering them in three different spots. Don’t worry about being too precise with your “plops.”Continue plopping the colors into the mold, using slightly larger plops for the white soap since we have more of it. Work quickly, as the soap will start to thicken up as we go. Once all the soap is plopped into the mold, give it firm taps on the counter to help get rid of bubbles.
- Now it’s time to make the hanger swirl! Insert the hanger into the soap against the long side of the mold furthest away from you. Drag the hanger against the bottom of the mold toward you. Once you drag the hanger about 1/6th of the way, pull the hanger up until it almost breaks through the top of the soap, but not quite. Move the hanger towards you about 1/6th of the way. Push the hanger back down into the soap, and drag the hanger against the bottom of the mold and move it towards you again, moving about 1/6th of the way. Bring the hanger up until it almost breaks the top, then move it over and push it back down. This wasn’t my most precise hanger swirl, so don’t worry about making it perfect! You can see the swirl in action here.
- Tap the mold firmly on the counter to help get rid of air bubbles. Use a dowel, chopstick (or the back of a spoon!) to swirl the top of the soap. I used basic “loop-de-loop” motions. Don’t worry too much about the swirl, a lot of it will get covered up with the embeds.
- Place the melt and pour embeds in the center of the soap, pressing down lightly to help them stick. Place them so there is a small amount of room between each, to allow for a clean cut.
- Once there is no more room for embeds, sprinkle the top of the soap with Fine Iridescent Glitter. Spritz with 99% isopropyl alcohol to prevent soda ash. Do not cover. If the soap gets too hot, it could slightly melt the embeds. Allow the soap to stay in the mold for 2-3 days. Unmold and cut into bars, and allow to cure for 4-6 weeks. Enjoy!