I’m still in NYC and after a full day of meetings and another evening show (Chicago – I bought tickets for less than half price from a scalper and felt very NYC-savvy), I’m getting ready for Better TV tomorrow and a few more magazine meetings before flying back home to Bellingham, Washington.
This project was designed by Debbie C. of the renowned href=”http://soapylove.blogspot.com/”>SoapyLove. Debbie was the first to do href=”http://www.soapylove.com/”>Soap Popsicles on a grand scale with difficult designs and fetching colors (don’t miss her ghoulish href=”http://www.soapylove.com/”>Halloween designs) Here, she shares her very cool “Silhouette” technique with Soap Queen Readers. If you haven’t seen the Silhouette Soaps, click href=”http://soap-queen.blogspot.com/2008/08/pnw-soapers-unite.html”>here to be taken to a post with a picture of a gaggle soaps using this technique.
Thanks, Debbie!
What you’ll need:
” href=”https://www.brambleberry.com/kits.html”>Buy the entire KIT
Fragrance oil, skin safe (1/8 teaspoon per bar)
Black oxide pigment
Soap mold with simple shape and flat surface
How much is “a little bit?” I like to do 70% alcohol to 30% black oxide.
” title=”Silhouette14 by brambleberrysoap, on Flickr” href=”http://www.flickr.com/photos/8437514@N03/2882634155/”> Stir this slurry up well. Notice there are still clumps in the bottom. Not to worry, these will stick to your bowl as you pour the black oxide mixture into your soap and you’ll be left with a wonderful dark black.
Step Two: Pour into Flat Mold
Once you have the black slurry, cut clear soap into small chunks, approximately 1 ounce per bar you’re making.Put into Pyrex cup and melt in microwave – about 15 seconds per ounce.Stir until all chunks are melted.
” title=”Silhouette15 by brambleberrysoap, on Flickr” href=”http://www.flickr.com/photos/8437514@N03/2883471068/”>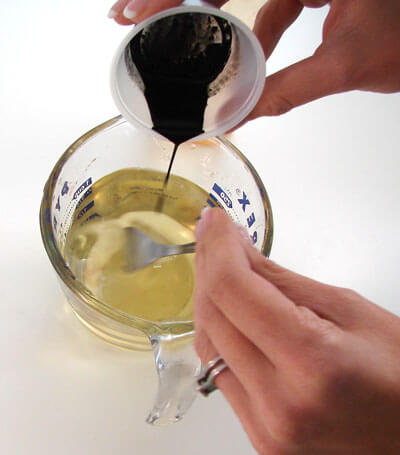
Pour into soap mold, making 1/8” layer. Don’t forget to spray with rubbing alcohol to ensure there are no pesky bubbles marring your flat surface. Allow to set at room temperature; if in a hurry, put in refrigerator for 10 minutes until solid.Save any extra soap to re-melt for future projects.
” title=”Silhouette16 by brambleberrysoap, on Flickr” href=”http://www.flickr.com/photos/8437514@N03/2883471156/”>
You can also pour into your plain multi-cavity soap molds – that way you are sure your silhouette will fit in your soap mold.
Make your black flat soap and check back tomorrow on how to prepare your sillouette.
Click here for Part One Instructions
Click here for Part Two Instructions
Click here for Part Three Instructions