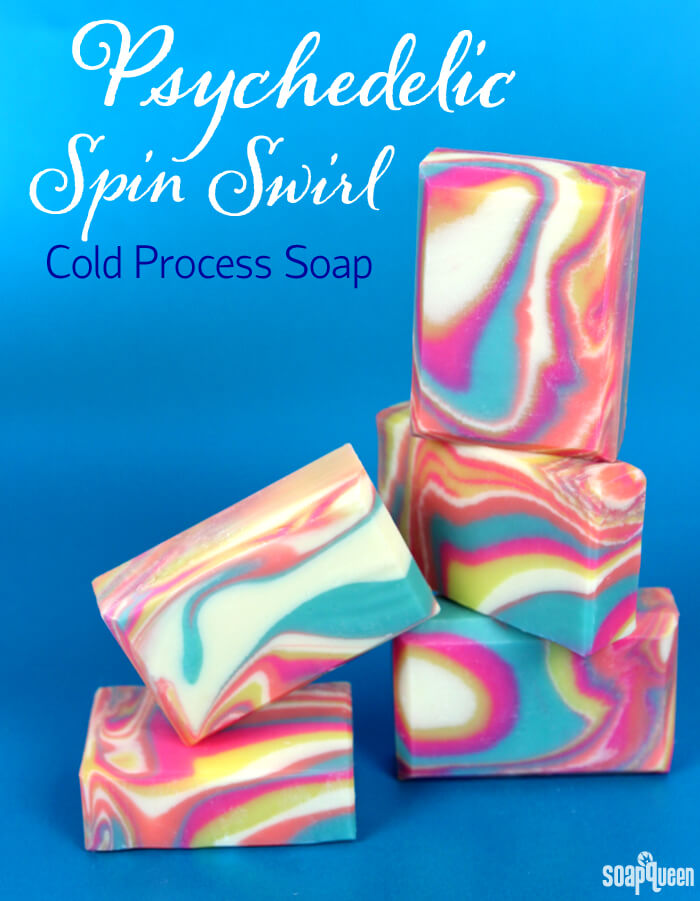
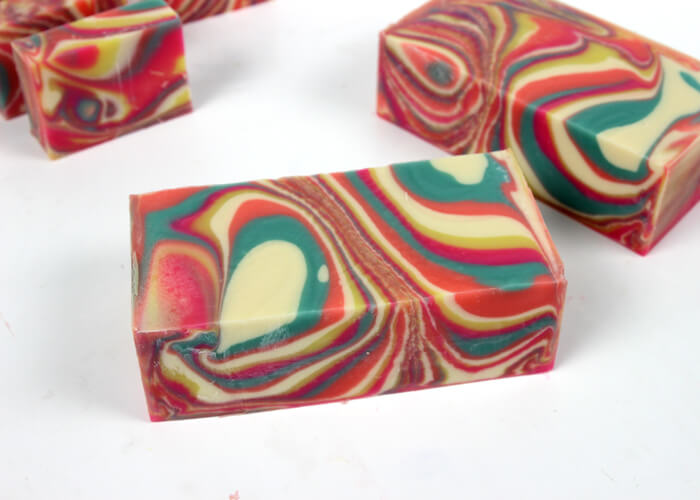
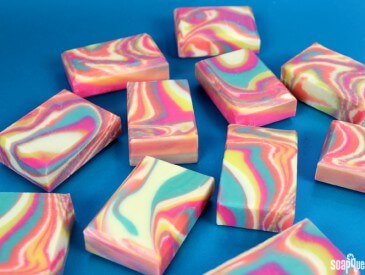
The origin of the word “psychedelic” can be traced to the Greek word “psyche.” It often refers to strong experiences of color, sound, smell taste or touch. During the 1960’s, the term psychedelic was used to describe music, clothing and art. This palm free Psychedelic Spin Swirl Soap features a bright color palette and complex fragrance blend that is well…quite groovy! =)
If you are unfamiliar with the spin swirl technique, it was recently made popular by Amy of Great Cakes Soapworks during a recent Soap Challenge Club. First, layers of thin trace soap are poured into a slab mold. Read more about thin trace here. Then, the mold is spun on the counter and stopped quickly with your hands. The stopping motion causes the soap to move back and forth, creating a beautiful swirl effect. To see it in action, check out this beautiful video from Sarah of Spicy Pinecone. I used a Lazy Susan to help my soap really spin! (PS – You probably saw all 3 trial versions of this if you follow me on Snapchat. I’m ‘Bramble-Berry’ there.)
It’s a tricky technique to master; this soap took me three tries in order to find a recipe and scent combination that allowed for the soap to “spin.” The key is to have a high amount of slow moving oils, such as olive oil or canola oil. You also need a fragrance oil that behaves perfectly in cold process soap, and does not accelerate at all. I used a combination of Kumquat and Patchouli Fragrance Oils to create a blend that not only behaves well, but is reminiscent of the groovy 60’s.
What You’ll Need:
9 Bar Birchwood Mold
Silicone Liner for 9 Bar Mold
15.5 oz. Canola Oil
.5 oz. Castor Oil
1.5 oz. Cocoa Butter
12.5 oz. Coconut Oil
2.5 oz. Hemp Seed Oil (Refined)
7.5 oz. Olive Oil
10 oz. Rice Bran Oil
6.8 oz. Sodium Hydroxide Lye
16.5 oz. Distilled Water
Neon Blue Raspberry Colorant
Titanium Dioxide
Fizzy Lemonade Colorant
Tangerine Wow! Colorant
Electric Bubble Gum Colorant
2 oz. Kumquat Fragrance Oil
1 oz. Patchouli Fragrance Oil

Click here to add everything you need for this project to your Bramble Berry shopping cart!
If you’ve never made Cold Process soap before, stop here! I highly recommend checking out our FREE four part SoapQueen.tv series on Cold Process Soapmaking, especially the episode on lye safety. And if you’d rather do some reading, Bramble Berry carries a wide range of books on the topic, including my newest book, Soap Crafting. You can also checkout the digital downloads for that instant gratification factor.
SAFETY FIRST: Suit up for safe handling practices! That means goggles, gloves and long sleeves. Make sure kids, pets, and other distractions and tripping hazards are out of the house or don’t have access to your soaping space. Always soap in a well-ventilated area.
COLOR PREP: To ensure that the Titanium Dioxide blends smoothly into the soap batter, we recommend micronizing it before dispersing it in oil. Please note this is an optional tip but it does help with the titanium dioxide clumping in the soap. =) To micronize colorant, simply use a coffee grinder to blend the colorant to break up any clumps of color and prevent streaks of white from showing in the final soap. We like to use a coffee grinder that has a removable, stainless steel mixing area for easy cleaning. Then, disperse 1 teaspoon of the colorant into 1 tablespoon of sunflower or sweet almond oil (or any other liquid oil). Then in separate containers, disperse 1 teaspoon of Neon Blue Raspberry Colorant, Tangerine Wow! Colorant, Electric Bubble Gum Colorant, Fizzy Lemonade Colorant in 1 tablespoon lightweight liquid oil. There are a lot of colorants because for this technique because contrasting colors provide the best canvas for the design to reallllllly shine and pop.
FRAGRANCE PREP: In a glass, fragrance safe container, blend together Kumquat and Patchouli Fragrance Oils. Set aside.
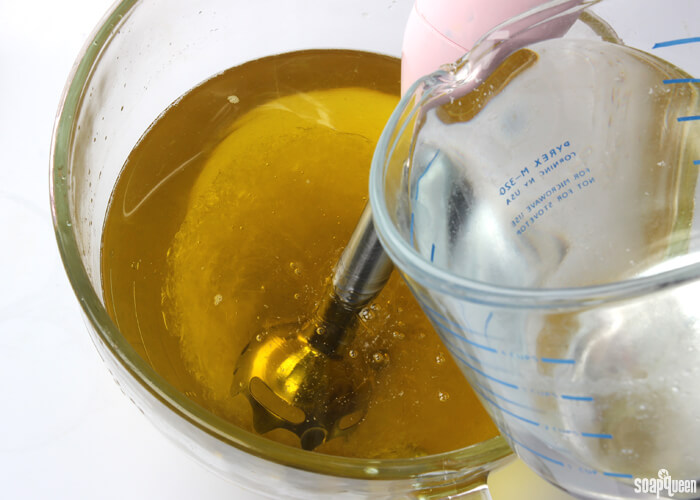
ONE: Slowly and carefully add the lye to the water and gently stir until the lye has fully dissolved and the liquid is clear. Set aside to cool.
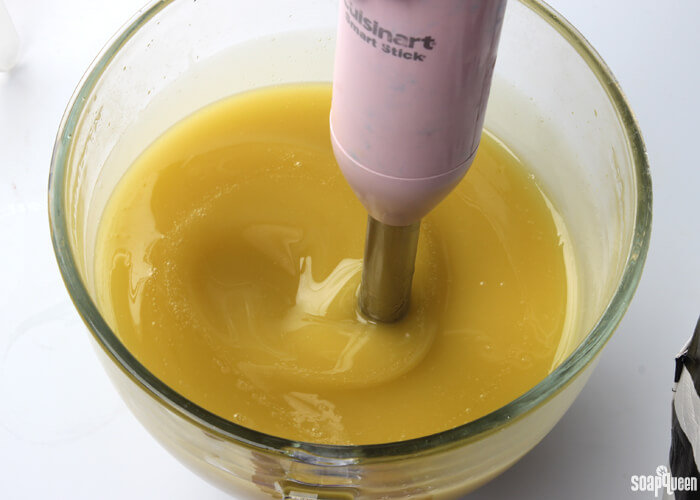
TWO: Combine the coconut oil, olive oil, rice bran, hemp seed (refined), canola oil, castor oil, and cocoa butter. Once the lye water and the oils have cooled to 130 degrees or below (and are ideally within 10 degrees of each other), add the lye water to the oils and stick blend until you reach a light trace. If you’d like a harder bar of soap that releases faster from the mold, you can add sodium lactate to the cooled lye water. Use 1 teaspoon of sodium lactate per pound of oils in the recipe. For this recipe, add about 3 tsp. sodium lactate.
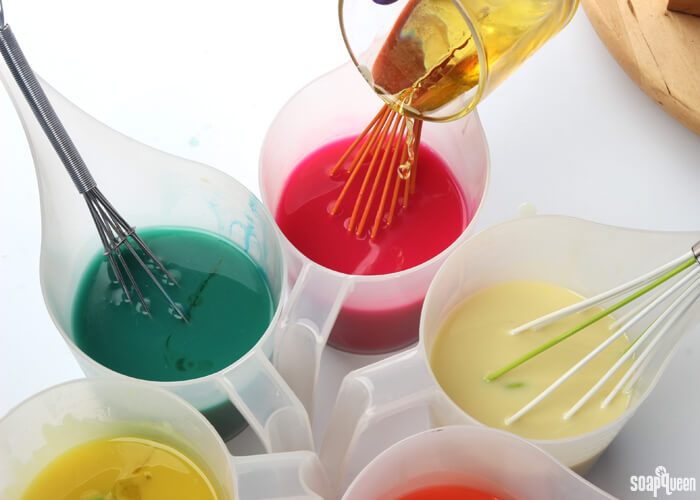
 THREE: Once you have reached a very light trace (you don’t want to see trailings) split the soap into 5 equal containers. Each container should hold about 450 mL. Then, to each container add the dispersed colorants listed below. Use a whisk to fully mix in. Once the colors are whisked in, arrange them on the counter in the order you’d like to pour. Our arrangement was pink, yellow, white, orange and blue. Split the fragrance blend equally into each container and whisk to fully incorporate.
- Container A (Blue): 1.5 Tbs. dispersed Neon Blue Raspberry Colorant
- Container B (White): 1 Tbs. dispersed Titanium Dioxide Colorant
- Container C (Pink): 1 Tbs. dispersed Electric Bubblegum Colorant
- Container D (Orange): 1 Tbs. dispersed Tangerine Wow! Colorant
- Container E (Yellow): 1 Tbs. dispersed Fizzy Lemonade Colorant
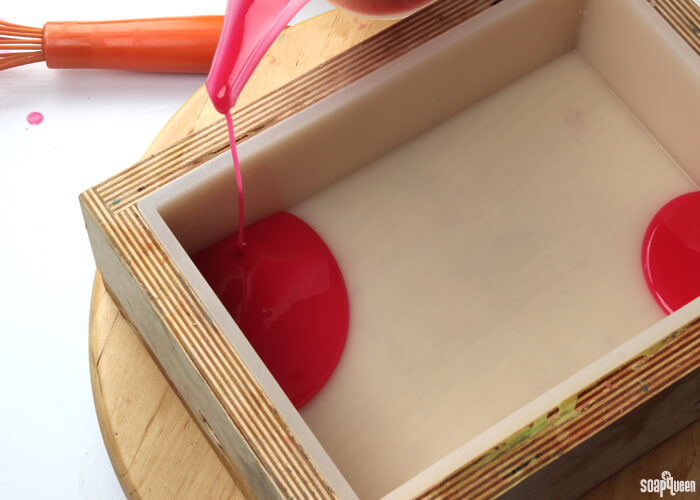
 FOUR: Begin pouring the pink soap into two corners across from each other in the mold. Count to three for each pour to help make sure the pour is even on both sides.
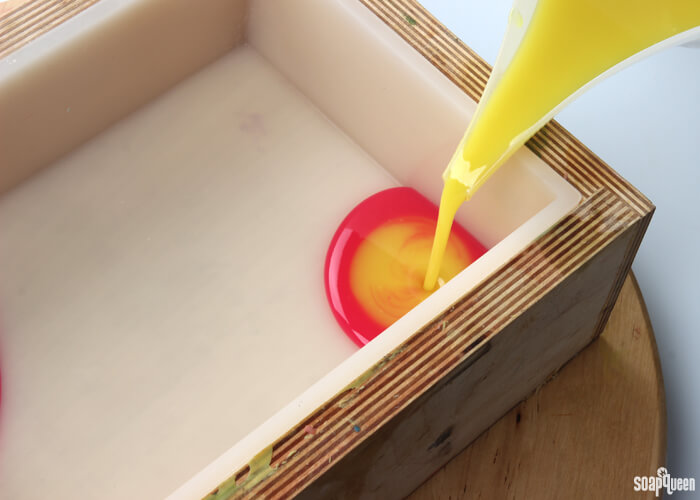
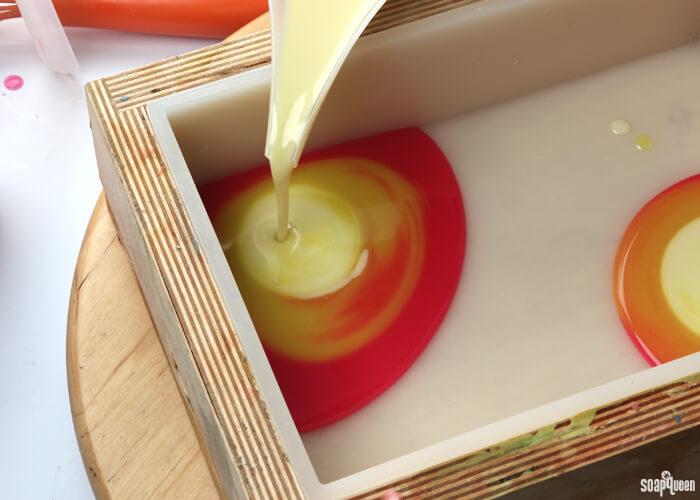
 FIVE: Pour the yellow soap into the pink in both corners, counting to three to help ensure the pours are even on each side. As you pour, the soap should be thin enough to gently push it throughout the mold. As you pour each color, place it back into your color arrangement to help ensure you stay consistent with the color order.
 SIX: Pour the white soap on top of the yellow in both corners of the mold, counting to three to make sure the pours are even.
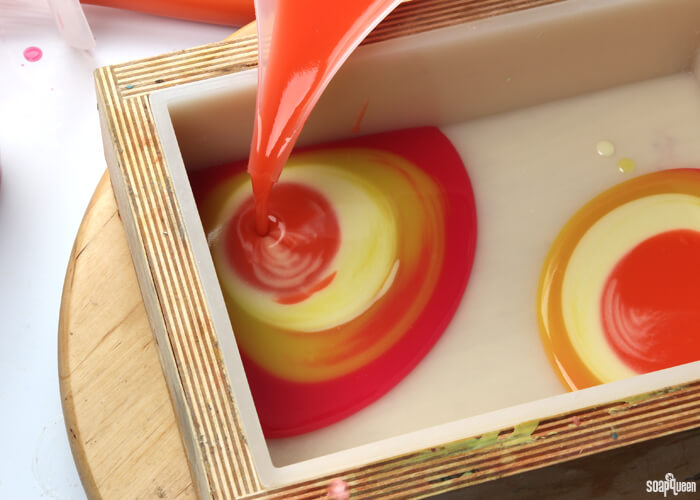
 SEVEN: Pour the orange soap on top of the white in both corners, counting to three for each pour.
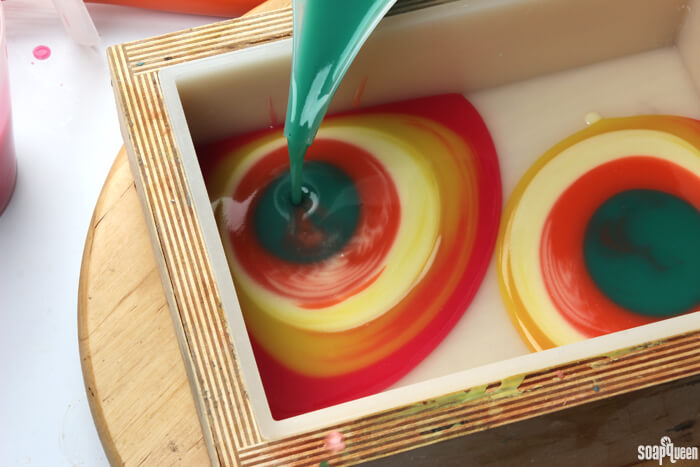
 EIGHT: Finally, pour a layer of blue soap onto the orange in both corners, counting to three for each pour.
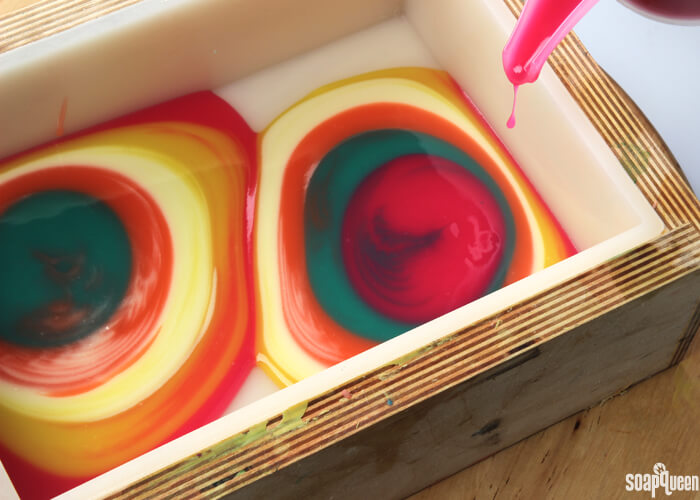
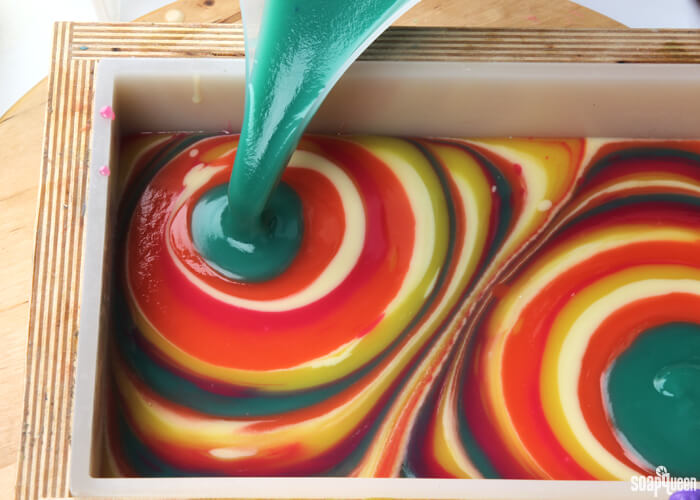
 NINE: Whisk all colors to avoid any graininess, and to keep the soap smooth, thin and workable. Continue pouring with the pink soap into each corner, counting to three for each pour. Continue pouring each color in the correct color order into both corners of the mold. During the pouring process, continue to give each color a whisk to ensure the soap stays pourable.
 Below, you can see the blue soap becoming a little grainy. This is totally normal; just give the batter a little whisk to help it become smooth again =)
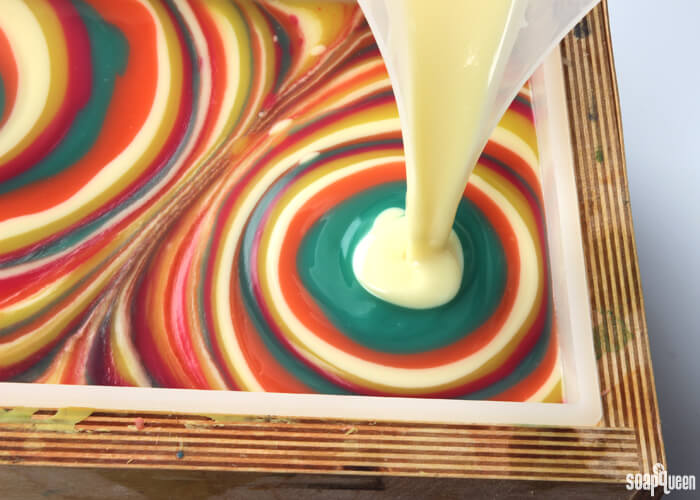
 TEN: Continue to keep pouring the soap into the mold until all the colors have been used. Remember to work quickly, you want the soap to be thin throughout the entire process. Below, you can see the white soap becoming slightly thicker than thin trace. This was our last pour, so it worked out beautifully!
 ELEVEN: Give the mold a few firm taps on the counter to help eliminate air bubbles, and to help the layers of soap settle. Place your mold on your Lazy Susan if you have one. If not, that’s fine too, but it really makes this technique easy! Begin to spin the Lazy Susan, stopping it quickly to help give the soap movement. You want the centrifugal force created by the spin and stop movement to move the soap in various directions within the mold. Be careful not to spin too hard, or the soap may spill out of the mold! Check out the Vine video below to see this in action.

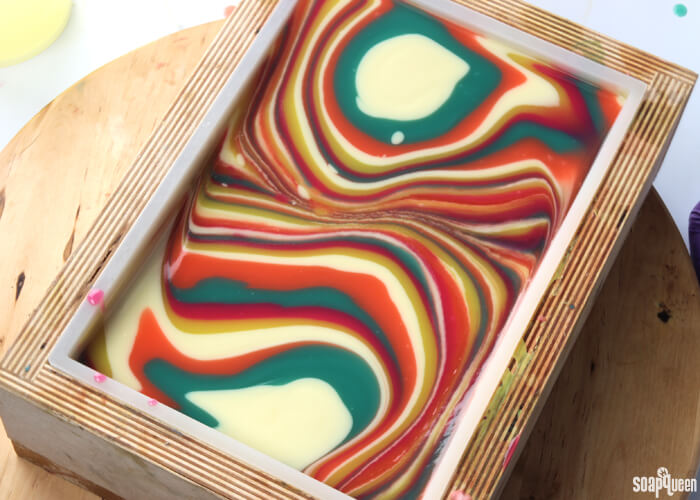 TWELVE: Keep spinning the mold until the colors have begun to create patterns due to the spin and stop motion. A good place to stop is when the colors begin to blend together. You can see this beginning to happen in the bottom corner of the mold in the photo below. Once you’re happy with the spin effect, spray the top of the soap with 99% isopropyl alcohol to help avoid soda ash. Because I want the colors of this soap to really pop, I ensured gel phase by placing it on a heating pad for 20-30 minutes, and insulating it for 24 hours. Read more about insulating your soap here. Remove from the mold after 3-4 days, cut, and allow to cure for 4-6 weeks.
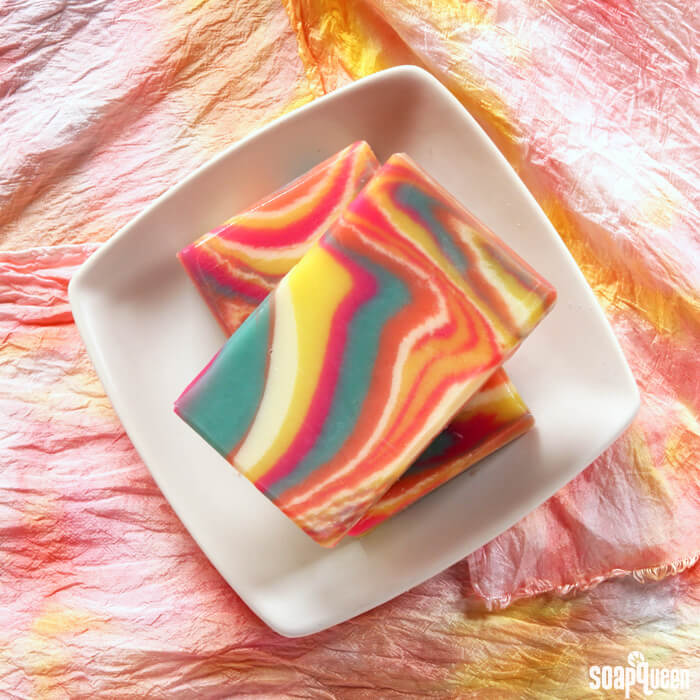
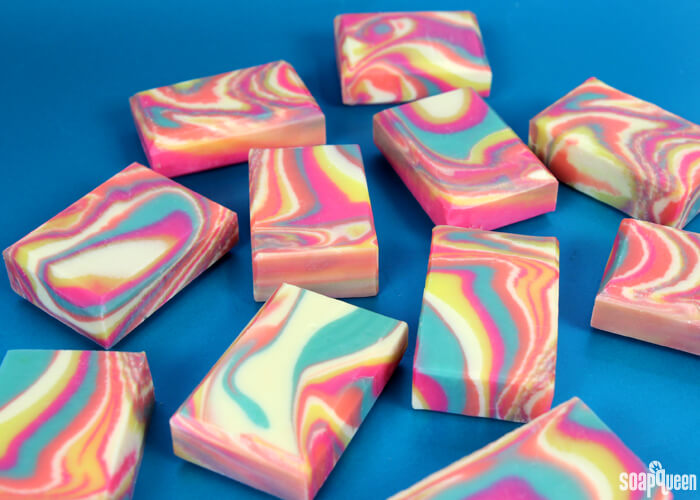
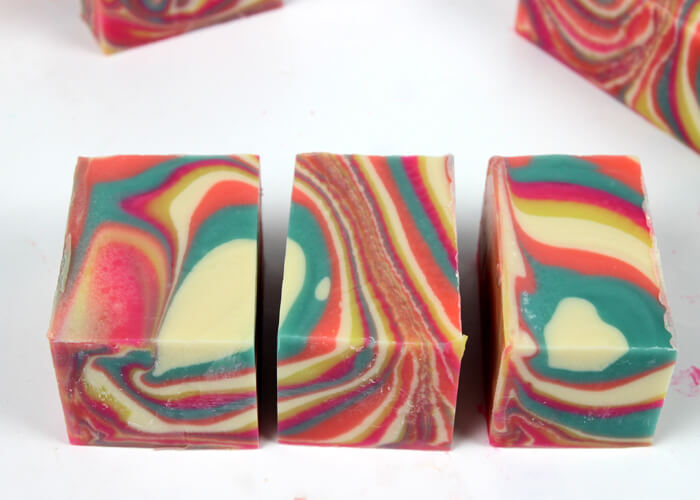
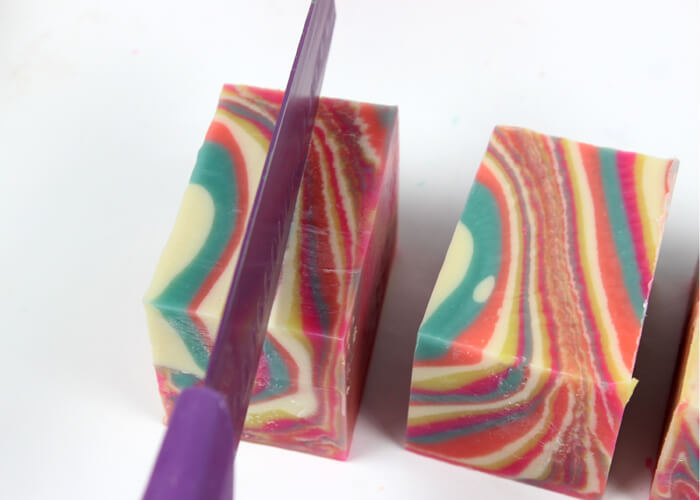
For this design, I prefer to cut my soap horizontally. This really highlights the movement within the swirl. To cut your soap horizontally, first cut the slab into three large pieces down the length of the mold. From each of these three pieces, you will get six bars.
 Cut the large pieces of soap into three equal pieces. These bars will now be roughly the size and shape as the bars created with the 9 Bar Birchwood Mold dividers.
 Now here is the cool part! Flip these bars on the side, and cut directly down the center. To see the horizontal cut in action, check out this Infinity Swirl Soap on Soap Queen TV. Around the 11 minute mark is where I demonstrate the horizontal cut. =)
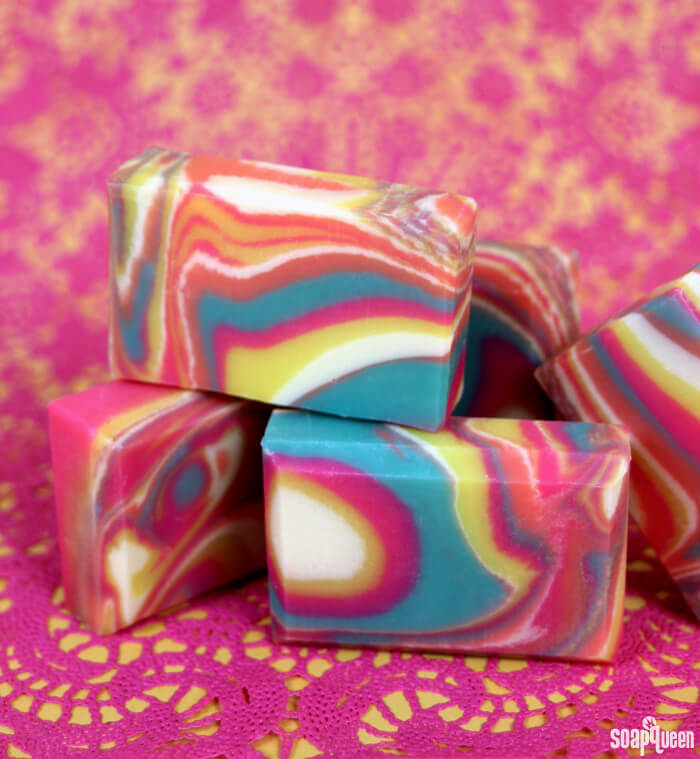
Have you tried the spin swirl technique yet? It was definitely a challenge for me!
Psychedelic Spin Swirl Cold Process Tutorial
Ingredients
- 9 Bar Birchwood Mold
- 15.5 oz. Canola Oil
- .5 oz. Castor Oil
- 1.5 oz. Cocoa Butter
- 12.5 oz. Coconut Oil
- 2.5 oz. Hemp Seed Oil Refined
- 7.5 oz. Olive Oil
- 10 oz. Rice Bran Oil
- 6.8 oz. Sodium Hydroxide Lye
- 16.5 oz. Distilled Water
- Neon Blue Raspberry Colorant
- Titanium Dioxide
- Fizzy Lemonade Colorant
- Tangerine Wow! Colorant
- Electric Bubble Gum Colorant
- 2 oz. Kumquat Fragrance Oil
- 1 oz. Patchouli Fragrance Oil
Instructions
SAFETY FIRST: Suit up for safe handling practices! That means goggles, gloves and long sleeves. Make sure kids, pets, and other distractions and tripping hazards are out of the house or don’t have access to your soaping space. Always soap in a well-ventilated area.
COLOR PREP: To ensure that the Titanium Dioxide blends smoothly into the soap batter, we recommend micronizing it before dispersing it in oil. Please note this is an optional tip but it does help with the titanium dioxide clumping in the soap. =) To micronize colorant, simply use a coffee grinder to blend the colorant to break up any clumps of color and prevent streaks of white from showing in the final soap. We like to use a coffee grinder that has a removable, stainless steel mixing area for easy cleaning. Then, disperse 1 teaspoon of the colorant into 1 tablespoon of sunflower or sweet almond oil (or any other liquid oil). Then in separate containers, disperse 1 teaspoon of Neon Blue Raspberry Colorant, Tangerine Wow! Colorant, Electric Bubble Gum Colorant, Fizzy Lemonade Colorant in 1 tablespoon lightweight liquid oil.
FRAGRANCE PREP: In a glass, fragrance safe container, blend together Kumquat and Patchouli fragrance oils. Set aside.
- Slowly and carefully add the lye to the water and gently stir until the lye has fully dissolved and the liquid is clear. Set aside to cool.
- Combine the coconut oil, olive oil, rice bran, hemp seed (refined), canola oil, castor oil, and cocoa butter. Once the lye water and the oils have cooled to 130 degrees or below (and are ideally within 10 degrees of each other), add the lye water to the oils and stick blend until you reach a light trace. If you’d like a harder bar of soap that releases faster from the mold, you can add sodium lactate to the cooled lye water. Use 1 teaspoon of sodium lactate per pound of oils in the recipe. For this recipe, you’d add about 3 tsp. sodium lactate.
- Once you have reached a very light trace (you don’t want to see trailings) split the soap into 5 equal containers. Each container would hold about 450 mL. Then, to each container add the dispersed colorants listed below. Use a whisk to fully mix in. Once the colors are whisked in, arrange them on the counter in the order you’d like to pour. Our arrangement was pink, yellow, white, orange and blue.Container A (Blue): 1.5 Tbs. dispersed Neon Blue Raspberry ColorantContainer B (White): 1 Tbs. dispersed Titanium Dioxide ColorantContainer C (Pink): 1 Tbs. dispersed Electric Bubblegum ColorantContainer D (Orange): 1 Tbs. dispersed Tangerine Wow! ColorantContainer E (Yellow): 1 Tbs. dispersed Fizzy Lemonade Colorant
- Begin pouring the pink soap into two corners across from each other in the mold. Count to three for each pour to help make sure the pour is even on both sides.
- Pour the yellow soap into the pink in both corners, counting to three to help ensure the pours are even on each side. As you pour, the soap should be thin enough to gently push it throughout the mold. As you pour each color, place it back into your color arrangement to help ensure you stay consistent with the color order.
- Then pour the white colored soap on top of the yellow in each corner of the mold, counting to three to make sure the pours are even.
- Pour the orange soap on top of the white in each corner, counting to three for each pour.
- Finally, pour a layer of blue soap onto the orange in both corners, counting to three for each pour.
- Whisk all colors to avoid any graininess, and to keep the soap smooth, thin and workable. Continue pouring with the pink soap into each corner, counting to three for each pour. Continue pouring each color in the correct color order into both corners of the mold. During the pouring process, continue to give each color a whisk to ensure the soap stays pourable. Below, you can see the blue soap becoming a little grainy. This is totally normal; just give it a little whisk to help it become smooth again =)
- Continue to keep pouring the soap into the mold until all the colors have been used. Remember to work quickly, you want the soap to be thin throughout the entire process. Below, you can see the white soap becoming slightly thicker than thin trace. This was our last pour, so it worked out beautifully!
- Give the mold a few firm taps on the counter to help eliminate air bubbles, and to help the layers of soap settle. Place your mold on your Lazy Susan if you have one. If not that’s fine too, but it really makes this technique easy! Begin to spin the Lazy Susan, stopping it quickly to help give the soap movement. You want the centrifugal force created by the spin and stop movement to move the soap in various directions within the mold. Be careful not to spin too hard, or the soap may spill out of the mold! Check out the video below to see this in action.
- Keep spinning the mold util the colors have begun to create patterns due to the spin and stop. A good place to stop is when the colors begin to blend together. You can see this beginning to happen in the bottom corner of the mold in the photo below. Once you’re happy with the spin effect, spray the top of the soap with 99% isopropyl alcohol to help avoid soda ash. Because I want the colors of this soap to really pop, I promoted gel phase by placing it on a heating pad for 20-30 minutes, and insulating it for 24 hours. Remove from the mold after 3-4 days, cut, and allow to cure for 4-6 weeks.
- For this design, I prefer to cut my soap horizontally. I feel this really highlights the movement within the swirl. To cut your soap horizontally, first cut the slab into three large pieces down the length of the mold. From each of these three pieces, you will get six bars.
- Now here is the cool part! Flip these bars on there side, and cut directly down the center. To see the horiztontal cut in action, check out this Infinity Swirl Soap on Soap Queen TV. Around the 11 minute mark is where I demonstrate the horizontal cut =)