Bramble Berry is proud to once again sponsor the Handcrafted Soap & Cosmetic Guild Conference! We’re providing conference goers with super sized sample bags packed to capacity with some of our favorite Bramble Berry products, and sending along super soaper Kathryn Hackney (check out previous Soap Queen appearances here and here) to teach a Cold Process Colorant Master class. Don’t forget that our fabulous guest bloggers will be reporting back on other classes and conference happenings!
Bummed about not being able to attend this year’s conference? Not to worry. We’re keeping everyone in the loop by offering you the option to purchase the a super-sized version of the kit we included in the goodie bags through Brambleberry.com in a full size handy cold process kit. And we’re offering a PDF download of Kat’s amazing Cold Process Colorant Master Class and Powerpoint presentation so you can feel like you were right there with her. While it’s not quite the same as being there, it’s a close second.
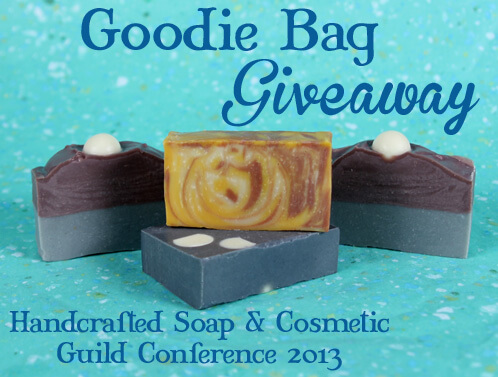
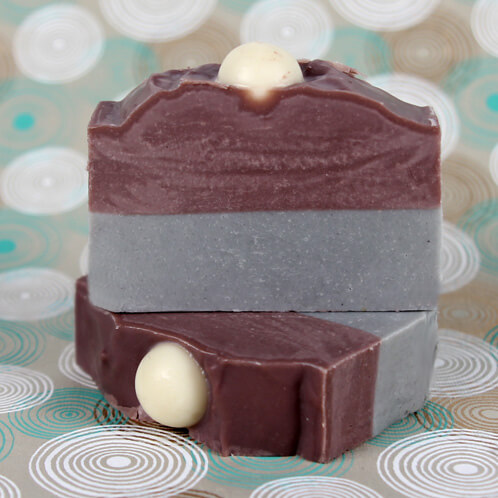
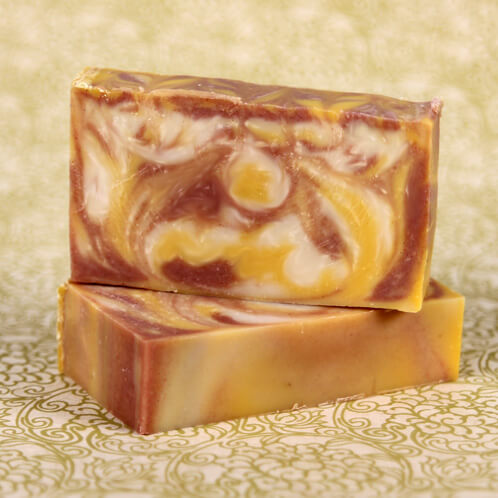
Pictured above are three (yes, three!) different soaps that you can make with your Soap Guild Goodie Bag kit. And that’s not all – scroll down to the end of this post to read about how you can win your very own Soap Guild Goodie Bag Kit Sample! The giveaway has closed and winners are being contacted! Thank you to all those who entered.
You can click here to purchase the Super Sized Soap Guild Goodie Bag Kit and save over $15. The individual items are:
33 oz Swirl Quick Mix Oil
0.2 oz Purple Brazilian Clay
0.2 oz Red Brazilian Clay
0.2 oz Activated Charcoal
0.2 oz Annatto Seed
2 oz Lavender 40/42
2 oz Cranberry Chutney
4 inch Silicone loaf Mold
Tutorial #1: Embedded Spheres

PART ONE: Make the embeds
Recipe:
1.3 oz Swirl Quick Mix
0.2 oz Sodium Hydroxide (Lye)
0.4 oz Distilled Water
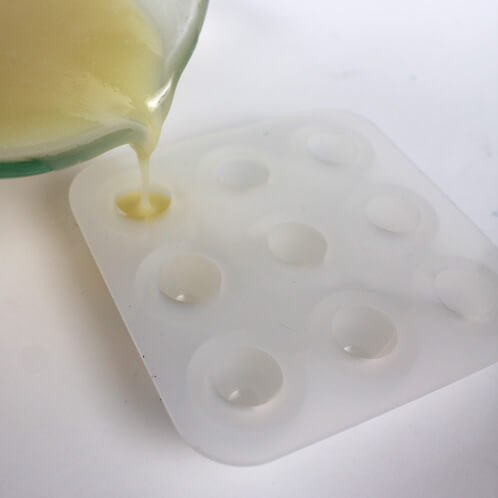
9 Ball Sphere Mold
SAFETY: Suit up for safe handling practices! Long sleeves, gloves, and eye protection are necessary when making cold process soap. Eye glasses are not sufficient protection. Be sure that kids, pets, and other tripping/distraction hazards are out of the house or don’t have access to your soaping space. Always soap in a well-ventilated area.
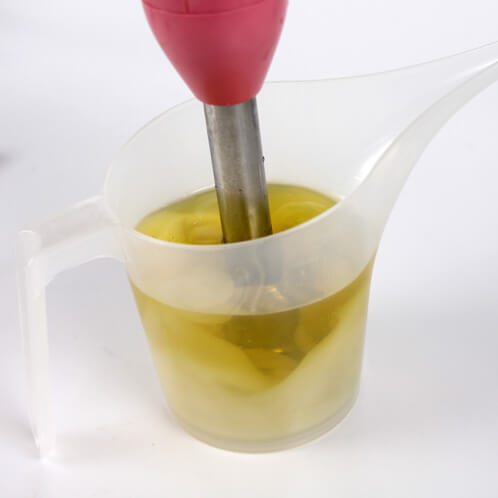
ONE: Melt the entire bag of Quick Mix oils. Give the bag a good shake and measure out 1.3 ounces by weight.
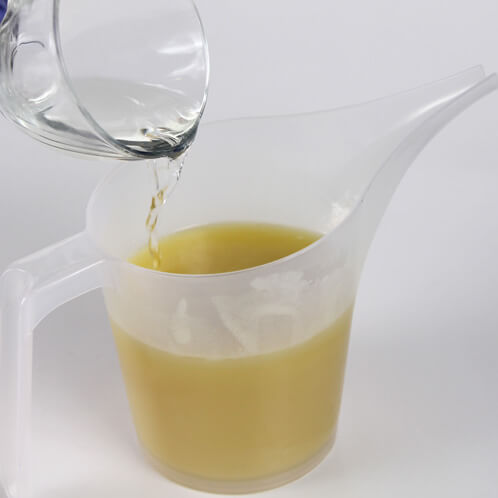
TWO: Slowly and carefully add the lye to the water and stir until clear. Set aside to cool.
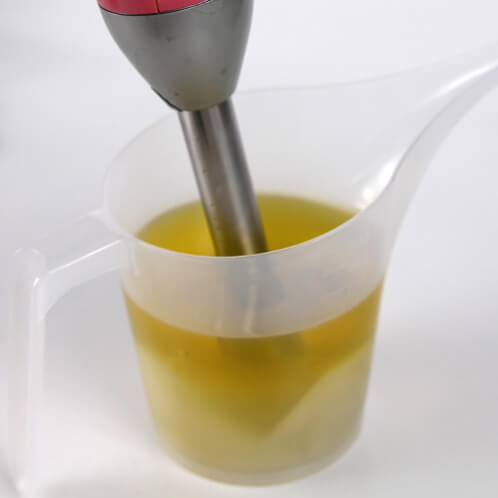
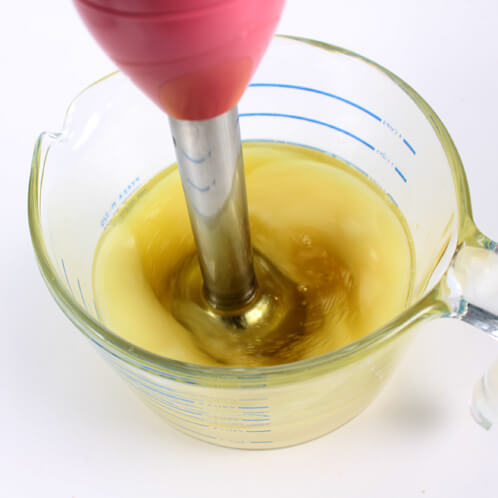
THREE: When the lye water and the oils have reached 120 degrees or below (and are ideally within 10 degrees of each other), carefully pour the lye water into the oils. Pulse the stick blender at first, then keep a steady mix until the lye water and oils are emulsified and the mixture reaches medium trace.
FOUR: Pour the soap into the Small 9 Ball Sphere mold. Gently tamp the mold on the table to remove air bubbles and use a soap cutter or other non-reactive straight edge to clean the top of the mold of any dribbles.
FIVE: Cover and insulate for 24 hours. Unmold after 3-4 days.
PART TWO: Make the loaf soap
Recipe:
9.7 oz Swirl Quick Mix
1.3 oz Sodium Hydroxide (Lye)
3.2 oz Distilled Water
0.75 oz Lavender Essential Oil
Activated Charcoal
Small Silicone Loaf Mold
SAFETY: Suit up for safe handling practices! Long sleeves, gloves, and eye protection are necessary when making cold process soap. Eye glasses are not sufficient protection. Be sure that kids, pets, and other tripping/distraction hazards are out of the house or don’t have access to your soaping space. Always soap in a well-ventilated area.
ONE: Melt the entire bag of Quick Mix oils and measure out 9.7 ounces by weight.
TWO: Slowly and carefully add the lye to the water and stir until clear. Set aside to cool.
THREE: When the lye water and the oils have reached 120 degrees or below, carefully pour the lye water into the oils. Pulse the stick blender at first, then keep a steady mix until the lye water and oils are emulsified and the mixture reaches light trace.
FOUR: Add Lavender Essential oil to the soap batter and mix in using a whisk.
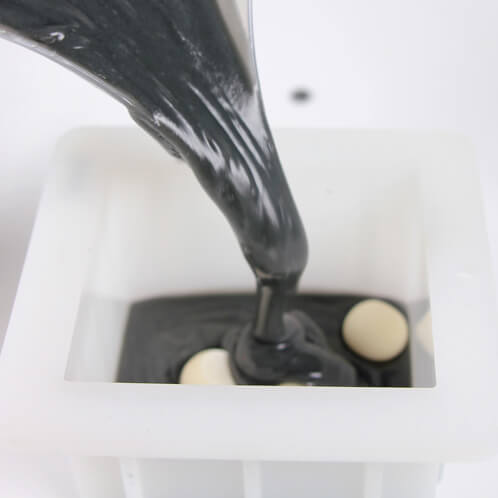
FIVE: Add 1 level teaspoon Activated Charcoal and stick blend until the mixture reaches medium-thick trace.
SIX: Pour the charcoal colored soap into the mold, filling about 1/4 full. Gently place 3 embeds randomly in the soap. Cover with another 1/4 of the soap, and place another three embeds in the soap. Repeat with one more layer of soap and embeds, and cover with one last layer of soap so that the embeds are completely hidden.
SEVEN: Spray entire surface with 91% Isopropyl Alcohol and cover and insulate for 24 hours. Unmold after 3-4 days.
Tutorial #2: Cute as a Button
PART ONE: Make the embeds
Recipe:
1.3 oz Swirl Quick Mix
0.2 oz Sodium Hydroxide (Lye)
0.4 oz Distilled Water
9 Ball Sphere Mold
SAFETY: Suit up for safe handling practices! Long sleeves, gloves, and eye protection are necessary when making cold process soap. Eye glasses are not sufficient protection. Be sure that kids, pets, and other tripping/distraction hazards are out of the house or don’t have access to your soaping space. Always soap in a well-ventilated area.
ONE: Melt the entire bag of Quick Mix oils. Give the bag a good shake and measure out 1.3 ounces by weight.
TWO: Slowly and carefully add the lye to the water and stir until clear. Set aside to cool.
THREE: When the lye water and the oils have reached 120 degrees or below (and are ideally within 10 degrees of each other), carefully pour the lye water into the oils. Pulse the stick blender at first, then keep a steady mix until the lye water and oils are emulsified and the mixture reaches medium trace.
FOUR: Pour the soap into the Small 9 Ball Sphere mold. Gently tamp the mold on the table to remove air bubbles and use a soap cutter or other non-reactive straight edge to clean the top of the mold of any dribbles.
FIVE: Cover and insulate for 24 hours. Unmold after 3-4 days.
PART TWO: Make the soap
Recipe:
9.7 oz Swirl Quick Mix
1.3 oz Sodium Hydroxide (Lye)
3.2 oz Distilled Water
Activated Charcoal
Purple Brazilian Clay, dispersed (see below)
.75 oz Lavender Essential Oil
Small Silicone Loaf Mold
DISPERSE CLAY: Mix 2 teaspoons Purple Brazilian Clay in 2 teaspoons water.
SAFETY: Suit up for safe handling practices! Long sleeves, gloves, and eye protection are necessary when making cold process soap. Eye glasses are not sufficient protection. Be sure that kids, pets, and other tripping/distraction hazards are out of the house or don’t have access to your soaping space. Always soap in a well-ventilated area.
ONE: Melt the entire bag of Quick Mix oils and measure out 9.7 ounces by weight.
TWO: Slowly and carefully add the lye to the water and stir until clear. Set aside to cool.
THREE: When the lye water and the oils have reached 120 degrees or below, carefully pour the lye water into the oils. Pulse the stick blender at first, then keep a steady mix until the lye water and oils are emulsified and the mixture reaches light trace.
FOUR: Add Lavender Essential oil to the soap batter and mix in using a whisk.

FIVE: Split the batch into two equal parts.To one batch, add a level 1/8 teaspoon Activated Charcoal and to the second batch add 1 3/4 teaspoons dispersed Purple Brazilian Clay. Stick blend each batch to medium-thick trace.
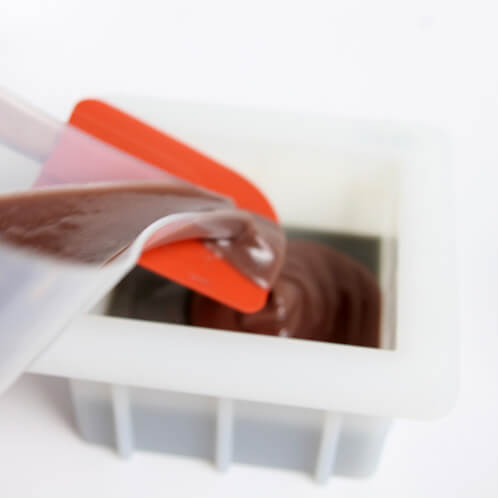
SIX: Pour the charcoal colored soap into the mold. Tamp the mold on the table to flatten out the layer.

SEVEN: Pour the purple colored soap over the charcoal colored soap, using a spatula to pour over to prevent breakthrough in layers.
EIGHT: Use a spatula or spoon to build a peak down the center of the thick-traced purple soap. Place four embeds in the center of the peak.
NINE: Spray entire surface with 91% Isopropyl Alcohol and cover and insulate for 24 hours. Unmold after 3-4 days.
Tutorial #3: In-The-Pot Swirl
Recipe:
11 oz Swirl Quick Mix oil
1.5 oz Sodium Hydroxide (Lye)
3.6 oz Distilled Water
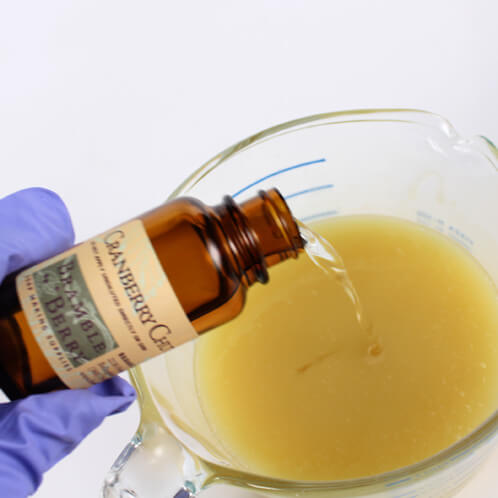
0.75 oz Cranberry Chutney Fragrance Oil
Annatto Seed Infusion (see below)
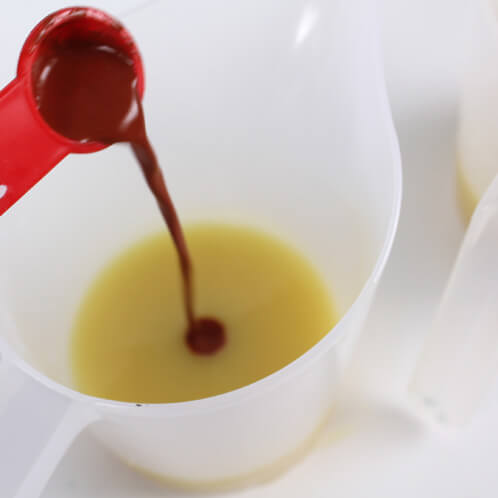
Red Brazilian Clay, dispersed (see below)
Small Silicone Loaf Mold
INFUSE: 0.2 oz (about 1/2 Tablespoon) Annatto Seed in 1.25 oz (by weight) Sunflower Oil or other lightweight liquid oil.
DISPERSE CLAY: Mix 1/2 teaspoon Red Brazilian Clay in 1 teaspoon water.
SAFETY: Suit up for safe handling practices! Long sleeves, gloves, and eye protection are necessary when making cold process soap. Eye glasses are not sufficient protection. Be sure that kids, pets, and other tripping/distraction hazards are out of the house or don’t have access to your soaping space. Always soap in a well-ventilated area.
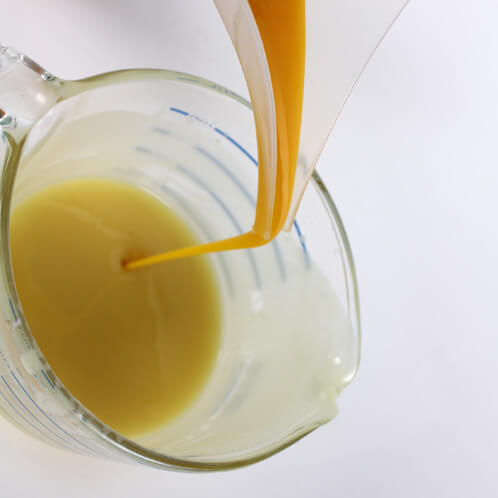
ONE: Melt the entire bag of Quick Mix oils and measure out 11 ounces by weight.
TWO: Slowly and carefully add the lye to the water and stir until clear. Set aside to cool.
THREE: When the lye water and the oils have reached 120 degrees or below, carefully pour the lye water into the oils. Pulse the stick blender at first, then keep a steady mix until the lye water and oils are emulsified and the mixture reaches light trace.
FOUR: Add Cranberry Chutney fragrance oil to the soap batter and stick blend until the mixture reaches medium trace.
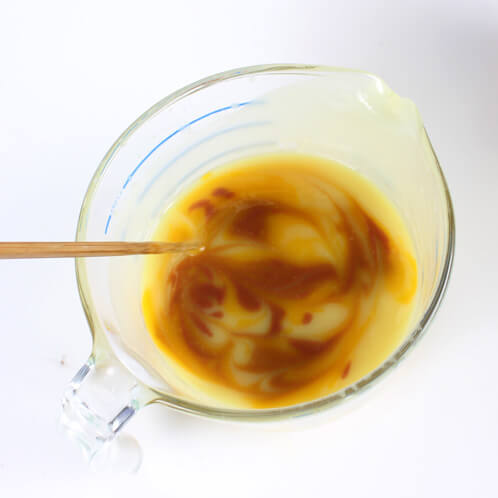
FIVE: Split the batches into three equal parts. To one part, add 2 teaspoons Annatto Seed infusion. To the second part, add all of the dispersed clay. Leave the third part uncolored. Mix in the colorants with a whisk so as not to accelerate trace.
SIX: From a high vantage point, pour the Annatto Seed colored soap batch into the uncolored batch in three spots: 12:00, 4:00 and 8:00, then one in the center. Reserve about 2 Tablespoons of soap for the swirled top. Repeat with the Red Brazilian clay colored batch, again reserving about 2 Tablespoons of soap.
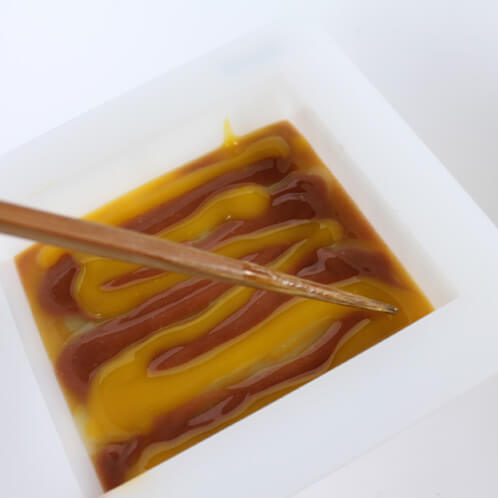
SEVEN: Using a chopstick or skewer, drag through each of the entry points and including the center. Only drag the skewer through the soap once. Be careful not to overmix – you want to swirl, not blend!
EIGHT: Pour the soap into the mold. As you pour, the soap will continue to mix slightly and enhance the swirl you started with the chopstick!

NINE: Using the reserved Annatto colored soap, pour in an “s” curve parallel to the longer edge of the mold. Follow the “s” created with the Annatto soap with a second “s” using the Red Brazilian clay colored soap. Drag a skewer or chopstick inserted into the top 1/4” of the soap in another “s” curve that is perpendicular to the one created by the soap.
TEN: Spray entire surface with 91% Isopropyl Alcohol and cover and insulate for 24 hours. Unmold after 3-4 days.
Stay tuned to Soap Queen to get the conference low-down from our traveling trio!