• January 2, 2013

I’ve been loving (obsessing over?) the hair chalking trend going around. If you follow me on Pinterest you may have seen a few hair chalking pins lately, so of course I had to give it a try. After a few test runs with the help of some gracious Bramble Berry team members’ luscious locks, I’ve come up with what I think is a great hair chalk recipe that works on both light and dark colored hair. Plus, a how-to about applying the chalk to hair once it’s made. It washes out in 1-2 shampoos (depending on the color of your hair before chalking; lighter hair may take a second shampoo) and really pops – the perfect low-commitment pizzazz to kick off the new year right.

How to Make and Apply Hair Chalk

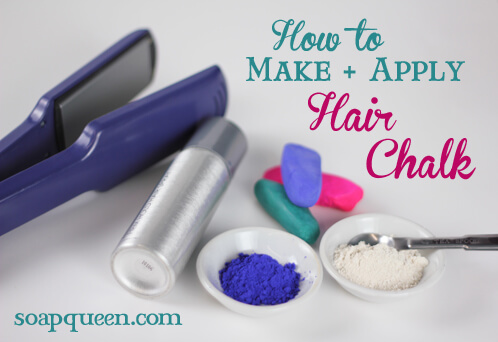
Making the Hair Chalk

Recipe:

2 Tablespoons Colorant (We found that oxides and Bramble Berry neon pigments worked best and micas didn’t really work at all; they just crumble apart.)

1/2 teaspoon Kaolin Clay

1 Tablespoon Witch Hazel

1/2 teaspoon Arrowroot Powder

1/2 teaspoon Water

Click here to add everything you need to your Bramble Berry shopping cart!

ONE: Mix dry colorant (in the pictures, I’m using Electric Bubblegum Pigment) and Kaolin Clay together in a bowl big enough to stick both hands in.

Mixing Kaolin and Colorant

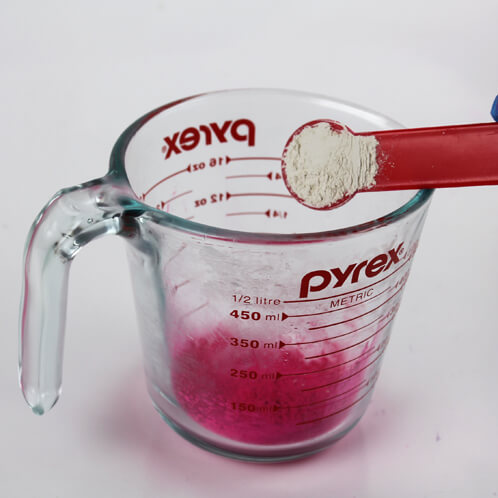
TWO: Create a slurry by placing the Arrowroot Powder and water in a separate small container and mixing well. Microwave the mixture for 5 seconds. If it’s not a little bit thick after 5 seconds, try another three second burst. You do not want it gummy, just slightly thickened and overheating will cause gumminess so proceed with caution (and the 3 second bursts) while heating.

Making Arrowroot Slurry

THREE: Add the Witch Hazel to the dry powders, and hand mix together (while wearing gloves!). Once well mixed, add the Arrowroot Powder and Water slurry.  Really squish the mixture together. You don’t want it crumbly or wet, or to have bits of undispersed clay. It should have texture just like kid’s modeling clay. If it is too dry, spritz witch hazel one spritz at a time until correct consistency is reached.

Finishing the Hair Chalk

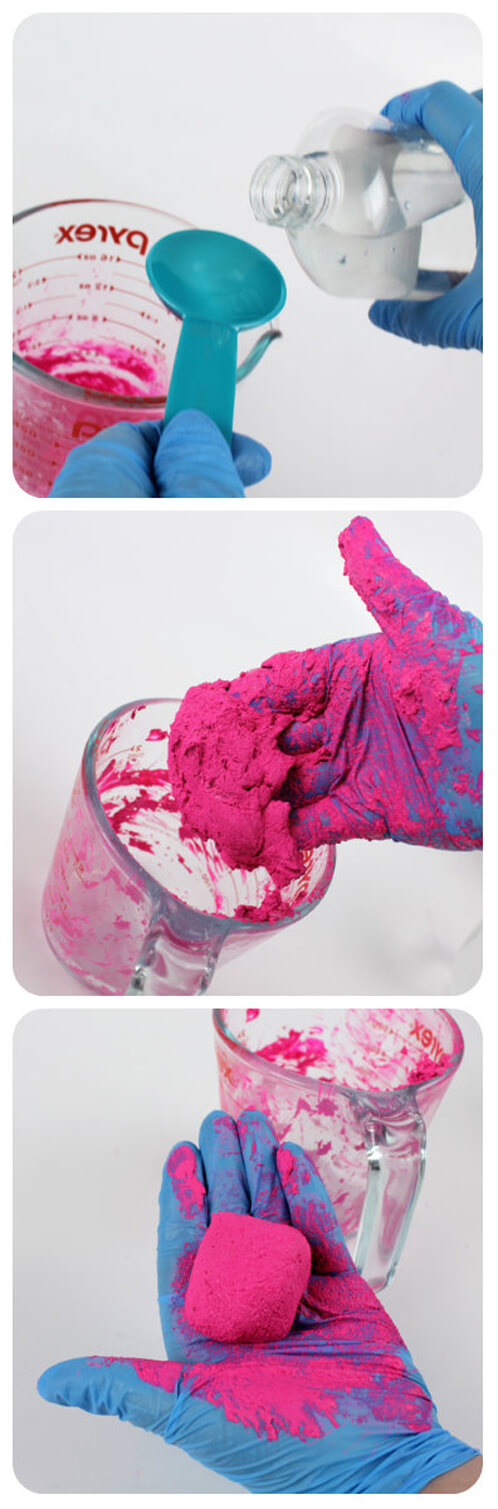
FOUR: Roll mixture on a piece of parchment paper until you get the shape you like. Allow to air dry overnight.

Applying the Hair Chalk

Tools:

Gloves

Apron

Spray Bottle with water

Comb

Blow-Dryer, Hair Straightener and/or Curling Iron

Hairspray

COLORS USED: Electric Bubblegum Neon Pigment, Ultraviolet Blue Neon Pigment, Hydrated Chrome Green Pigment

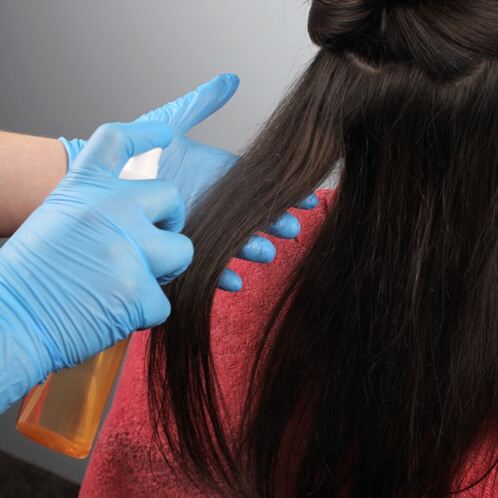
PREP: Cover the shoulders of the person you’re applying the chalk to with an old towel or a thin sheet of plastic. Put on some gloves to protect your hands, and wear an apron to protect clothing. A plastic/waterproof apron would work best if you have one.

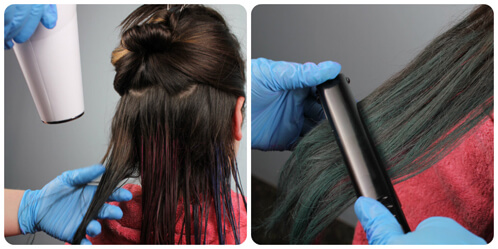
NOTE: For the tutorial, I pulled half of Rachel’s hair up so I could chalk just the hair underneath for an ombre or peekaboo effect. In the very last picture, check out Becky’s blonde hair with chalk on the outermost strands. Both styles worked great! Get creative with where the chalk is applied for some really unique effects. Use of the hair chalk can have as subtle or as obvious a result as you’d like.

ONE: Wet designated area of hair desired to be chalked using the spray bottle. Really saturate the hair with a good amount of water!

Spray Hair with Water

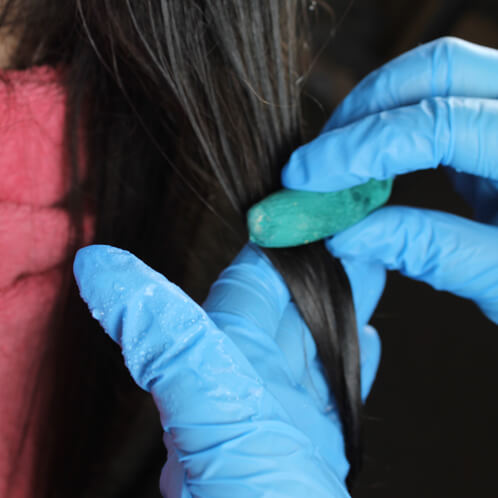
TWO: Apply the chalk to the wet hair by dragging it along the strands. Use your fingers to rub the chalk into the hair really well.

Chalking the Hair

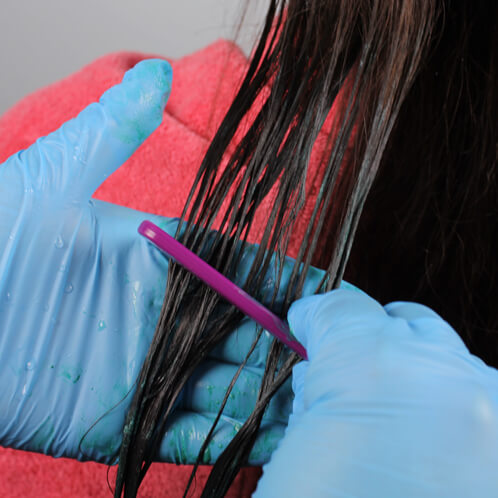
THREE: Once you’ve reached the desired amount of coverage, comb through the hair to evenly distribute the chalk.

Combing the Chalk Through

FOUR: Heat-set the chalk using either a blow-dryer, curling iron, or straightener. A curling iron or straightener on wet hair may not be the best idea for those with damaged hair. You can also straighten or curl the hair after you blow-dry it. Take this opportunity to style the hair before the next step.

Heat setting chalk

FIVE: Spray chalked hair with hair spray so that it doesn’t brush off onto clothing.

Finished Chalked Hair

Thanks Rachel G. and Becky for being the hair chalk models extraordinaire!

Click here for a printable PDF of this tutorial.

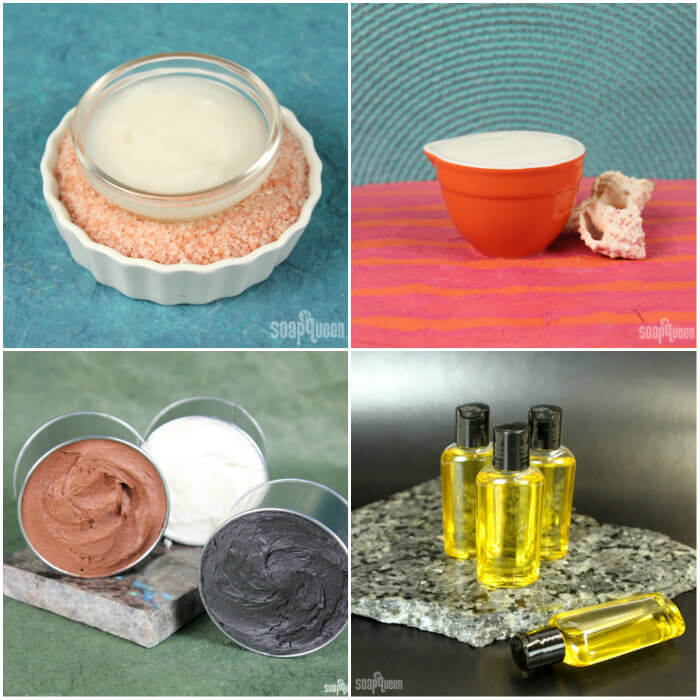
Looking for more hair DIY recipes? Check out the fun tutorials below!  The Argan Oil Shampoo and Leave-In Conditioner (top left and right) leave your hair feeling silky and soft. Don’t forget about manly facial hair; the Sculpting Mustache Wax and Moisturizing Mahogany Beard Oil keep beards looking polished. 

haircollage

You may also like these

Become an email subscriber

Enter your email address below and you will receive all our new posts directly in your email inbox.

  1. I’m SO excited to try this! I was wondering — will it rub off on my clothes? I know you suggested hairspray to help set it, but is that foolproof or should I anticipate some color running off when I’m choosing my top for that day?

    Thank you for sharing!

    -c

    1. Hi Cheryl!

      As long as your hair is dry and you use hairspray, it shouldn’t rub off on your clothing. You may want to try it with an old T shirt just to be extra careful. 🙂

      -Kelsey with Bramble Berry

    1. Hi Amal!

      After testing some other ingredients, we really found that Kaolin Clay works best. Kaolin clay is also great in bath bombs 🙂

      -Amanda with Bramble Berry

  2. I was wondering if I could use food coloring for the color part of this?? Also I wasn’t sure if I used food coloring if it would stain the hair… Thanks!!

    1. Hi Ella!

      We have not tested this recipe with food coloring, but because it is so different than powdered colorants like oxides, my guess is that it may not work very well. I would guess that food coloring would not give you a very vibrant color. Of course you can always give it a try, but I wouldn’t recommend it.

      -Amanda with Bramble Berry

  3. Hi, love this recipe!
    Just wondering whether tapioca flour (arrowroot) is the same as the arrowroot powder that is listed in the recipe.

    Thanks!

    1. Hi Melanie!

      The arrowroot powder is indeed different from tapioca flour, although they have very similar characteristics. We have not tried this recipe with tapioca flour, but if you do let us know how it goes! 🙂

      -Amanda with Bramble Berry

  4. So I’d love to do this but I don’t want super bright colors.
    I am looking for more of a burgendy or dark red. Any ideas?

    1. Hi Nicole!

      This would be beautiful with a darker color as well! If you are looking for a deep red or burgundy, here are a few pigments you could use! The Burgundy Mica is more brown, while the Brick Red is still brownish, but with more red.

      Burgundy Pigment:
      https://www.brambleberry.com/Burgundy-Pigment-P4051.aspx

      Brick Red Oxide Pigment:
      https://www.brambleberry.com/Brick-Red-oxide-Pigment-P4041.aspx

      I hope this gives you some ideas! If you give this recipe a try, I would love to see some photos on our Facebook Page! I have been dying to try this recipe out as well 🙂

      -Amanda with Bramble Berry

  5. I just tried making the hair chalk (followed exact measurements/ingredients) and I’m having the same problem like a previous reader, just like pink water. I mixed the arrowroot/water good and microwaved it several times, but it just isn’t thickening. The arrowroot/water mix did seem to be thickened. Is there any way to thicken it once it’s all mixed? I received all ingredients from Brambleberry and received them all today. Thanks!

    1. Hi Allison!

      We are so sorry to hear that you are having a bit of trouble with this recipe, and we are hear to help you troubleshoot. If it isn’t thickening for you, I would suggest adding a touch more arrowroot to see if that helps thicken it up. I hope this helps!

      -Becky with Bramble Berry

  6. Are there any warnings you can think of that we need to provide to customers if we sell hair chalk like this? I’m wondering if it’s harmful to breathe the dust or maybe it doesn’t put off any dust like a typical chalk since it’s more clay-like?

    (I know that using pastel chalk on hair is very dangerous so this is a great option instead of that.)

    Thanks!
    Jenn

    1. Hi Jenn!

      When we made this hair chalk we found that there wasn’t a lot of dust in the air, but if you are worried, you can leave a note on the packaging. We made this hair chalk especially for people who wanted to control the ingredients in their cosmetic products and do hope that you get a chance to try it out! 🙂

      -Becky with Bramble Berry

      1. Thanks! Tried it and loved it!!

        Trying to figure out white chalk…titanium dioxide or zinc oxide? I’ve read some cautions on titanium dioxide so I didn’t know if it would be too much if used in chalk as a white pigment?

          1. I have only been able to get one color to work…red. The rest just come out super gooey and sticky and can’t be rolled. It just sticks to container, gloves, etc and doesn’t harden dry. I’m stumped. Have done the exact same thing for each. Only using oxides, no Micas. I have a huge order to fill and I’m freaking out. Anyone have any ideas on what to do to fix the issue?

        1. Hi Jenn!

          We are sorry to hear that you are experiencing some frustration with the hair chalk. This recipe can actually take a couple days to harden up, so I would definitely give them that extra time. I would also make sure to let them dry in the coolest area in your home as possible as anywhere that is humid is going to draw moisture to them. What other colorants have you been trying working with?

          -Becky with Bramble Berry

          1. Orange oxide and yellow oxide are the two I cannot get to hard correctly or roll. Oh and also I tried ultramarines too (a blue and a violet). No luck. I cannot get the chalk off my gloves to work with it. It’s a clumpy mess. Not sure why the red would be so different from all the other colors. I used precise measurements each time. I even experimented with the arrowroot at a few different consistencies in case I wasn’t understanding the description of what the texture should be. I had an order for 150 that someone was hoping I could fill but it looks like I’m going to have to play around with this more to figure out what is going on with the other colors. I don’t think they want all red. 🙂

  7. Is there any way I can make it waterproof or if there is somewhere I can buy it?

    1. Good morning, Clara!

      If you have lighter hair (blonde), this hair chalk will actually partially stay in, even after a wash. Currently, we don’t have way to make this particular hair chalk waterproof, but that is sort of the beauty of it. You can wash your hair and try another color the next day! 🙂

      -Becky with Bramble Berry

  8. Hello. My kids and I tried this recipe this afternoon. I don’t know if maybe we didn’t microwave the arrowroot and water long enough but once we added the slurry to the mixture, it would not thicken. It was like bright pink water. What could we be doing wrong?

    1. Good morning, Haven!

      I am so sorry to hear that you are having some issues with this recipe. We are here to help you troubleshoot and definitely want to make sure we can get this tutorial to work for you!

      Did you try microwaving the arrowroot + water mixture an extra few times to help it thicken up? We suggest making sure the Arrowroot Powder and water are mixed well, and then popping it in the microwave for 5 seconds. If it hasn’t gotten thicken after the 5 seconds, try another 3-second burst. Keep doing that 3-second burst until it has thickened up.

      Another thing to look at is your Arrowroot Powder. Did you get it from Bramble Berry? You will want to make sure that there are no extra additives as that can actually change the consistency of this hair chalk.

      I hope this helps!
      -Becky with Bramble Berry

      1. Thanks for the reply. We did microwave the mixture several times until it was thick. It just never made a “paste” when added to the other ingredients. I did get my arrowroot from Brambleberry. I just received it on the Thursday prior to posting my original reply so it is fresh. I will try it again and see if I can figure it out. To me it just seemed like not enough dry ingredients.

        1. Hi Haven!

          The Arrowroot Powder and water should blend and thicken as soon as the heat hits it. I would suggest making sure you blend the Arrowroot Powder with the distilled water before you microwave it with a mini-mixer, to make sure they are fully blended. Keep us updated on your second batch — we will be waiting to hear how it turned out. 🙂

          -Becky with Bramble Berry

          Mini White Plastic Mixer: https://www.brambleberry.com/Mini-White-Plastic-Mixer-P4721.aspx

  9. Hi! I was wondering if you think that Procion MX dye will work for these? It is a pigment dye that I use to tie dye and buy in bulk online. It is a permanent dye when used on cotton fabric, I sill want the chalk to be able to wash out over time though! Thanks for any help 🙂

    1. Good morning, Brette!

      Before you use any colorant in this tutorial, you will want to make sure it is skin and hair safe. We’ve never used that dye, so I would definitely suggest contacting the vendor to make sure it can be used on the hair. I hope this helps! =)

      -Becky with Bramble Berry

  10. Was wondering how many pieces of chalk u can make from one batch and how many batches you can make with the supplies ordered? Thinking of making large qty

    1. Good afternoon, Hope!

      This hair chalk was was just so much fun to make and I was so happy that I was one of the lucky testers for it.

      In this particular recipe the ingredients listed above will only make you one hair chalk stick. But, if you order the kit, you will have enough ingredients to make twelve hair chalk sticks. The only thing you would need to order more of is color! I’d suggest trying other colors like Tangerine Wow!, Fizzy Lemonade and Fired Up Fuchsia.

      Fired Up Fuchsia Colorant: https://www.brambleberry.com/Fired-Up-Fuchsia-Colorant-P4967.aspx

      Fizzy Lemonade Colorant: https://www.brambleberry.com/Fizzy-Lemonade-Colorant-P4965.aspx

      Tangerine Wow! Colorant: https://www.brambleberry.com/Tangerine-Wow-Colorant-P4964.aspx

      I hope this helps! We can’t wait for you to create these and you’ll have to keep us updated on your progress. If you get any fun pictures of the final product or the chalk in the hair we’d love for you to share them with us on Bramble Berry’s Facebook page.

      https://www.facebook.com/BrambleBerry

      -Becky with Bramble Berry

    1. Good afternoon, Jamie!

      Thanks for stopping by. =) The Neon Colorant Sampler Pack does not have enough of each colorant for this particular project. You would need the full amount of colorant for it to show up on the hair. But, you can totally reduce (halve or quarter) the amounts in this recipe to get smaller amounts so that you can use the colorant in the sample pack. Let us know if you do end up trying this one out, it’s so much fun and we’d love to get your feedback. I hope this helps! =)

      -Becky with Bramble Berry

  11. Would t-shirt dye (used for tie dyeing) work too? And where would arrow root and kaolin clay be sold? (preferably a store, not online)

    1. Good morning, Danielle!

      Great questions. We don’t suggest using any ingredients that aren’t safe for hair and skin for this project. You’ll want to double-check with the manufacturer of the t-shirt dye that you are wanting to use to make sure it will be safe (and work). You can typically find Arrowroot Powder and Kaolin Clay at your natural health food store, and we also carry online at Bramble Berry’s website.

      Kaolin Clay: https://www.brambleberry.com/Kaolin-Clay-P3235.aspx

      Arrowroot Powder: https://www.brambleberry.com/Arrowroot-Powder-P3706.aspx

      I hope this helps! Keep us updated on your progress and if you get any pictures of your hair chalk in use, we’d love to see how they turn out. You can share them with us on Bramble Berry’s Facebook page!

      https://www.facebook.com/BrambleBerry

      -Becky with Bramble Berry

  12. My hair gets puffy whenever I wet it. Is there a way I can color my hair without wetting it? Also, are there any more common ingredients like something that may be lying around the house I could use? I really dont want to search all day for things.

    1. Good morning, Ayana!

      We’ve found that applying the chalk to the hair while dry tends to make the hair chalk a little more flaky then we had liked. But, you can definitely try it out to see if it works better for you. We tried several different ingredients for this recipe and found that the Kaolin Clay, Witch Hazel, Arrowroot Powder and Distilled Water worked the best for application and sticking-power for us. You should be able to find those ingredients at your local natural grocer or you can order them from Bramble Berry’s website. =)

      https://www.brambleberry.com

      -Becky with Bramble Berry

  13. Hi,
    I have been looking for something temporary and semi-shocking for my age. I just turned 60 and my blonde hair is going white and the ‘darker’blonde parts are turning pewter. I need color! So I’m going to do this in sea colors and shock my hubby and the garden club…I love it.
    I turn pink plastic flamingos into dragons (and other creatures) on Etsy so I think I’m entitled to be a little “colorful” don’t you?
    Thanks for the tutorial.
    Kate

    1. It is such a fun recipe! I surprised my husband when I came home from work one day with green, blue and pink hair, he didn’t recall me going to work that way. 😀 Let us know how it turns out for you and if you get any pictures, we’d love to see them.
      -Becky with Bramble Berry

  14. How long will the chaulk last if I were to put it into a container and sell it as a kit in my shop ?

    1. Hi Debbie!

      Since this recipe contains such a small amount of water, it should last up to a year. Just make sure you keep it in a dry and cool area so it doesn’t melt or crumble. I hope this helps! =)

      -Becky with Bramble Berry

  15. Very cool, my girls are going to love this…I was wondering, could I use cornstarch instead of arrowroot powder?
    Thanks!
    Mariah

Comments are closed.

{"email":"Email address invalid","url":"Website address invalid","required":"Required field missing"}

The Latest from Soap Queen TV

Inspired by Gems & Crystals

All About Essential Oils

The Power of Charcoal

Create Your Own Clay Face Mask

DIY Bath Bombs

Cold Process Soap Tips & Tricks

Learn the Basics of Cold Process Soapmaking

Learn the Basics of Melt & Pour Soapmaking

Want to Start Your Own Soap Business?

Soap Business Success Stories

Soap Queen TV Favorites

Ingredient Spotlight

Disclosure

Unless stated otherwise, all images are original material and are copyrighted. If you'd like to use an image, please be a friend and credit the photo and link back to Soap Queen. Feel free to share, tweet and pin to your hearts content.