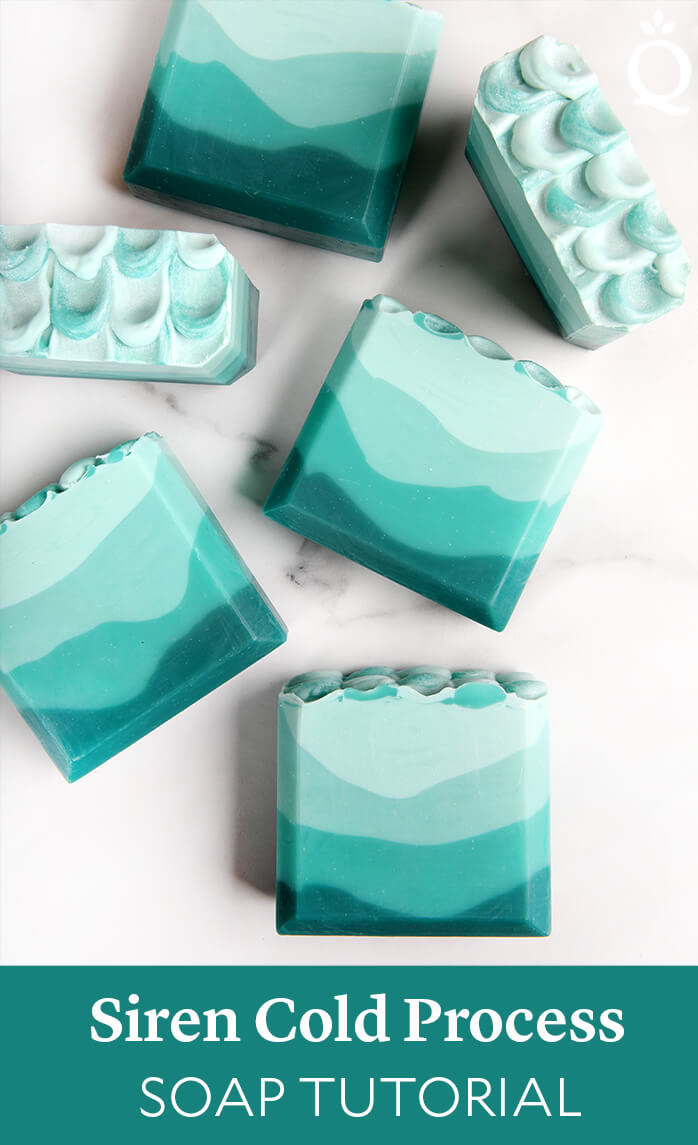
This cold process soap is inspired by the colors and textures of the ocean, mermaids, and sirens. It’s scented with new Pacific Pearl Fragrance Oil from the Seascape Collection. To make the top look like mermaid scales, soap is dotted on with a squeeze bottle and smoothed out with a spoon.
We first tackled this technique in 2015 with the Mermaid Tail Cold Process Soap. For that recipe, we created separate batches for the base and scales so the soap stayed thin enough to pipe. This tutorial uses one large batch, but you still have plenty of time to work. Make sure to stick blend sparingly and use a well-behaved fragrance oil.

Creating the mermaid scales isn’t necessarily hard, but it takes a little practice to get the feel for it. The soap needs to be firm enough to hold its shape but fluid enough to squeeze out easily. If you don’t have squeeze bottles, you can also use frosting bags. Below are a few videos that show this technique in action.
- How to Pipe a Textured/Flattened Dot Top on CP Soap by Nancy’s Garden Soap Co
- Mermaid Soap by Nichole McGhie
- Making and Cutting Mermaid Lagoon Cold Process Soap by Yellow Cottage Soapery
What You Need:
5 Pound Mold with Sliding Bottom
Silicone Liner for 5 lb Wood Mold
2 Squeeze Bottles
1.2 oz. Castor Oil (2%)
16.2 oz. Coconut Oil (27%)
4 oz. Meadowfoam Oil (6.7%)
16.2 oz. Olive Oil (27%)
16.2 oz. Palm Oil (27%)
6.2 oz. Sweet Almond Oil (10.3%)
8.4 oz. Sodium Hydroxide Lye
18.8 oz. Distilled Water (5% water discount)
4 oz. Pacific Pearl Fragrance Oil
Hydrated Chrome Green Pigment
Titanium Dioxide
Black Oxide Pigment
Super Pearly White Mica in a Powder Sprayer
Click below to add everything you need for this project to your Bramble Berry shopping cart!
If you’ve never made cold process soap before, stop here. We highly recommend checking out our FREE four part SoapQueen.tv series on cold process soapmaking, especially the episode on lye safety. And if you’d rather do some reading, Bramble Berry carries a wide range of books on the topic, including Pure Soapmaking. You can also check out the digital downloads for that instant gratification factor.
FRAGRANCE PREP: Measure 4 ounces of Pacific Pearl Fragrance Oil into a small glass container and set aside.
COLORANT PREP: Disperse 3 teaspoons of titanium dioxide into 3 tablespoons of a lightweight liquid oil such as sunflower or sweet almond oil. Disperse 1/2 teaspoon Black Oxide Pigment into 1/2 tablespoon of lightweight liquid oil. Then, disperse 2 teaspoons of Hydrated Chrome Green Pigment with 2 tablespoon of lightweight oil. Use a mini mixer to get rid of clumps.
Optional: To ensure the titanium dioxide blends smoothly into the soap, we recommend micronizing it before dispersing it in oil. Use a coffee grinder to break up any clumps of color and prevent streaks of white from showing in the final soap. We like to use a coffee grinder that has a removable stainless steel mixing area for easy cleaning.
SAFETY FIRST: Suit up for safe handling practices. That means goggles, gloves, and long sleeves. Make sure kids, pets, other distractions, and tripping hazards are out of the house or don’t have access to your soaping space. Always soap in a well-ventilated area.
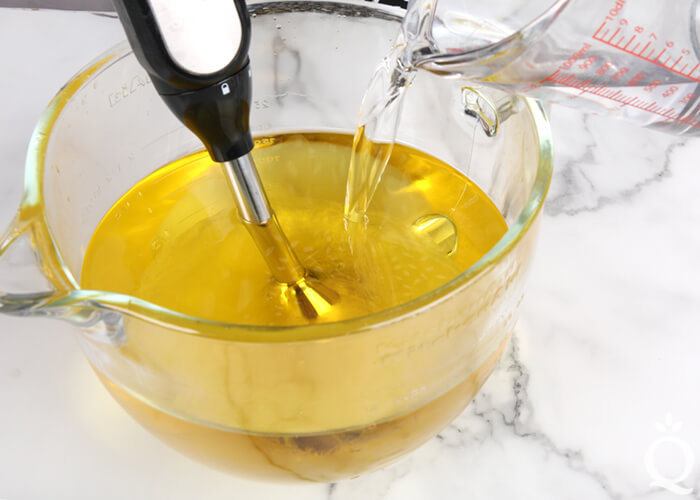
ONE: Slowly and carefully add 8.4 ounces of lye to 18.8 ounces of distilled water. Gently stir until the lye has fully dissolved. Set it aside to cool. If you’d like a harder bar of soap that releases faster from the mold, you can add sodium lactate to the cooled lye water. Use 1 teaspoon of sodium lactate per pound of oils in the recipe. For this recipe, you’d add 4 teaspoons sodium lactate.
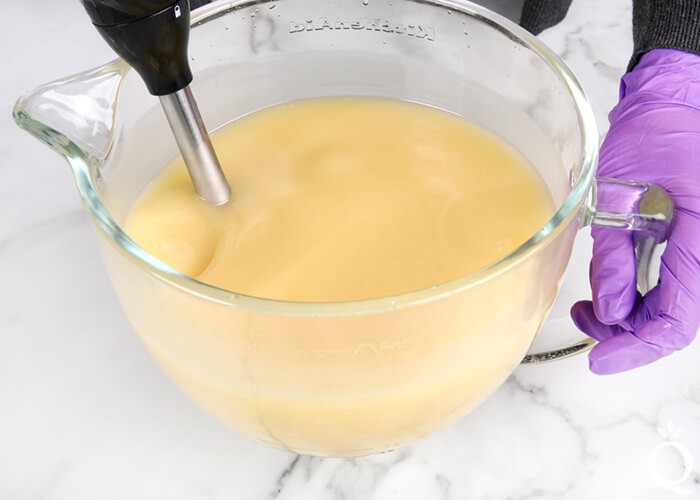
TWO: Melt and combine 1.2 ounces of castor oil, 16.2 ounces of coconut oil, 4 ounces of meadowfoam oil, 6.2 ounces of sweet almond oil, 16.2 ounces of olive oil, and 16.2 ounces of palm oil (remember to fully melt then mix your entire container of palm oil before portioning) into a large mixing bowl. Once the lye water and the oils have cooled to 130 degrees F or below (and are ideally within 10 degrees of each other), add the lye water to the oils and stick blend the mixture to a thin trace.
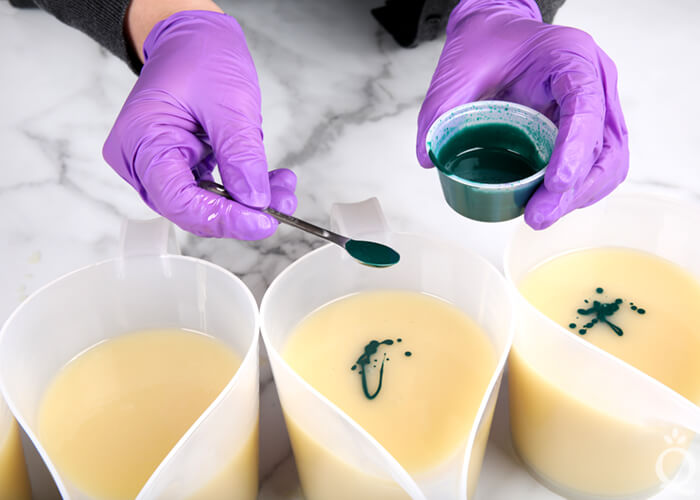
THREE: Split the soap batter into four separate containers. Two containers should contain 600 mL, and the other two containers should contain 700 mL.
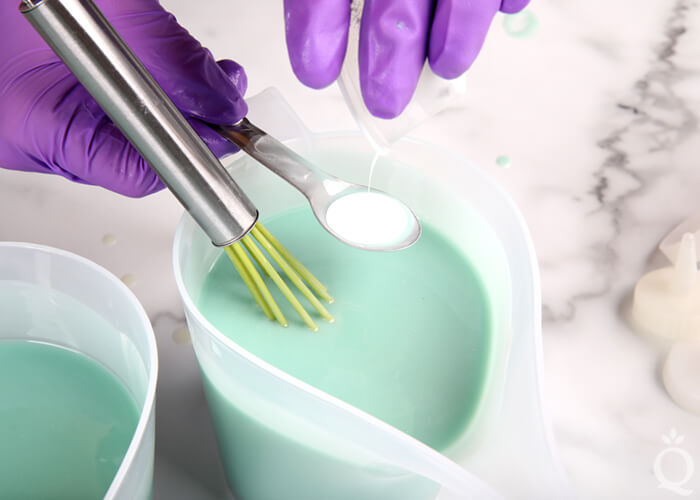
FOUR: Add the following amounts of dispersed colorants to each container and use a whisk to incorporate.
- Container A – lightest green (700 mL): 2 tablespoons dispersed titanium dioxide + 1/2 teaspoon dispersed Hydrated Chrome Green Pigment
- Container B – light green (600 mL): 1 teaspoon dispersed titanium dioxide + 1/2 teaspoon Hydrated Chrome Green Pigment
- Container C – medium green (700 mL): 1 teaspoon dispersed Hydrated Chrome Green Pigment
- Container D – darkest green (600 mL): 1.5 teaspoons dispersed Hydrated Chrome Green Pigment + about 1/8 teaspoon dispersed Black Oxide Pigment
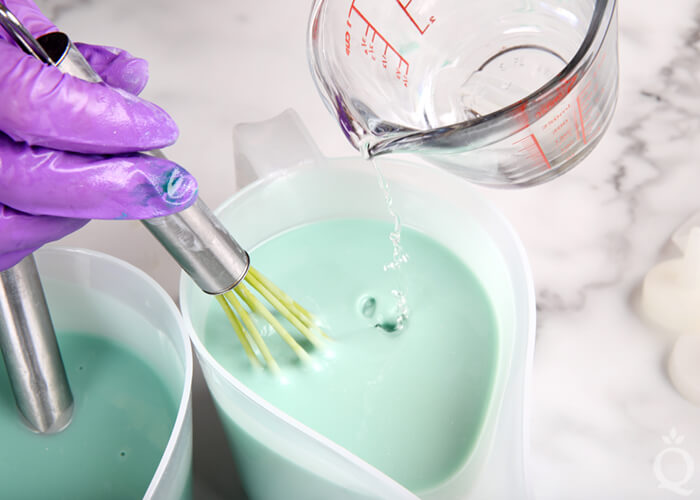
FIVE: Add the 4 ounces of Pacific Pearl Fragrance Oil evenly to each container (it’s okay to eyeball it).
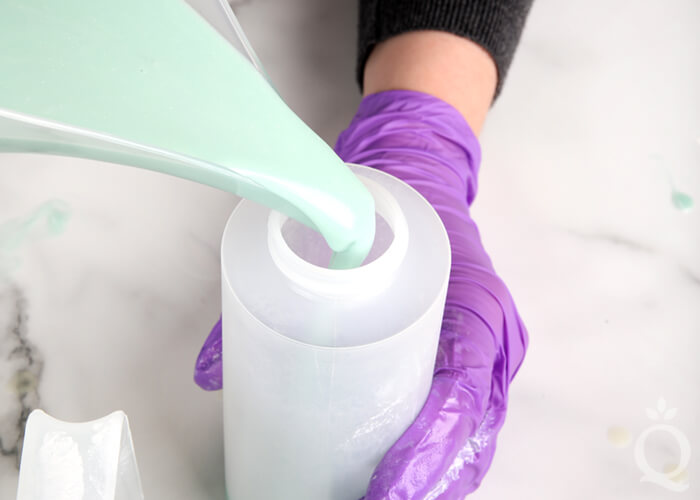
SIX: Pour about 100-150 mL of the lightest green soap (container A) and 100-150 mL of the medium green soap (container C) into the squeeze bottles. Screw on the lids and set aside.
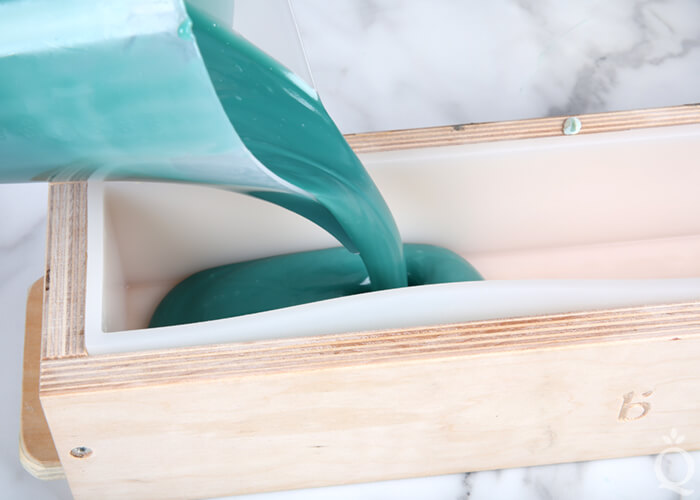
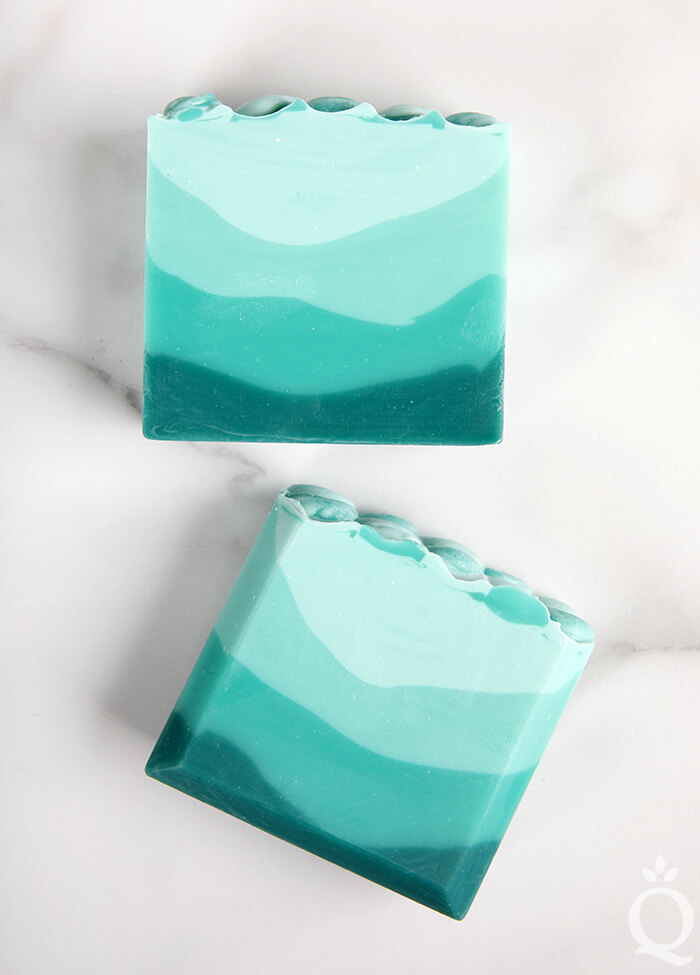
SEVEN: If the soap is still at a thin trace, stick blend each container from lightest to darkest until all four colors are a medium trace. Pour all of the darkest green soap into the mold. Use a spoon to create peaks and divots into the soap.
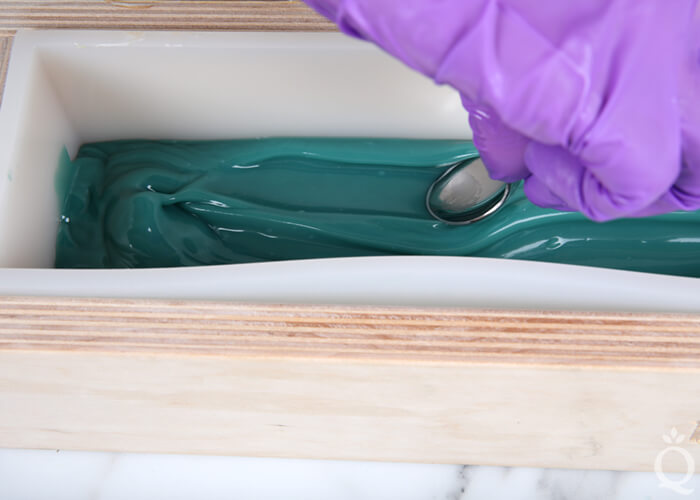
EIGHT: Pour all of the medium green soap into the mold. Tap firmly on the counter to get rid of bubbles, then use a spoon to create peaks and divots into the medium green soap layer.
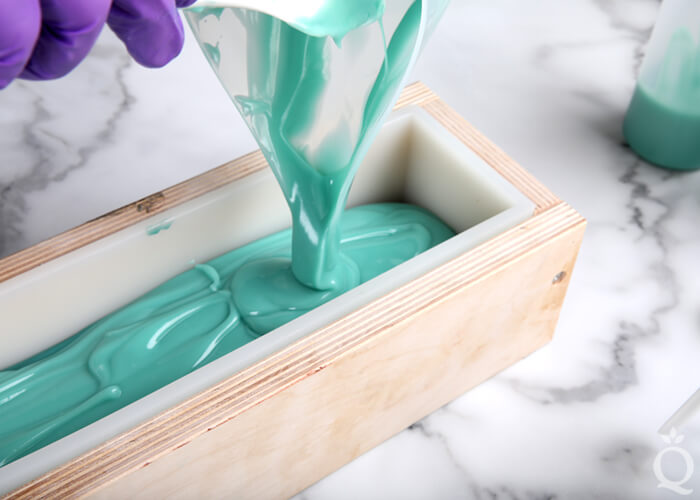
NINE: Pour all of the light green soap into the mold. Tap firmly on the counter to get rid of bubbles, then use a spoon to create peaks and divots into the light green soap layer.
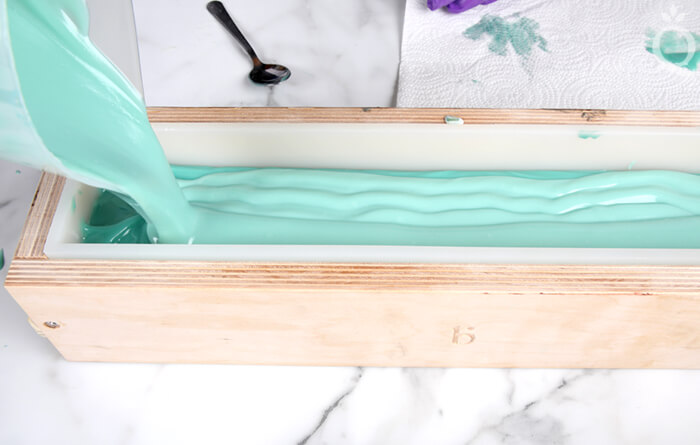
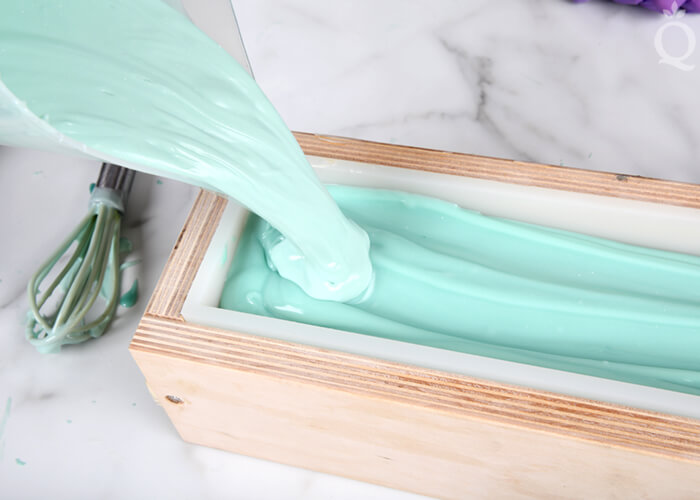
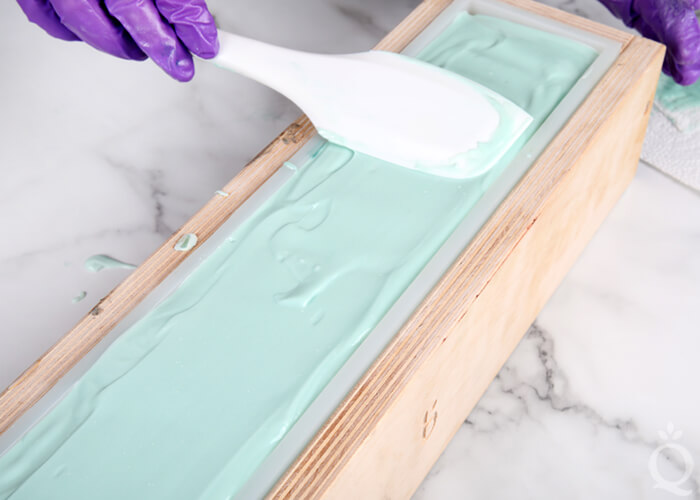
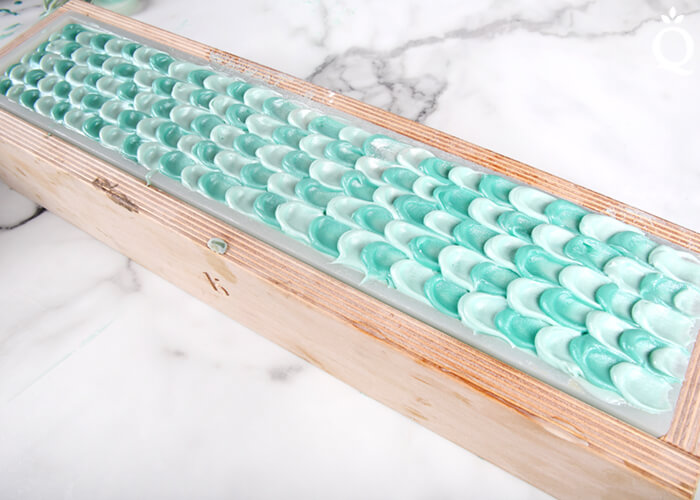
TEN: Pour all of the lightest green soap into the mold. It will fill to the very top of the silicone liner. Use a large spoon or spatula to evenly spread the soap to create a smooth and even base to create the scales.
Create the Scales/Petals
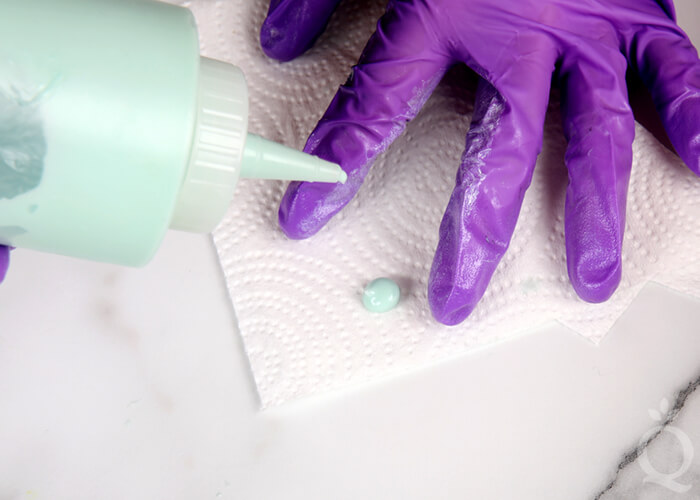
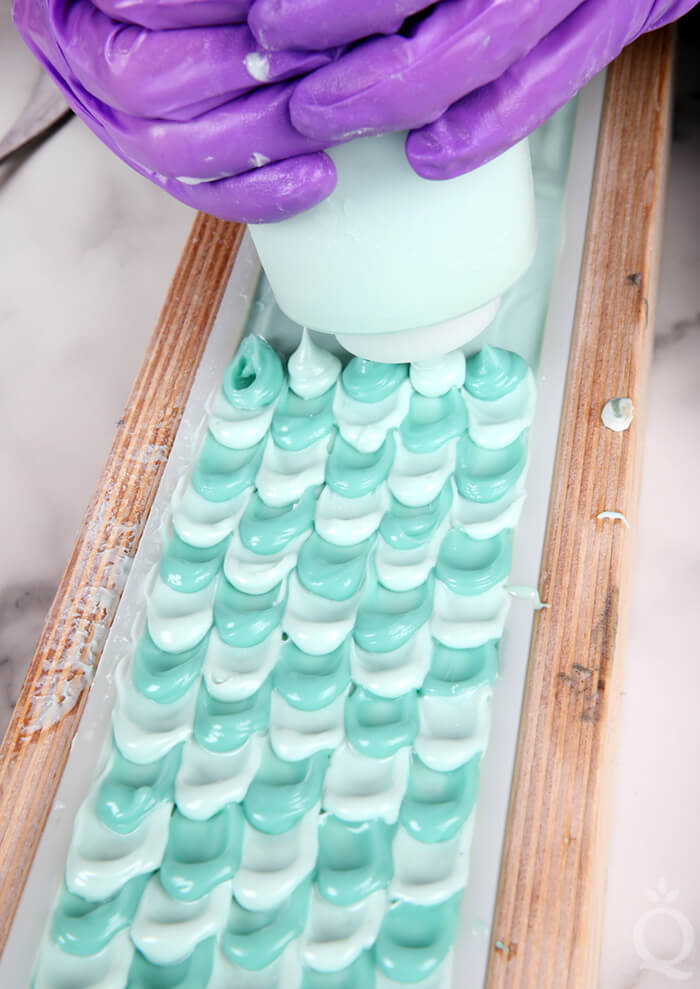
This technique involves squeezing dots of soap and then using a spoon to lightly press and slide down. The soap should be thin enough that it can be squeezed out of the bottles, but thick enough that it holds its shape.
To get the feel for it, you may want to practice a few scales on a paper towel. If the soap doesn’t come out easily, cut a small portion of the squeeze bottle tip off to create a larger hole.
You’ll also need a spoon with a slightly pointed tip. If the spoon tip is too round, it may be difficult to create the scales. Make sure your spoon is not aluminum, which reacts with the lye and creates toxic fumes. You will also need paper towels on hand to clean off the spoon in between different colors of scales.
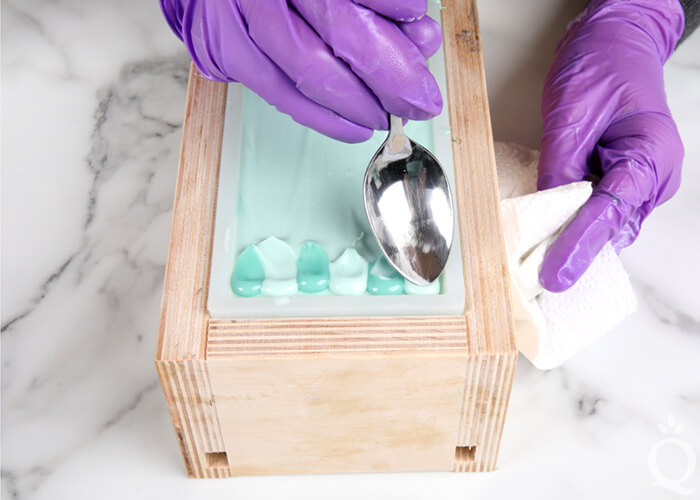
ELEVEN: Working quickly, create five dots of color across the top of the mold, swapping the color with each dot. The dots should just touch. Once you have placed five dots, Use the spoon to gently press each dot of color, sliding the spoon toward you. Between each color, clean off the spoon on the paper towel or rag.
NOTE: In the photos below, you can see that in the first row we placed six dots. We found this to be a little bit tight, and switched to only five dots in the next layer.

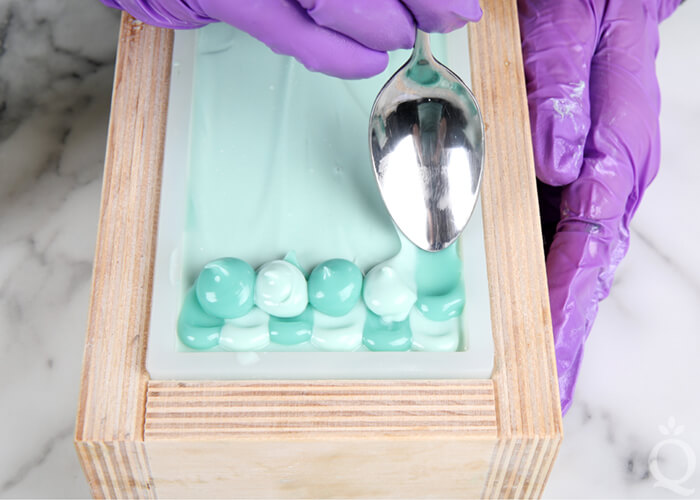
TWELVE: In the second row, switch the color order so that you squeeze a light green dot onto a dark green dot in the layer above, and vice versa. Use the spoon to gently press each dot of color, sliding the spoon toward you. Continue swapping the color order for each row.
TIP: To keep the process going as quickly as possible, squeeze one color of dots first, and fill in the row with the other color. This eliminates picking up the bottles as often, and helps speed the process along.
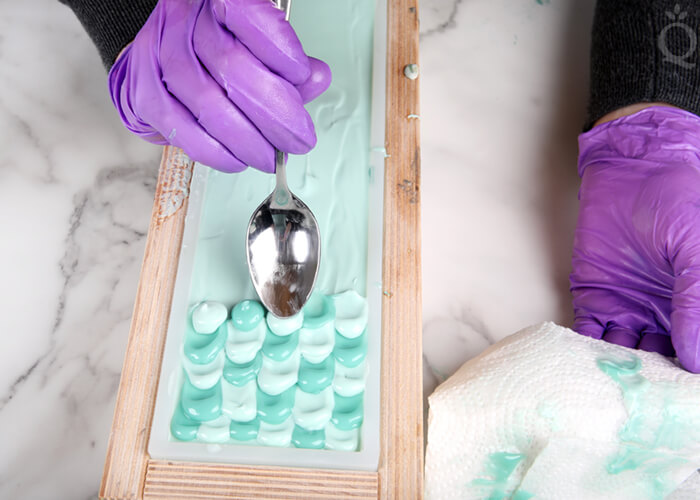

THIRTEEN: As you work, the soap will continue to thicken. This is why it’s important to work carefully but also quickly. Don’t worry about each scale being completely perfect.
Once we got to about the middle of the mold, our soap was getting quite thick. It was still workable, but required us to tap the squeeze bottle on the counter to transfer the soap to the top of the bottle. We also cut off the very tip to produce a larger hole for the soap to be squeezed through. 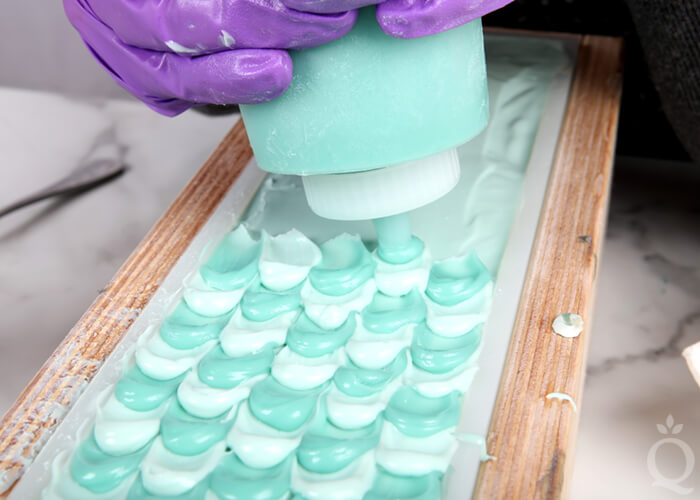
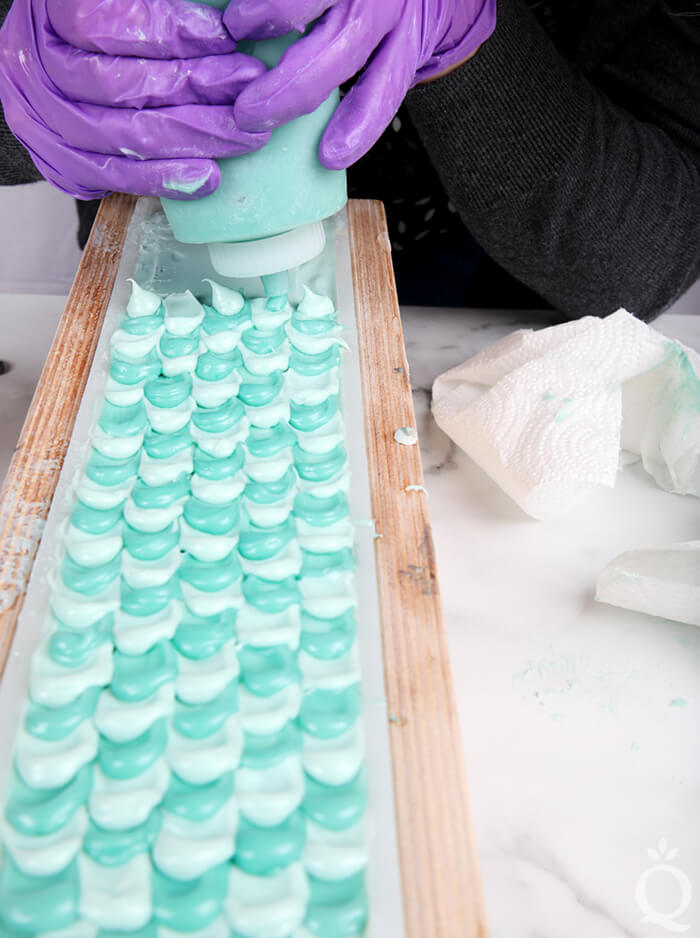
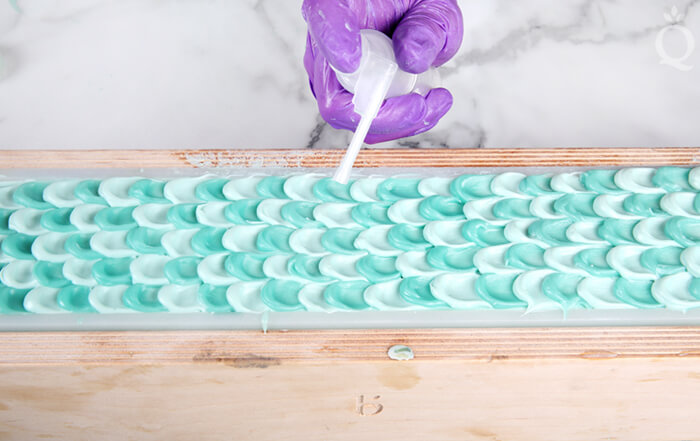
FOURTEEN: Continue squeezing scales until you reach the very end of the mold.
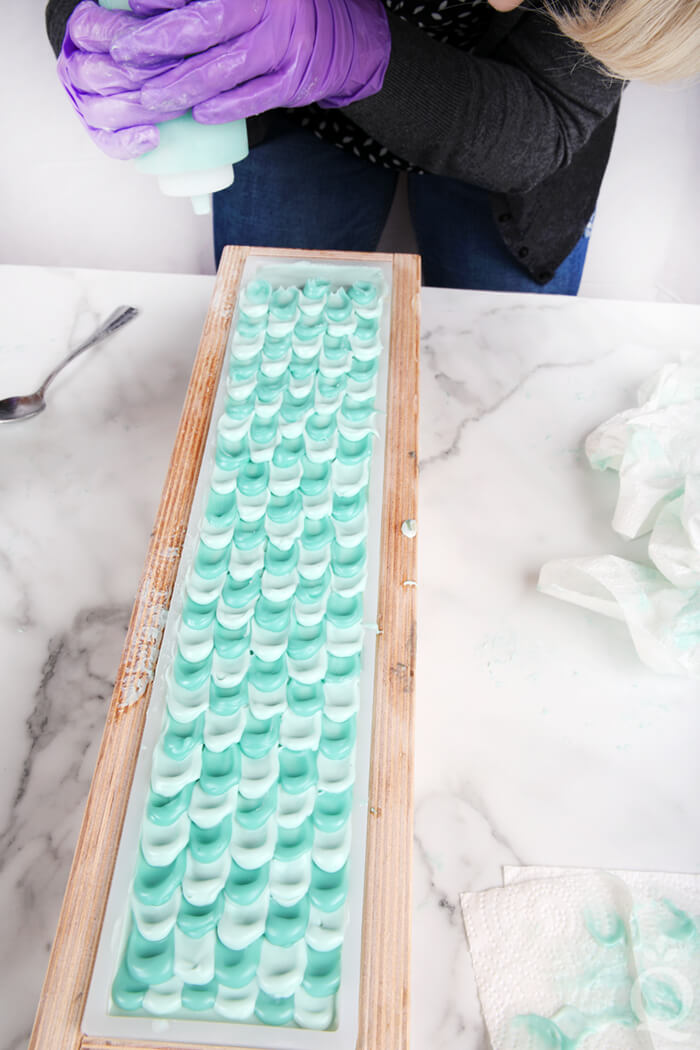
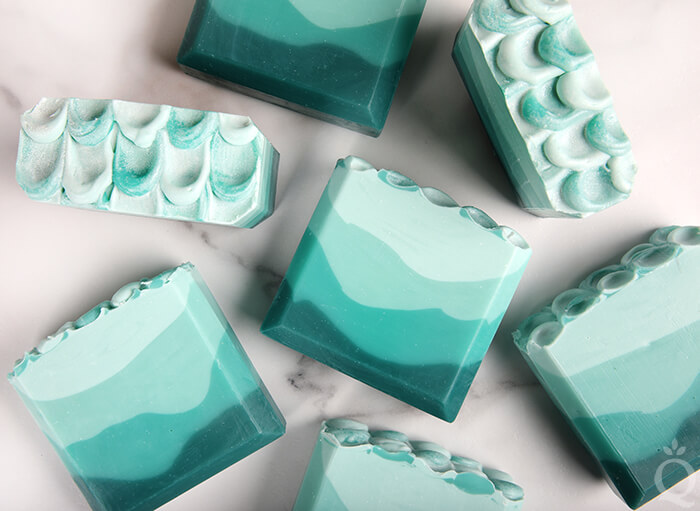
FIFTEEN: Once the top is completely decorated, use the powder sprayed filled with Super Pearly White Mica to dust a light layer on top. It’s tricky to see in photos, but the mica really makes the scales pop.
SIXTEEN: Spray the soap with 99% isopropyl alcohol to prevent soda ash. To promote gel phase, place the soap on a heating pad set to medium for 30-60 minutes. To help insulate, we bent a piece of cardboard and placed it over the mold without touching the top. Allow it to stay covered for at least 6 hours. Keep an eye on it to make sure it doesn’t get too hot and crack. If you see a crack starting to form, take it off the heating pad and remove any insulation.
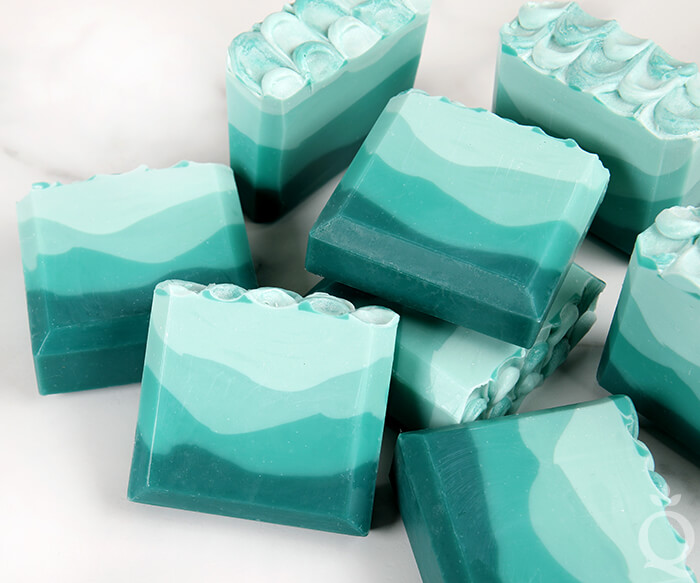
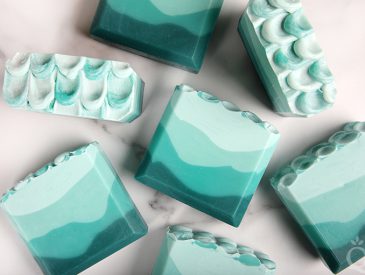
After about 1-3 days (depending if sodium lactate was used or not), remove the soap from the mold and silicone liner. Cut into thick bars to allow 2 rows of scales to be seen in each bar. After cutting, allow them to cure for 4-6 weeks and enjoy.
We used the Soap Beveller to finish these bars. Below, you can see the difference between beveled and non-beveled soap.
Siren Cold Process Soap Tutorial
Ingredients
- 5 Pound Mold with Sliding Bottom
- Silicone Liner for 5 lb Wood Mold
- 2 Squeeze Bottles
- 1.2 oz. Castor Oil 2%
- 16.2 oz. Coconut Oil 27%
- 4 oz. Meadowfoam Oil 6.7%
- 16.2 oz. Olive Oil 27%
- 16.2 oz. Palm Oil 27%
- 6.2 oz. Sweet Almond Oil 10.3%
- 8.4 oz. Sodium Hydroxide Lye
- 18.8 oz. Distilled Water 5% water discount
- 4 oz. Pacific Pearl Fragrance Oil
- Hydrated Chrome Green Pigment
- Titanium Dioxide
- Black Oxide Pigment
- Super Pearly White Mica in a Powder Sprayer
Instructions
FRAGRANCE PREP: Measure 4 ounces of Pacific Pearl Fragrance Oil into a small glass container and set aside.
COLORANT PREP: Disperse 3 teaspoons of titanium dioxide into 3 tablespoons of a lightweight liquid oil such as sunflower or sweet almond oil. Disperse 1/2 teaspoon Black Oxide Pigment into 1/2 tablespoon of lightweight liquid oil. Then, disperse 2 teaspoons of Hydrated Chrome Green Pigment with 2 tablespoon of lightweight oil. Use a mini mixer to get rid of clumps.
- Optional: To ensure the titanium dioxide blends smoothly into the soap, we recommend micronizing it before dispersing it in oil. Use a coffee grinder to break up any clumps of color and prevent streaks of white from showing in the final soap. We like to use a coffee grinder that has a removable stainless steel mixing area for easy cleaning.
SAFETY FIRST: Suit up for safe handling practices. That means goggles, gloves, and long sleeves. Make sure kids, pets, other distractions, and tripping hazards are out of the house or don’t have access to your soaping space. Always soap in a well-ventilated area.
- Slowly and carefully add 8.4 ounces of lye to 18.8 ounces of distilled water. Gently stir until the lye has fully dissolved. Set it aside to cool. If you’d like a harder bar of soap that releases faster from the mold, you can add sodium lactate to the cooled lye water. Use 1 teaspoon of sodium lactate per pound of oils in the recipe. For this recipe, you’d add 4 teaspoons sodium lactate.
- Melt and combine 1.2 ounces of castor oil, 16.2 ounces of coconut oil, 4 ounces of meadowfoam oil, 6.2 ounces of sweet almond oil, 16.2 ounces of olive oil, and 16.2 ounces of palm oil (remember to fully melt then mix your entire container of palm oil before portioning) into a large mixing bowl. Once the lye water and the oils have cooled to 130 degrees F or below (and are ideally within 10 degrees of each other), add the lye water to the oils and stick blend the mixture to a thin trace.
- Split the soap batter into four separate containers. Two containers should contain 600 mL, and the other two containers should contain 700 mL.
- Add the following amounts of dispersed colorants to each container and use a whisk to incorporate.Container A – lightest green (700 mL): 2 tablespoons dispersed titanium dioxide + 1/2 teaspoon dispersed Hydrated Chrome Green PigmentContainer B – light green (600 mL): 1 teaspoon dispersed titanium dioxide + 1/2 teaspoon Hydrated Chrome Green PigmentContainer C – medium green (700 mL): 1 teaspoon dispersed Hydrated Chrome Green PigmentContainer D – darkest green (600 mL): 1.5 teaspoons dispersed Hydrated Chrome Green Pigment + about 1/8 teaspoon dispersed Black Oxide Pigment
- Add the 4 ounces of Pacific Pearl Fragrance Oil evenly to each container (it’s okay to eyeball it).
- Pour about 100-150 mL of the lightest green soap (container A) and 100-150 mL of the medium green soap (container C) into the squeeze bottles. Screw on the lids and set aside.
- If the soap is still at a thin trace, stick blend each container from lightest to darkest until all four colors are a medium trace. Pour all of the darkest green soap into the mold. Use a spoon to create peaks and divots into the soap.
- Pour all of the medium green soap into the mold. Tap firmly on the counter to get rid of bubbles, then use a spoon to create peaks and divots into the medium green soap layer.
- Pour all of the light green soap into the mold. Tap firmly on the counter to get rid of bubbles, then use a spoon to create peaks and divots into the light green soap layer.
- Pour all of the lightest green soap into the mold. It will fill to the very top of the silicone liner. Use a large spoon or spatula to evenly spread the soap to create a smooth and even base to create the scales.
Create the Scales/Petals
- Working quickly, create five dots of color across the top of the mold, swapping the color with each dot. The dots should just touch. Once you have placed five dots, Use the spoon to gently press each dot of color, sliding the spoon toward you. Between each color, clean off the spoon on the paper towel or rag. NOTE: In the photos below, you can see that in the first row we placed six dots. We found this to be a little bit tight, and switched to only five dots in the next layer.
- In the second row, switch the color order so that you squeeze a light green dot onto a dark green dot in the layer above, and vice versa. Use the spoon to gently press each dot of color, sliding the spoon toward you. Continue swapping the color order for each row. TIP: To keep the process going as quickly as possible, squeeze one color of dots first, and fill in the row with the other color. This eliminates picking up the bottles as often, and helps speed the process along.
- As you work, the soap will continue to thicken. This is why it’s important to work carefully but also quickly. Don’t worry about each scale being completely perfect. Once we got to about the middle of the mold, our soap was getting quite thick. It was still workable, but required us to tap the squeeze bottle on the counter to transfer the soap to the top of the bottle. We also cut off the very tip to produce a larger hole for the soap to be squeezed through.
- Continue squeezing scales until you reach the very end of the mold.
- Once the top is completely decorated, use the powder sprayed filled with Super Pearly White Mica to dust a light layer on top. It’s tricky to see in photos, but the mica really makes the scales pop.
- Spray the soap with 99% isopropyl alcohol to prevent soda ash. To promote gel phase, place the soap on a heating pad set to medium for 30-60 minutes. To help insulate, we bent a piece of cardboard and placed it over the mold without touching the top. Allow it to stay covered for at least 6 hours. Keep an eye on it to make sure it doesn’t get too hot and crack. If you see a crack starting to form, take it off the heating pad and remove any insulation.
- After about 1-3 days (depending if sodium lactate was used or not), remove the soap from the mold and silicone liner. Cut into thick bars to allow 2 rows of scales to be seen in each bar. After cutting, allow them to cure for 4-6 weeks and enjoy. We used the Soap Beveller to finish these bars. Below, you can see the difference between beveled and non-beveled soap.