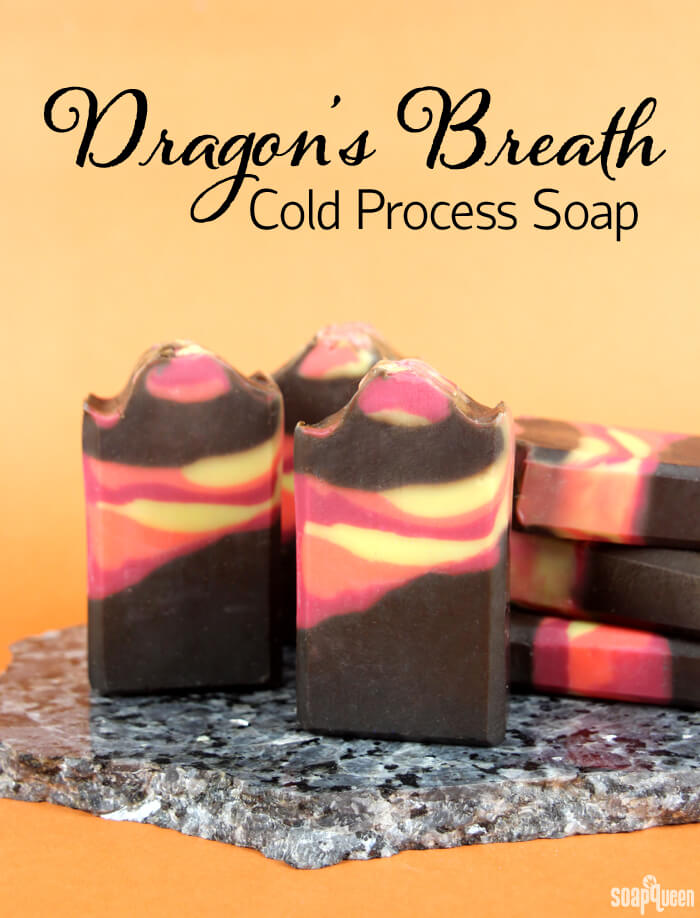
Powerful, beautiful and full of fire, the appeal of dragons can’t be denied. Dragons have been reimagined for decades, from the menacing Smaug in “Lord of the Rings,” to the friendly Toothless in DreamWorks “How to Train Your Dragon.” Now, with the popularity of HBO’s “Game of Thrones,” dragons are more relevant than ever!
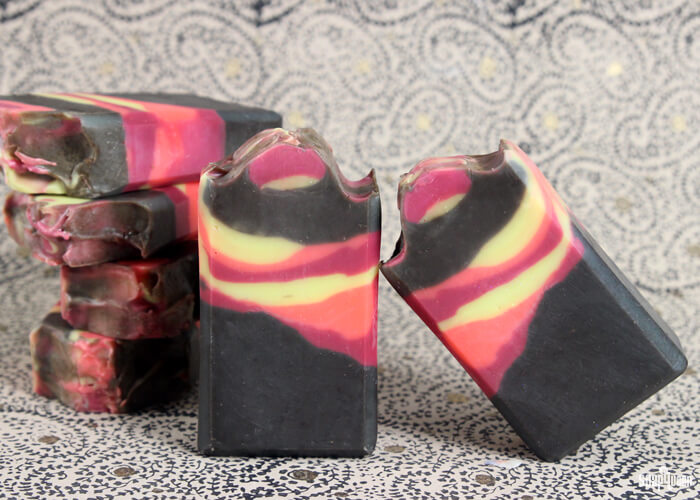
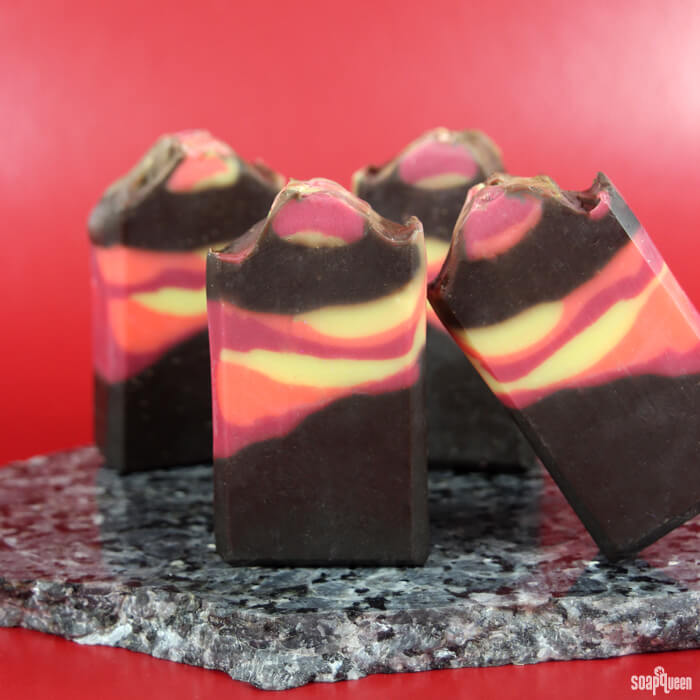
This Dragon’s Breath Cold Process soap is inspired by the fire and smoke emitted from a dragon’s mouth. Scented with Dragon’s Blood Fragrance Oil, this project smells wonderfully warm and smoky. To achieve the sloped fiery layers, the soap is poured into the Tall Narrow Wood Loaf Mold at an angle. A medium trace gives the layers the textured variability of a true flame.
What You’ll Need:
Tall Narrow Wood Loaf Mold
10.7 Coconut Oil
15.1 oz. Olive Oil
10.7 oz. Palm Oil
4.3 oz. Rice Bran Oil
2.2 oz. Chia Seed Oil
6.1 oz. Sodium Hydroxide Lye
14.2 oz. Distilled Water
2 oz. Dragon’s Blood Fragrance Oil
Activated Charcoal
Merlot Sparkle Mica
Electric Bubble Gum Colorant
Fizzy Lemonade Colorant
Tangerine Wow! Colorant

SAFETY FIRST: Suit up for safe handling practices! That means goggles, gloves and long sleeves. Make sure kids, pets, and other distractions and tripping hazards are out of the house or don’t have access to your soaping space. Always soap in a well-ventilated area.
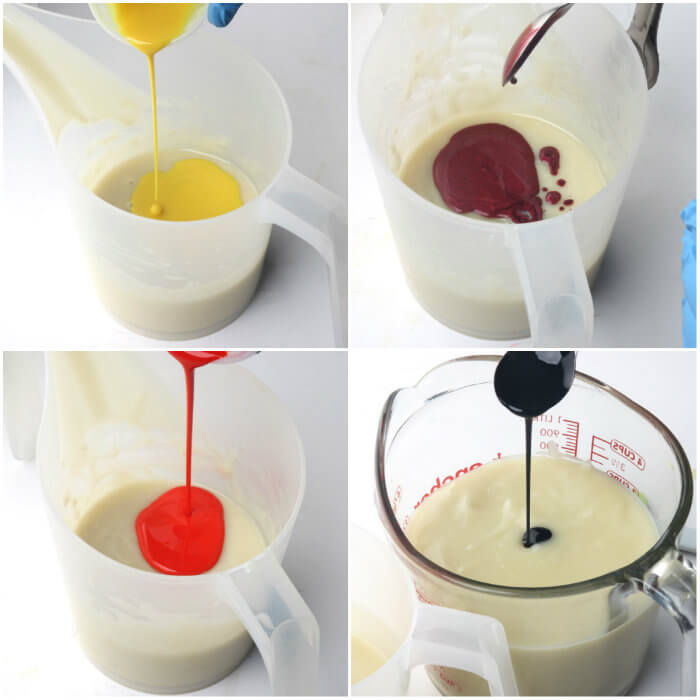
COLOR PREP: In separate containers, disperse 1 teaspoon of the Merlot Sparkle Mica, Electric Bubble Gum Colorant, Tangerine Wow and Fizzy Lemonade Colorant into 1 tablespoon of sunflower or sweet almond oil (or any other liquid oil). Then, disperse 2 teaspoons of the activated charcoal into 2 tablespoon of light liquid oil. Use a mini mixer to get the clumps of color worked out smoothly.
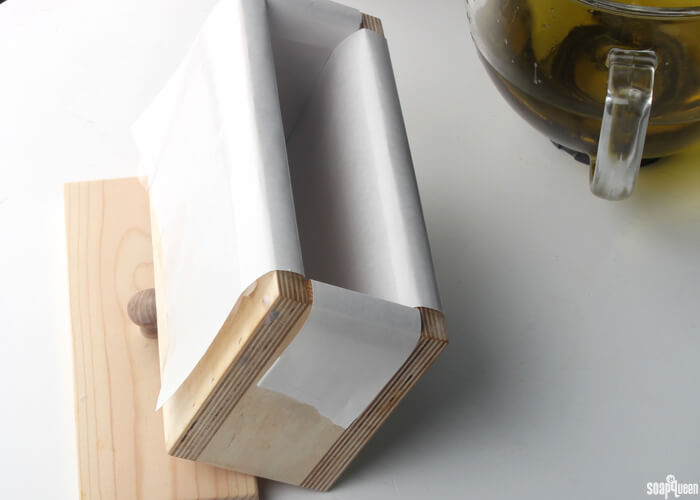
MOLD PREP: Line the Tall Narrow Wood Loaf Mold with freezer paper with the shiny side up. For tips on how to line the mold, click here.
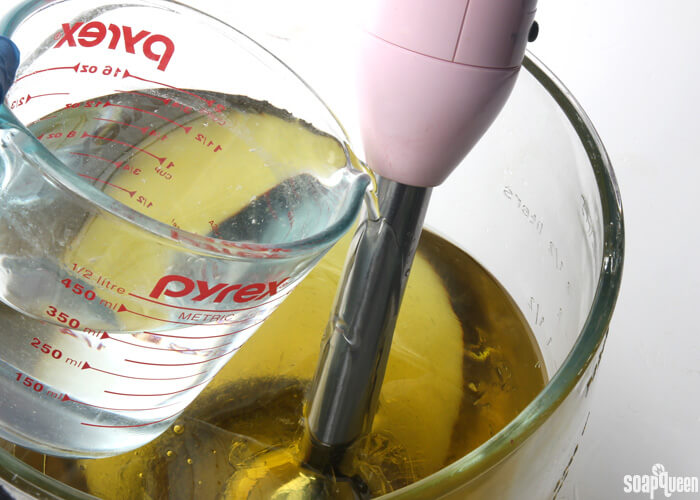
ONE: Slowly and carefully add the lye to the water and gently stir until the lye has fully dissolved and the liquid is clear. Set aside to cool.
TWO: Place the lid of the Tall Narrow Wood Loaf mold on the counter, and set the mold on top to achieve an angle.
THREE: Fully melt and combine the coconut, chia seed, rice bran, palm and olive oils (remember to fully melt then mix your entire container of palm oil before portioning). Once the lye water and the oils have cooled to 130 degrees or below (and are ideally within 10 degrees of each other), add the lye water to the oils and stick blend until thin trace. If you’d like a harder bar of soap that releases faster from the mold, you can add sodium lactate to the cooled lye water. Use 1 teaspoon of sodium lactate per pound of oils in the recipe. For this recipe, you’d add about 3 tsp. sodium lactate.
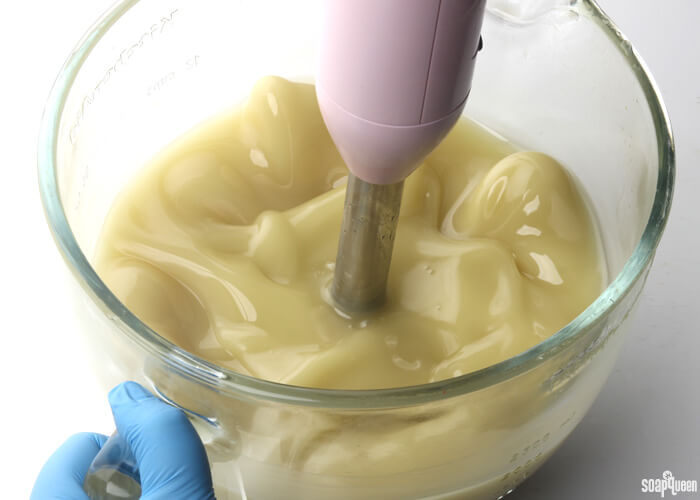
THREE: Once the batter has reached a light trace, split the batch into five separate containers. Three of the containers should contain about 200 mL. One of the remaining containers should contain about 800 mL, while the last container will hold about 300 mL.
FOUR: To the container with 800 mL, add 5 tsp. of dispersed activated charcoal. To the container with 300 mL, add 2 tsp. dispersed activated charcoal. Use a whisk to fully incorporate the colors. To the three containers containing 200 mL, add the dispersed colorants listed below. Use a whisk to fully blend in the colors.
- Container A: All dispersed Tangerine Wow Colorant = Orange
- Container B: All dispersed Fizzy Lemonade Colorant = Yellow
- Container C: 3 tsp. Merlot Sparkle Mica + 2 tsp. Electric Bubble Gum Colorant = Red
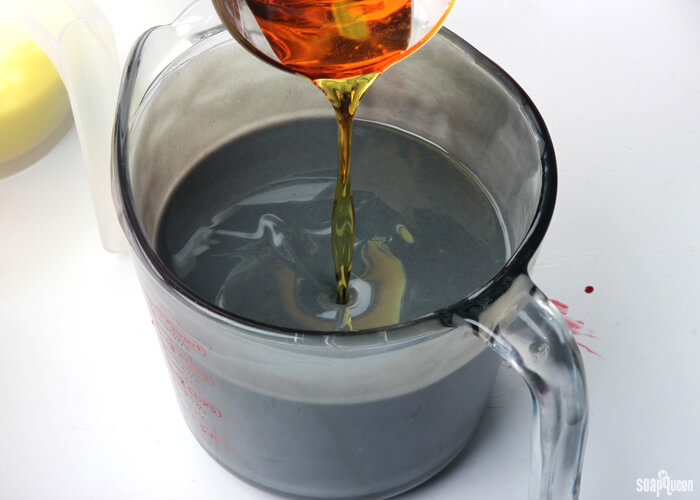
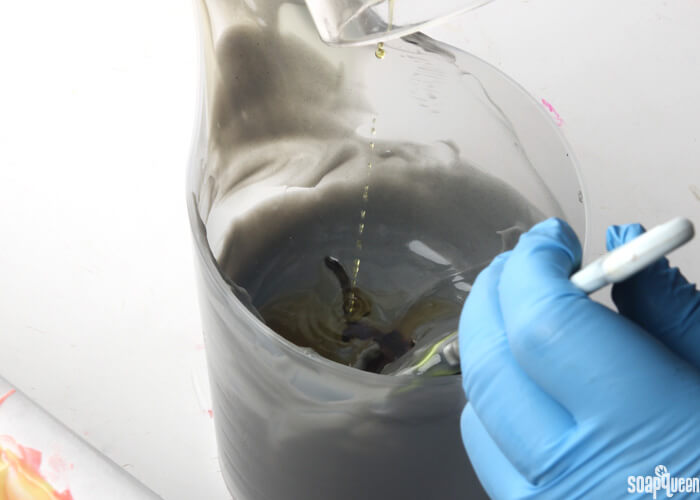
FIVE: To the large container of black soap, add 3/4 of the Dragon’s Blood Fragrance Oil and whisk in.
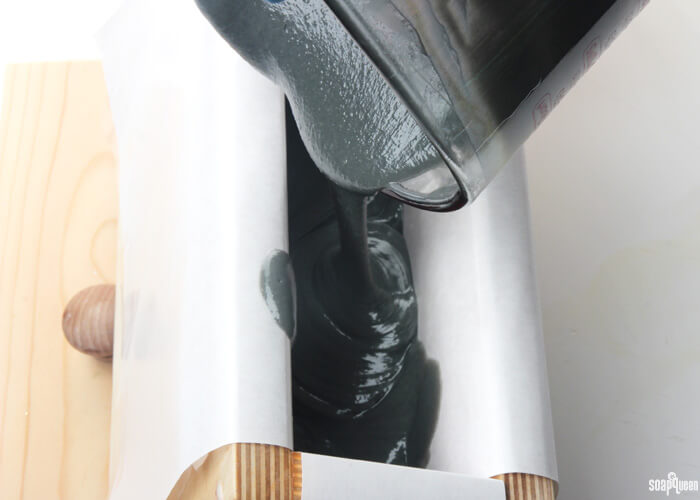
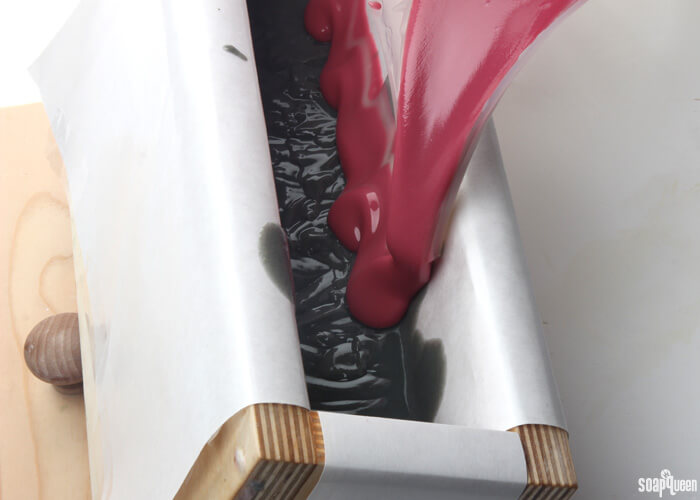
 SIX: Pour all of the fragranced black soap into the angled mold. The soap will pool into the bottom corner. Keeping the mold at an angle, gently tap the mold on the counter to evenly disperse the soap. Place the mold back onto the lid to retain the angle. Notice that the trace is a medium to thick trace here. This helps the layers stay suspended and is important to the design but can be tricky to achieve (too thin? too thick? It’s hard to tell. Don’t worry this project looks amazing even if the trace is a little too thin or a little too thick!) =)
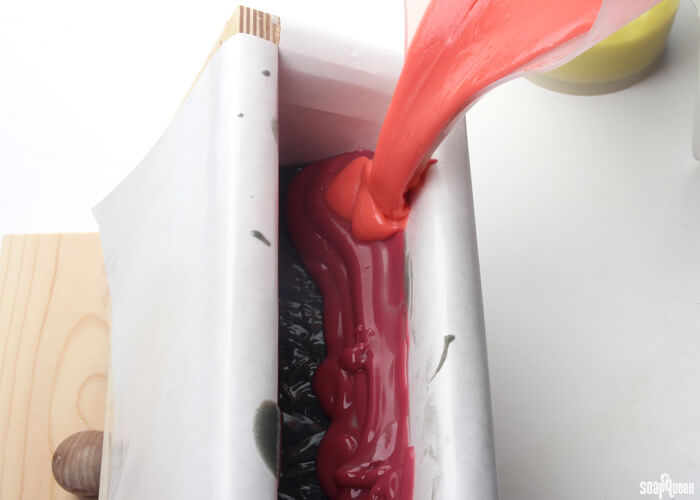
 SEVEN: Pour about half of the red soap onto the black, allowing the red soap to slide down the side of the mold. Try your best to keep the soap evenly dispersed down the length of the mold, but don’t worry if it’s not perfect.
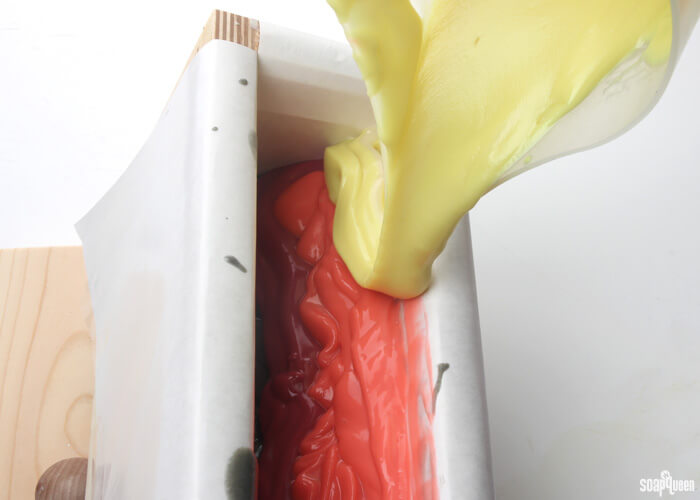
 EIGHT: Pour about half of the orange soap over the red, allowing the soap to fall down the side of the mold.
 NINE: Pour about half of the yellow soap down the side of the mold over the orange. Tap the mold on the counter, while still keeping the mold at an angle. This gently distributes the three layers of colors.
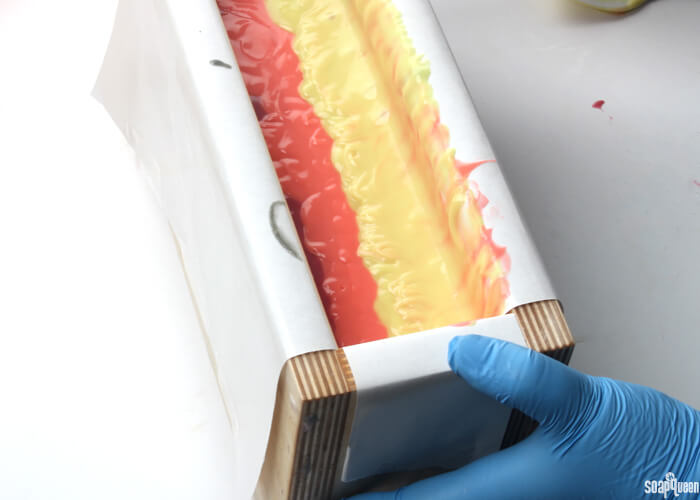
 TEN: Repeat this layering process, starting with red and ending with yellow. Save a small amount of each color to use for the top.
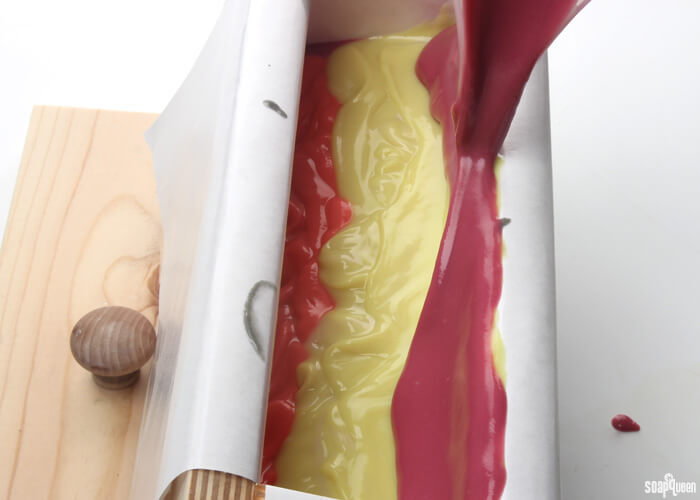 ELEVEN: Once all three layers have been poured, remove the mold from the top of the lid and allow it to lay flat on the counter. Tap the mold firmly on the counter to release air bubbles.
 TWELVE: Add the remaining fragrance oil to the small container of black soap. Use a whisk to fully incorporate.
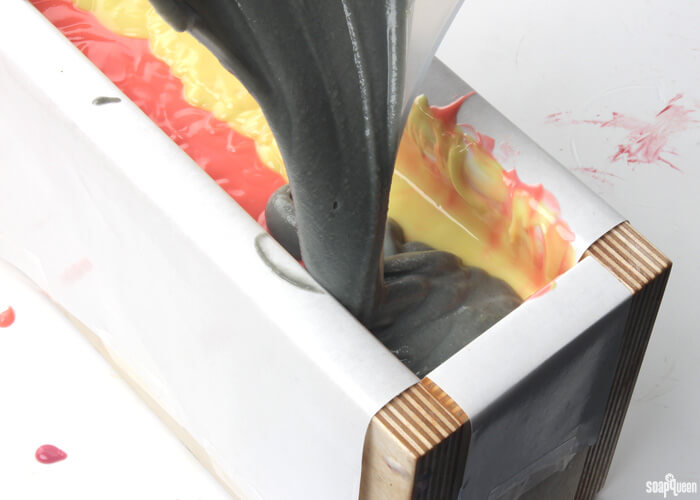
 THIRTEEN: Slowly pour the black top onto the layers of color, covering the entire surface. Use a spoon to evenly distribute the soap while not disturbing the layers below.
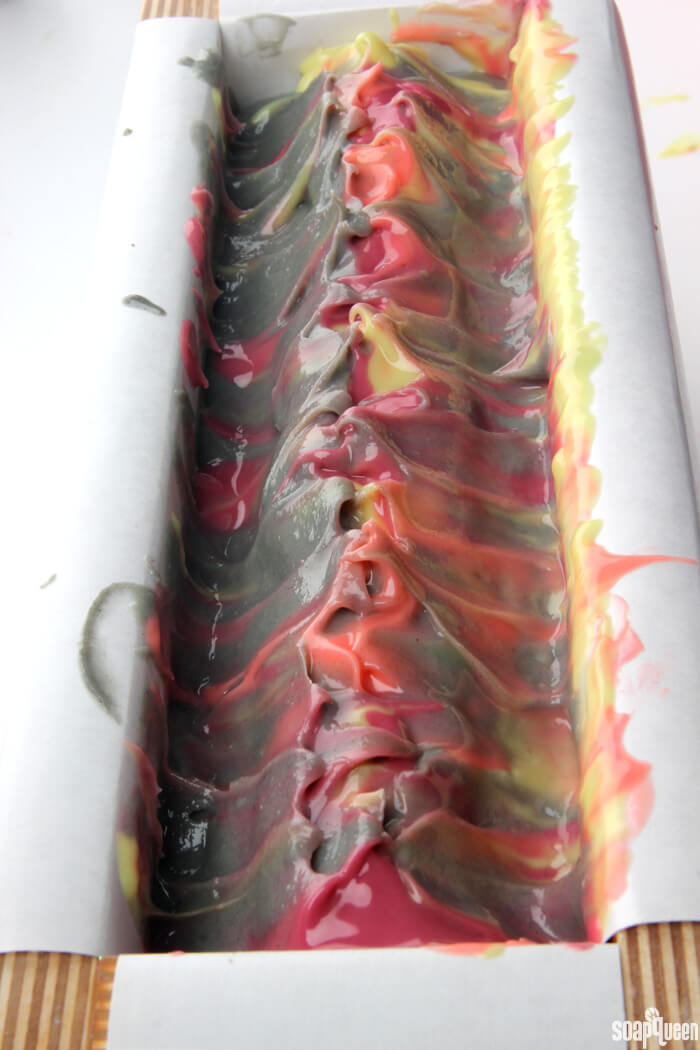
 FOURTEEN: Drop spoonfuls of red, orange and yellow soap onto the black. Don’t worry about being precise!
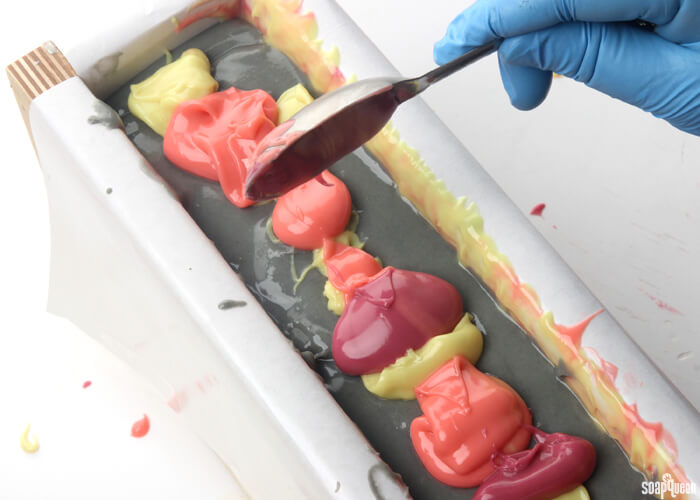 FIFTEEN: Use a spoon to create a peak in the center of the mold. If you’d like more texture, go for it! Just be careful not to mix the colors too much.
 SIXTEEN: Once you’re happy with the texture on top, spray with 99% isopropyl alcohol to prevent soda ash. If possible, place the lid on top of the mold. The peaks on this soap were a little too large to do so. Instead, I covered the soap with a piece of bent cardboard and covered with a blanket. Place the mold onto a heating pad set to medium for about 20-30 minutes. Turn the heat off and allow to stay covered for 24 hours. After 24 hours, uncover and allow to sit in the mold for 3-4 days.
What mystical creature are you most inspired by? I’ll create a tutorial for the most interesting or unique suggestion. After all, I’ve done Mermaid inspired soap, Cinderella inspired soap and now dragons =)
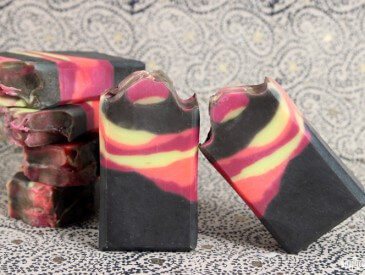
Dragon's Breath Cold Process
Ingredients
- Tall Narrow Wood Loaf Mold
- 10.7 Coconut Oil
- 15.1 oz. Olive Oil
- 10.7 oz. Palm Oil
- 4.3 oz. Rice Bran Oil
- 2.2 oz. Chia Seed Oil
- 6.1 oz. Sodium Hydroxide Lye
- 14.2 oz. Distilled Water
- 2 oz. Dragon's Blood Fragrance Oil
- Activated Charcoal
- Merlot Sparkle Mica
- Electric Bubble Gum Colorant
- Fizzy Lemonade Colorant
- Tangerine Wow! Colorant
Instructions
SAFETY FIRST: Suit up for safe handling practices! That means goggles, gloves and long sleeves. Make sure kids, pets, and other distractions and tripping hazards are out of the house or don’t have access to your soaping space. Always soap in a well-ventilated area.
COLOR PREP: In separate containers, disperse 1 teaspoon of the Merlot Sparkle Mica, Electric Bubble Gum Colorant, Tangerine Wow and Fizzy Lemonade Colorant into 1 tablespoon of sunflower or sweet almond oil (or any other liquid oil). Then, disperse 2 teaspoons of the activated charcoal into 2 tablespoon of light liquid oil. Use a mini mixer to get the clumps of color worked out smoothly.
MOLD PREP: Line the Tall Narrow Wood Loaf Mold with freezer paper with the shiny side up. For tips on how to line the mold, click here.
- Slowly and carefully add the lye to the water and gently stir until the lye has fully dissolved and the liquid is clear. Set aside to cool.
- Place the lid of the Tall Narrow Wood Loaf mold on the counter, and set the mold on top to achieve an angle.
- Fully melt and combine the coconut, chia seed, rice bran, palm and olive oils (remember to fully melt then mix your entire container of palm oil before portioning). Once the lye water and the oils have cooled to 130 degrees or below (and are ideally within 10 degrees of each other), add the lye water to the oils and stick blend until thin trace. If you’d like a harder bar of soap that releases faster from the mold, you can add sodium lactate to the cooled lye water. Use 1 teaspoon of sodium lactate per pound of oils in the recipe. For this recipe, you’d add about 3 tsp. sodium lactate.
- Once the batter has reached a light trace, split the batch into five separate containers. Three of the containers should contain about 200 mL. One of the remaining containers should contain about 800 mL, while the last container will hold about 300 mL.
- To the three containers containing 200 mL, add the dispersed colorants listed below. Use a whisk to fully blend in the colors. To the container with 800 mL add 5 tsp. of dispersed activated charcoal. To the container with 300 mL, add 2 tsp. dispersed activated charcoal. Use a whisk to fully incorporate the colors.
Container A: All dispersed Tangerine Wow Colorant =Orange
Container B: All dispersed Fizzy Lemonade Colorant = Yellow
Container C: 3 tsp. Merlot Sparkle Mica + 2 tsp. Electric Bubble Gum Colorant = Red - To the large container of black soap, add 3/4 of the Dragon’s Blood Fragrance Oil and whisk in.
- Pour all of the fragranced black soap into the angled mold. The soap will pool into the bottom corner. Keeping the mold at an angle, gently tap the mold on the counter to evenly disperse the soap. Place the mold back onto the lid to retain the angle.
- Pour half of the red soap onto the black, allowing the red soap to slide down the side of the mold. Try your best to keep the soap evenly dispersed down the length of the mold, but don’t worry if it’s not perfect.
- Pour about half of the orange soap over the red, allowing the soap to fall down the side of the mold.
- Pour about half of the yellow soap down the side of the mold over the orange. Tap the mold on the counter, while still keeping the mold at an angle. This gently distributes the three layers of colors.
- Repeat this layering process, starting with red and ending with yellow. Save a small amount of each color to use for the top.
- Once all three layers have been poured, remove the mold from the top of the lid and allow it to lay flat on the counter. Tap the mold firmly on the counter to release air bubbles.
- Add the remaining fragrance oil to the small container of black soap. Use a whisk or spatula fully incorporate.
- Slowly pour the black top onto the layers of color, covering the entire surface. Use a spoon to evenly distribute the soap while not disturbing the layers below.
- Drop spoonfuls of red, orange and yellow soap onto the black. Don’t worry about being precise!
- Use a spoon to create a peak in the center of the mold. If you’d like more texture, go for it! Just be careful not to mix the colors too much.
- Once you’re happy with the texture on top, spray with 99% isopropyl alcohol to prevent soda ash. If possible, place the lid on top of the mold. The peaks on this soap were a little too large to do so. Instead, I covered the soap with a piece of bent cardboard and covered with a blanket. Place the mold onto a heating pad set to medium for about 20-30 minutes. Turn the heat off and allow to stay covered for 24 hours. After 24 hours uncover and allow to sit in the mold for 3-4 days.