• October 19, 2016

Chamomile & Coconut Oil Body Balm DIY

Chamomile is one of my favorite herbs to use in do-it-yourself beauty products. The use of chamomile in skincare has been traced all the way back to Ancient times, including ancient Egypt, Greece and Rome. Today, chamomile is still ingested and applied to the skin for its anti-inflammatory properties. To add the skin-loving properties to this balm, coconut oil is infused for several hours with chamomile herb.

Chamomile & Coconut Oil Body Balm DIY

Olive oil is combined with the coconut oil for a bit of softness, while yellow beeswax helps keep it solid in hotter temperatures. If you live in an extremely hot temperature, you can add more beeswax to increase the melting point. If you like a softer balm, decrease the amount of yellow beeswax. A great trick for testing the consistency of balms is the frozen spoon trick. It allows you to feel the balm when cooled, prior to pouring it into containers. In our tests, we found this balm begins to melt around 100 ° F.  Looking for more ways to incorporate chamomile into your skincare? Check out the recipes below!

Chamomile Tutorials

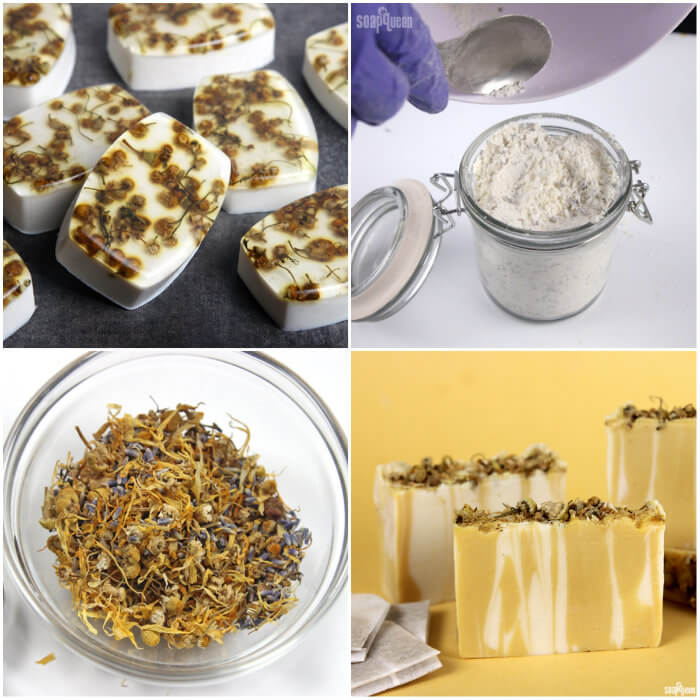
Top Row: Chamomile Oat Melt & Pour Bars, Lavender & Chamomile Goat Milk Bath Tea
Bottom Row: Soothing Eye Tea, Yellow Chamomile Cold Process Soap

What You’ll Need:
3 Candle Tins
12 oz. Coconut Oil (10 oz. infused coconut oil)
0.5 oz. Chamomile Herb
2 oz. Olive Oil
1 oz. Yellow Beeswax


Click here
 
to add everything you need for this project to your Bramble Berry shopping cart!

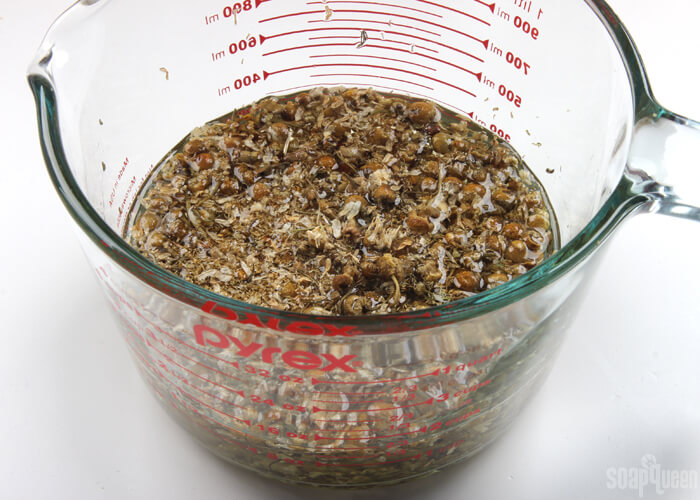
ONE: First, infuse the coconut oil with chamomile. In a heat safe container, add 12 ounces of the coconut oil and place in the microwave and heat until about 150 ° F. You only need 10 total ounces of infused coconut oil for this recipe, but as you strain the chamomile out of the oil later, some will be lost. Be careful when removing the container from the microwave, as it will be very hot. Add the chamomile herb and allow the chamomile to infuse the coconut oil for about 2 hours, up to overnight. Feel free to infuse the chamomile in the oils for as long as you’d like, but I would recommend at least 2 hours.

Because coconut oil turns solid when it cools, it may need to be placed back into the microwave to reheat and maintain a hot temperature. You can also use a crock pot to infuse the oils, learn more about that process here.

Chamomile & Coconut Oil Body Balm DIY

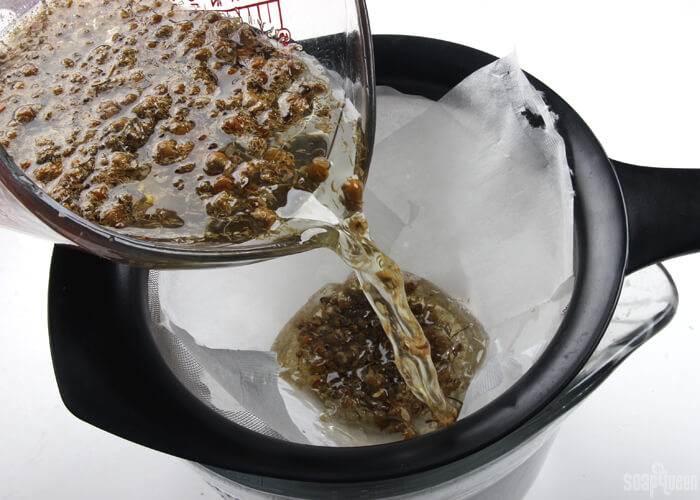
TWO: Once the coconut oil is infused, strain the oil through a fine meshed sifter lined with a paper towel to remove chamomile herb. You may need to do this process more than once to remove all the small chamomile pieces. Weigh how much oil is leftover; some of the coconut oil will be lost in the straining process, which is why more coconut oil was infused than needed. For this recipe, you need 10 ounces of coconut oil. If you have less than 10 ounces, add more un-infused coconut oil to the infused oil until you have 10 ounces.

Chamomile & Coconut Oil Body Balm DIY

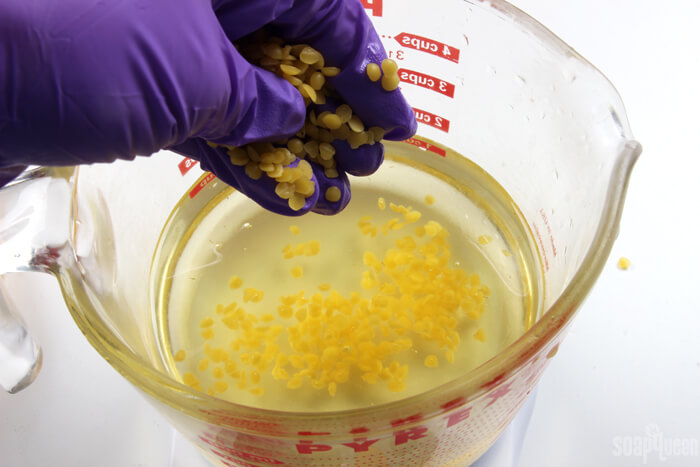
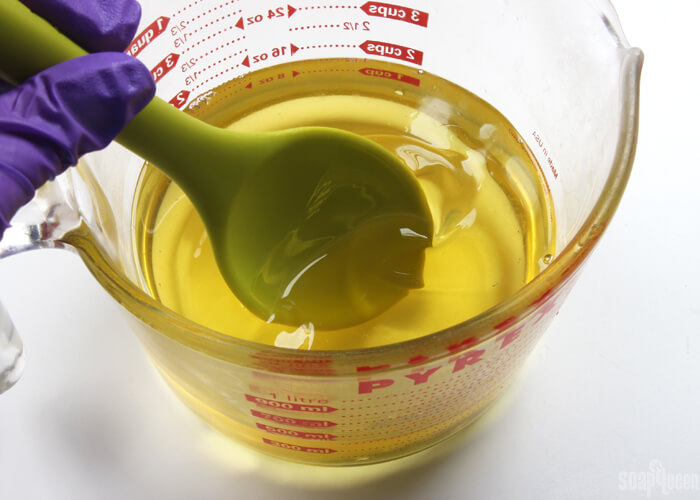
THREE: Add the beeswax and olive oil to the coconut oil. Place the container back in the microwave and heat using 30-60 bursts until the beeswax is melted. Beeswax has a very high melting point, so be careful when removing the container from the microwave as it will be very hot. Because of this, don’t use a glass container with too much head space. The container can actually explode if it gets too hot! Once melted, remove from the microwave carefully, as the mixture will be very hot.

Chamomile & Coconut Oil Body Balm DIY

FOUR: Stir all the ingredients together, and pour into the candle tins. Allow them to fully cool and harden. This will take several hours. To use, rub your fingers on the balm to warm and slightly melt, and apply balm where needed.

Chamomile & Coconut Oil Body Balm DIYChamomile & Coconut Oil Body Balm DIY

Infused Chamomile & Coconut Balm

Soap Queen
This body balm is infused with chamomile for skin-loving benefits.
Prep Time 2 hours
Cook Time 30 minutes
Total Time 2 hours 30 minutes
Recipe type Balm
Makes 3 candle tins

Ingredients
  

  • 3 Candle Tins
  • 12 oz. Coconut Oil 10 oz. infused coconut oil
  • 0.5 oz. Chamomile Herb
  • 2 oz. Olive Oil
  • 1 oz. Yellow Beeswax

Instructions
 

  • First, infuse the coconut oil. In a heat safe container, add 12 ounces of the coconut oil and place in the microwave and heat until about 150 ° F. You only need 10 total ounces of infused coconut oil for this recipe, but as you strain the chamomile out of the oi later, some will be lost. Be careful when removing the container from the microwave, as it will be very hot. Add the chamomile herb and allow the chamomile to infuse the in the coconut oil for about 2 hours, up to overnight. Feel free to infuse the chamomile in the oils for as long as you’d like, but I would recommend at least 2 hours. Because coconut oil turns solid when it cools, it may need to be placed back into the microwave to reheat and maintain a hot temperature. You can also use a crock pot to infuse the oils, learn more about that process here.
  • Once the coconut oil is infused, strain the oil through a fine meshed sifter lined with a paper towel to remove chamomile herb. You may need to do this process more than once to remove all the small chamomile particles. Weigh how much oil is leftover; some of the coconut oil will be lost in the straining process, which is why more coconut oil was infused than needed. For this recipe, you need 10 ounces of coconut oil. If you have less than 10 ounces, add more un-infused coconut oil to the infused oil until you have 10 ounces.
  • Add the beeswax and olive oil to the coconut oil. Place the container back in the microwave and heat using 30-60 bursts until the beeswax is melted. Beeswax has a very high melting point, so be careful when removing the container from the microwave as it will be very hot. Because of this, don’t use a glass container with too much head space. The container can actually explode if it gets too hot! Once melted, remove from the microwave carefully, as the mixture will be very hot.
  • Stir all the ingredients together, and pour into the candle tins. Allow them to fully cool and harden. This will take several hours. To use, rub your fingers on the balm to warm and slightly melt, and apply balm where needed.
Tried this recipe?Let us know how it was!

You may also like these

Become an email subscriber

Enter your email address below and you will receive all our new posts directly in your email inbox.

    1. You can apply this balm to your face, but it’s especially great for dry areas like hands, elbows and feet.

  1. I made a balm similar to this with a few modifications (infused coconut oil with calendula instead of chamomile, omitted olive oil, added sweet almond oil and vitamin E and shea butter. I poured the heated mixture into twist tubes and put them in a refrigerator and they came out perfect. But its been about a week and I’m noticing some small whitish, gritty-like dots forming in the balm. They seem to melt away or disappear when I apply or rub into my skin but I want to be sure this isn’t the start of mold or bacteria growth. Any idea what could cause this? Or how I can be sure this isn’t some type of mold or bacteria forming?

    1. After a little more research, seems like the shea butter may be the culprit. Would you agree? And any suggestions to prevent this from happening?

      1. It sounds like it might be the shea butter. Tempering can help prevent that. To temper it, melt your butter completely and then pour into a mold. Put it into the fridge or freezer to cool very quickly. When it’s fully cool, take it out and store in a cool dark place. Then, use when you need it. This should eliminate the grains you’re finding in your products.

        Heating butters gently when you’re making your recipes can also help. We recommend heating your oils and waxes in a heat safe container. Then, remove that container from the microwave and add your shea butter. That allows it to melt gently and prevents any graininess.

  2. 4 stars
    I love this recipe and actually wanted to infuse a large batch of coconut oil and use it as needed for both this and other products. But I can’t find anything on how to preserve infused coconut oil or infused oils in general. Do I just infuse it and it keeps the same as regular coconut?

  3. 5 stars
    I love this recipe! One of my favourites. If I don’t have chamomile herb could I infuse the coconut oil with chamomile powder? If so how should I do this and how much should I use for this batch?

    1. Yes, chamomile powder will work fine. It’s probably more concentrated than the herb, so start with half as much and see what you think. If you want more you can add from there.

  4. What happens if you use liquid coconut oil in this recipe instead of starting with the solid form?

    1. That’s fine, that just means you can skip the extra step of melting the coconut oil. If your coconut oil is liquid at room temperature, you may want to keep the balm in the fridge so it doesn’t melt.

  5. 5 stars
    If I infuse the coconut oil & olive oil with the chamomile herb will it be ruined?
    I just did it by mistake.

    1. No that will be just fine, the only difference is your balm may be a different color from the increase in chamomile. Just make sure to strain everything out thoroughly.

  6. Hi,
    I tried this recipe last night with a few changes: I used calendula flowers instead of the chamomile. Also, I used olive oil, jojoba oil, primrose and camellia seed oil in combination to make up those 2 oz of liquid oil. Also added a few drops of lavender essential oil.
    Everything went well and looked good after I poured. However this morning I opened the tins to check them and in all of them the balm seems to have separated: the surface is very blotchy looking, sort of as if the liquid oils and the beeswax/coconut oil had clouded around each other.
    It feels fine but does not look good :). All the ingredients had been well incorporated and completely melted before so I don’t understand what went wrong. If you have any suggestions of what I could do differently I would appreciate that very much! Thanks so much!

    1. Is your room temperature fairly warm? I’m wondering if the balm is melting and forming the pools of oil.

      1. Thanks for the reply! No, it is cool weather here, also I was working in the basement, around 68 Fahrenheit inside. So not especially hot. I have made beeswax lip balm and lotion bars before and they never melted at these temps.

          1. Hi Kelsey,
            I remelted the whole batch last night, filled them in tins again and then put them in the fridge right away to cool down quickly. That seemed to do the trick! The surface now is nice and even, no separation, no liquids beading up.
            Maybe it was a matter of not stirring properly the first time (however I though I did…) or maybe it was because the temperature in the fridge helped everything to cool down so quickly and evenly that the ingredients did not have time to separate? I don’t know – but I am happy the batch is looking good now! After I removed the jars from the fridge in the morning the balm stayed fine.
            Thanks for taking the time to respond!

          2. Oh awesome, glad to hear your balm is looking great now. I think mixing well and cooling down quickly probably helped.

  7. 4 stars
    I’ve made this balm and love it! My only problem is that when it melts and then re-hardens it has a gritty or chunky texture, not smooth like it was before. I tried to also sub out some of the coconut out for mango butter thinking the melting point was an issue. Any suggestions? I’ve tried it both with essential oils (lavender) and with fragrance oils (coconut cream) and it’s happened with both. The recipe with the mango butter was probably grittier once it got hard again.

  8. Hello,

    Is a bit off topic here, but I couldn’t leave a comment on the old post. I’m researching ways to making homemade lotion or whipped coconut oil not so greasy and more absorbent. I was wondering if coconut flour would work and if anyone has tried it? Is it powdery enough?

    Thank you for your time, Amada (a.m.a.th.a)

    1. oops I meant “This is”. LOL! Sorry about that, my fingers got away from me. 😉

      1. We haven’t tried coconut flour, but tapioca flour and arrowroot powder work really well. They help absorb some of that greasy feeling. You can start with about 1 teaspoon, then test the butter on your arm. If you want more tapioca or arrowroot, you can add from there.

        Arrowroot powder: https://www.brambleberry.com/Arrowroot-Powder-P3706.aspx

        -Kelsey with Bramble Berry

  9. 5 stars
    May I know what is the expiry date for body balm?

    Also, do I need to keep it refrigerated to keep it from melting? I’m thinking of substituting coconut oil with jojoba or rosehip oil as I have really dry skin. Should I increase the amount of beewax so that it doesn’t melt easily? Thank you!

    1. This balm has a shelf life of at least 1 year and a melting point of about 80F. If your house is warmer, you can keep it in the fridge to prevent melting. You can swap out the coconut for jojoba or rosehip seed. That will make the balm softer, so adding beeswax will make it harder and can help preventing some melting. I would recommend adding an extra .2 oz. to start, then adding more from there if you like.

      The Spoon Trick helps you feel the texture of the balm while it’s still melted so you can adjust the ingredients: https://soapqueen.com/bath-and-body-tutorials/tips-and-tricks/spoon-trick/

      -Kelsey with Bramble Berry

      Rosehip seed oil: https://www.brambleberry.com/Rosehip-Seed-Oil-P6706.aspx

      Jojoba oil: https://www.brambleberry.com/Jojoba-Oil-Golden-P3219.aspx

  10. 5 stars
    I have been watching Soap Queen TV for the last 2 years, and I finally built up enough confidence to try something. I am very excited. I started off very easy, and will work my way up after I build up more confidence. I really need a hobby have suffered a horrible amount of lossover the last year, I think this is going to bring me joy. Again I love your channel.

  11. Hi! I was wondering if this can be packaged in tubes? Packaging options are very limited where I’m from and I’ve been using the same tin can for most of my products and it’s getting kinda boring. What other packaging options would you suggest? Thanks!

    1. We have some cute options you may like, including Push Tubes: https://www.brambleberry.com/Push-Tubes-Clear-P4203.aspx

      Or Mini Deodorant Tubes: https://www.brambleberry.com/Mini-Deodorant-Tube-P6110.aspx

      As for this recipe, it may be a bit too soft for a tube as it is now. You may try a small test batch just to be sure. If it is too soft, you can add more beeswax. It also helps to add 1% vitamin E oil. It has a sticky consistency that grips the sides of the tube, which helps the bars push out easily: https://www.brambleberry.com/Vitamin-E-Oil-P3200.aspx

      -Kelsey with Bramble Berry

    1. This balm hasn’t been tested by the FDA to prove that it treats eczema or diaper rashes. However, it is nice and moisturizing on the skin and helps keep it hydrated. 🙂

      -Kelsey with Bramble Berry

        1. It will! Too much beeswax can make the balm so firm it’s tricky to get any on your hand. I would recommend starting with .5-1 oz. extra of beeswax to start with. Then you can add more from there if you like. 🙂

          -Kelsey with Bramble Berry

  12. I have been researching soap making for several months, and finally decided to plunge into this world of art & chemistry. I’ve got all my essential ingredients, except the lye. My lye has been delayed in shipping, very frustrating.

    I couldn’t wait another minute to start making bath products, so I decided to try this balm for my first project! I didn’t have any straight chamomile, so I infused the oil with some sleepy time tea (chamomile, lemongrass, and peppermint.) I’m thrilled to report that I successfully made this balm! It smells heavenly & is amazingly moisturizing. Even my teenage son has fallen in love with it for his dry & cracked knuckles! (When a 16 year old boy loves a bath product, you know you’ve got a good recipe!)

    Thank you so much for this recipe! I can’t wait to try other ones!

    1. Oh that’s awesome Nicole, so glad to hear that! Nothing better than hydrated hands in the dry winter months. Have fun making soap too! 🙂

      -Kelsey with Bramble Berry

    1. You can apply this balm anywhere you need moisture! It’s especially great for dry areas like hands, elbows and feet. To use, rub your fingers on the balm to warm and slightly melt and apply. 🙂

      -Kelsey with Bramble Berry

    1. To add fresh aloe vera, you would need an emulsifier and a preservative. The aloe won’t mix with the oil and waxes without an emulsifier. E-wax is a good option! It is typically used at 3-6% in lotion recipes. Read more about making lotion here: https://soapqueen.com/bath-and-body-tutorials/lotion/how-to-create-homemade-lotion-recipes/

      E-wax: https://www.brambleberry.com/Emulsifying-Wax-P4896.aspx

      For the preservative, Phenonip or Optiphen at 1% would work well. Read more about preservatives here: https://soapqueen.com/bath-and-body-tutorials/lotion/talk-it-out-tuesday-preservatives/

      Another option is to add aloe extract. Because it’s dispersed in oil, you don’t have to worry about an emulsifier or preservative. It can be used at .5-3%. 🙂

      Aloe extract: https://www.brambleberry.com/Aloe-Extract-P4938.aspx

      -Kelsey with Bramble Berry

      1. Why would I need to use a preservative if I add aloe vera to this? I thought you only needed preservative if the products has water?

        1. Aloe vera is a fresh ingredient, so it can grow mold or bacteria like water can. That’s why we recommend a preservative! Some aloe vera liquid (like the kind Bramble Berry sells), comes with a preservative already added. In that case, you can use the preservative on the smaller end – .5%. That is a way to be extra careful and ensure no mold or bacteria growth. 🙂

          Aloe vera liquid: https://www.brambleberry.com/Aloe-Vera-Liquid-P3704.aspx

          -Kelsey with Bramble Berry

    1. You can use candelilla wax in place of the beeswax if you like! However, it will change the consistency. Candelilla wax is softer, meaning the balm will be softer overall. If you like a more firm texture, you can add more coconut oil. 🙂

      To check the consistency while it’s still warm, dip a cold spoon in. That will harden the balm instantly and you can check the consistency and adjust from there. Read more about The Spoon Trick here: https://soapqueen.com/bath-and-body-tutorials/tips-and-tricks/spoon-trick/

      -Kelsey with Bramble Berry

      Candelilla wax: https://www.brambleberry.com/Candelilla-Wax-P4207.aspx

  13. I’m wondering which essential oils you would recommend to add to this, and how much?

    1. You can use almost any of our essential oils! You’ll want to avoid citrus and cinnamon essential oil, as they can cause irritation in leave-on products. Some great options are lavender 40/42, lemongrass and eucalyptus. 🙂

      Essential oils: https://www.brambleberry.com/Essential-Oils-C157.aspx?ps=12&p=0

      Find out how much to add to this recipe using our Fragrance Calculator: https://www.brambleberry.com/Pages/Fragrance-Calculator.aspx

      -Kelsey with Bramble Berry

    1. You can use shea butter if you like! To infuse the shea butter, you will need to keep the temperature above 90F. That way it will stay melted and help infuse the chamomile. Also, shea butter does have a different feel than the coconut oil, so I would recommend a small test batch to see what you think of the consistency. 🙂

      Shea butter: https://www.brambleberry.com/Shea-Butter-P3220.aspx

      -Kelsey with Bramble Berry

    1. You can if you like! We cooled the balm at room temperature and that worked just fine too. 🙂

      -Kelsey with Bramble Berry

  14. 5 stars
    Do I only need to put three teaspoons of herb into the coconut oil? It sounds like very little to me, and in the picture it looks like a lot more than three teaspoons?

  15. Hi there! To infuse the oil do you needed to heat it with the chamomile or dose it just steep for a few days cold and away from the light?

    1. You sure can! You can add any fragrance oil you like. As for essential oils, you’ll want to avoid citrus essential oils as they are photosensitizers in leave-on products. The descriptions on Bramble Berry will tell you if they can be used in balm or not. 🙂

      Fragrance Oils: https://www.brambleberry.com/Fragrance-Oils-C161.aspx

      Essential Oils: https://www.brambleberry.com/Essential-Oils-C157.aspx

      You can use our Fragrance Calculator to find out how much to add. Just select “Lotion” from the drop down menu: https://www.brambleberry.com/Pages/Fragrance-Calculator.aspx

      -Kelsey with Bramble Berry

  16. 4 stars
    Hi,

    are the ounces weight or fluid measurements. I just made soap, and there everything goes by weight . I am a little confused.

    Thank you

  17. 5 stars
    What kind a shelf life does this recipe have? I know someone is going to ask me this at some point

    1. You can use candelilla wax instead! It is softer than beeswax, so it will change the consistency of this balm. I would recommend using 1 ounce of the candelilla wax. Then, dip a cold spoon in the melted balm. It will harden instantly and you can check the texture. If you want it harder, you can add more coconut oil. 🙂

      Read more about The Spoon Trick here: https://soapqueen.com/bath-and-body-tutorials/tips-and-tricks/spoon-trick/

      Candelilla wax: https://www.brambleberry.com/Candelilla-Wax-P4207.aspx

      -Kelsey with Bramble Berry

  18. Hi I was wondering what all do I list on my labels to sell my soap? do i have to list the ingredients? im using melt and pour clear soap base do i have to list those ingredients also?
    thanks, Mary Fontenot

    1. Hi Mary!

      When labeling your soap, you want to list all the ingredients, as well as the weight of the product and who made it. Listing the ingredients includes everything in the base, as well as the colors and fragrances. You can read more about how to label soap here: https://soapqueen.com/bath-and-body-tutorials/cold-process-soap/how-to-label-cold-process-soap/

      That post focuses on cold process, but the information applies to melt and pour as well. I would also highly recommend this book on Soap and Cosmetic Labeling: https://www.brambleberry.com/Soap-And-Cosmetic-Labeling-Book-1-Book-P3663.aspx

      It has lots of great information and is easy to read and understand. 🙂

      -Kelsey with Bramble Berry

    1. Hi Vikki! We haven’t worked a lot with aloe butter, so I’m not very familiar with it. I would recommend making a small test batch. If you find the balm is too soft, you can add more beeswax. If you find it’s too hard, you can add more olive oil. 🙂

      -Kelsey with Bramble Berry

  19. Can you use this recipe, which has a higher melting point in the one ounce clear push tubes or add a bit more beeswax to the lotion bars to increase the melting point? Basically, I am planning to use the lavender lotion bar recipe, but sub coconut oil for the avocado butter and use the one ounce push tubes. I feel like these ingredients must be a little flexible and look easy and fun now that my soap-making is done. Also, I only have beeswax in small bars. Do I need to grate them or just wait longer for them to melt? Thanks. This looks lovely. I have some calendula so I am going to use that for infusion.

    1. Hi Laura!

      I think substituting the avocado butter for coconut oil should be fine! You may want to test some in a Push Tube just to be sure. If you find the recipe is a bit too soft, you can add more coconut oil or beeswax so it slides out of the tube easily. With the tubes, we also like to add a slightly sticky oil like vitamin E or castor oil at 1%. That helps the lotion bars grip the side of the tube so they work a bit more easily. 🙂

      For the beeswax, I would recommend grating it into smaller pieces. That will help it melt more quickly and evenly!

      -Kelsey with Bramble Berry

      Lavender Lotion Bars: https://soapqueen.com/bath-and-body-tutorials/lotion/lavender-lotion-bars/

      Push Tubes: https://www.brambleberry.com/Push-Tubes-Clear-P4203.aspx

      Vitamin E Oil: https://www.brambleberry.com/Vitamin-E-Oil-P3200.aspx

      Castor Oil: https://www.brambleberry.com/Castor-Oil-P3195.aspx

    1. You can use calenula oil if you like! You can replace all the olive oil or do a mix. I would recommend making a small test with olive and calendula to see which one you like best. 🙂

      -Kelsey with Bramble Berry

  20. 5 stars
    Can you use the large tea bags and put the Calendula in for infusing, like in the Fresh Face Round Up + Chamomile and Calendula Infused Toner tutorial on August 25, 2014?

    Seems like it would be less messy and easier to work with. (Or does that method not work well with oils for infusing?)

    Thank You!
    Sly

Comments are closed.

{"email":"Email address invalid","url":"Website address invalid","required":"Required field missing"}

The Latest from Soap Queen TV

Inspired by Gems & Crystals

All About Essential Oils

The Power of Charcoal

Create Your Own Clay Face Mask

DIY Bath Bombs

Cold Process Soap Tips & Tricks

Learn the Basics of Cold Process Soapmaking

Learn the Basics of Melt & Pour Soapmaking

Want to Start Your Own Soap Business?

Soap Business Success Stories

Soap Queen TV Favorites

Ingredient Spotlight

Disclosure

Unless stated otherwise, all images are original material and are copyrighted. If you'd like to use an image, please be a friend and credit the photo and link back to Soap Queen. Feel free to share, tweet and pin to your hearts content.